
Learn the method to Enable a Guest Network on the Google Wifi System that will help you to have your privacy over your network as someone can easily access the data over the network. So follow the complete guide to proceed.
If you have any network in your home or business and have set it shared with some other people, you probably might be worried about those devices and data controls that are inter-related with that network that you don’t wish to share.
By default, if you share up any network, you do share access to all those devices and controls on that network; the thing is pretty bad.
Google Wifi System solves the issue by simply making up the preferences called guest network on your Wifi connection and allows you to share your Internet without providing access to local network files or the connected devices.
The people who abuse to share their private information and want to keep their data secure would find the Google Wifi System great.
For most users, this would become a great challenge to set up the Guest network on the Google Wifi System, knowing about the thing we have written about the full method to do so under this article.
If you are also looking for the method to set up the guest network on Google Wifi System, please read up the article now!
Also Read: Top 8 Best VPN For Your Windows To Browse Anonymously
Steps to Enable a Guest Network on the Google Wifi System
The method is quite simple and easy, and you need to follow the simple step-by-step guide that will help you easily create one guest network on your wifi system that you can assign to someone. So follow the below-discussed steps to proceed.
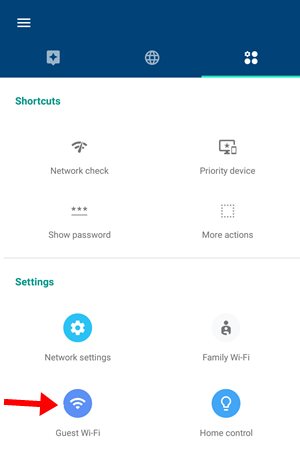
1. First of all, open up the Google Wifi app on your phone to get started; tap on the tab with the settings gear icon and the three other icons from inside the app. Under that tab, look forward to the option named Guest WiFi, which would be placed at the bottom of the app screen. Tap on that option and move to another step.
Remember that the Google Wifi app might not be available for all the platforms, but for most of the chances, if you own any updated and latest smartphone device, then you would easily find up this app.
2. Tap on the Next option in the bottom right corner of the screen, and on another appearing screen, give up the name to your Guest Wifi network, a password for the same, and hit on the Next again.
Further, click on the Next option when it appears on another screen and follows up for another step. The next option is to skip the screen to another part to select the particular Wifi and its management.
3. On the screen where you would reach now, you could allow access for certain devices to connect to your Wi-Fi network accessible through the guest session. Set up various allowances for the users and then hit the create option to make the new guest session.
You could be able to set the data transfer limit, information accessibility limits, etc. This is totally easy to set and manage those limits, and any average user will be able to perform it quite exactly through the simple UI Interface.
4. In some of the moments the app would make up the guest session for your Wifi network, click on the Done option or the button to finalize the amendments. Then hit did again on the appearing screen! You could use up the Share option to share the guest session details with other users so that they could access your network.
This step won’t be so much emphasizing; just trigger the pop-up responses by the app to continue further.

5. That’s all! From now onwards, every user who knows the password and the credentials for the network login to your guest account could access your Wifi network with those restricted functions and control your private information or devices! The limits and blocks that you have created before in the method would be availed to the users.
If you have suddenly set the wrong restrictions for the specific Wifi, you could also correct those changes by going to the 2-3 steps again inside the Google Wifi app.
And this was the method to set up the guest network on the Google Wifi System and prevented the shared users from accessing your local files and controls to the network-connected devices.
This should probably be used by the users who wish to remain safe from the hacking practices, too, because it makes it hard for any network users to get into your private data and machine!
I hope you like the guide, keep on sharing with others too. Also, leave a comment below if you have any related queries with this.


