Let’s have a look at the method to Add Custom Ringtones to iPhone using the simple well know tool and you can add your favorite ringtones your iOS device in minutes. So have a look at the complete guide discussed below to proceed.
By default, there are numerous ringtones available on the iPhone. These pre-set ringtones are made and implemented by the iPhone developers only and you are given the option to change these to your wish.
How to Add Custom Ringtones to iPhone/iOS Device
The method is quite simple and easy and you just need to follow the simple step by step guide that will help you to implement this.
Steps to Add Custom Ringtones to iPhone:
#1 In the very beginning you need to install the iTunes on your iPhone. Actually this is not at all required for any of the functions on the modern OS but still, for grabbing the custom ringtone addition functionality over the iPhone device, you would require it. Make sure that you install this on your device and then get ahead to the method.
#2 Always note that you have to select the ringtone file for the iTunes which should not exceed the time of 40 seconds. Do check to transfer the file that is of 40 seconds duration unless you want is able to make this as your ringtone. Another bad thing here is that you will also require converting the MP3 audio files to AAC format so as to utilize them as the ringtone.
#3 Finalize your audio file selection and make all of the above changes to the audio file. Drag and drop the AAC file from the iTunes on your desktop screen, this shall get you the ringtone file as AAC file. But there will be the .m4a extension to the file, you have to change the extension to .m4r. This could be done through renaming the file.

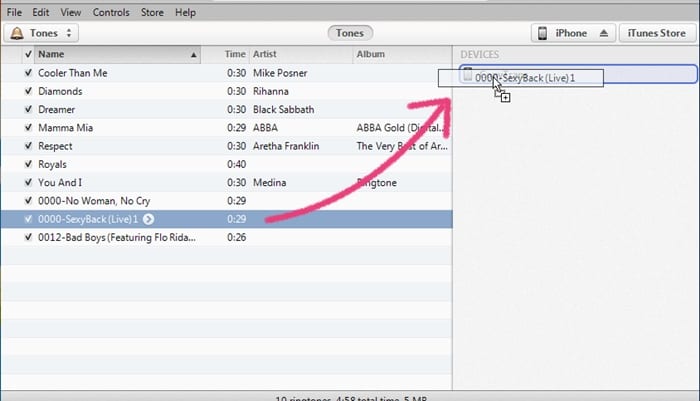
#4 Connect your iPhone device to the PC and then through that sync the selected ringtone file on the system. You know that syncing the files between the iPhone and PC is simple. Place the ringtone file in the Tones section or the folder so that the iPhone could be able to recognize it easily.
#5 Go to the Sounds and Haptics settings of your iPhone device after making the above sync. Through there you would be able to locate the newly added ringtone file. Select that file and finalize the selection for the ringtone on your iPhone. That’s it!
Overall we have now provided you with the whole details of the method to add the custom ringtone to the iPhone and hence make it ring the sound you wish for every call or notifications. We are now at the end of the article and reaching up to here we believe that you people would have got to know about the method accurately and easily.
Hopefully, you would even have liked the content of this article, if it is so then please make sure you share this up with the others. In case of any certainty regarding the post content, you could contact us anytime or write the comments section box below. Your opinions and the valuable suggestions would be cared for and estimated well, depending on this you should be getting some amazing posts in the future from our side. For that time please remain connected or tuned to our site!