iMessage is the top-rated messaging service that is available for users of Mac as well as iPhone. This messaging service is excellently built and filled with many functions and almost every required function.
Users using this service would be willing to have one function by which the images could be auto-saved to the phone or computer. Fortunately, this option is easily available for the iMessage; only simple steps must be followed to grab this functionality.
Auto-Save Images from iMessage to your iPhone or Computer
So, if you are looking for ways to auto-save images from iMessage to your iPhone or computer, you have landed on the right page. Below, we have shared some simple steps to auto-save images from iMessage to your iPhone or computer. Let’s get started.
For Mac
1. On Mac, an App named Hazel is available for users. Once installed, the app automatically downloads the images on iMessage. First, you will have to install this app on your Mac; you can install it for free and gain a trial period of two weeks.
Once installed, go to the Mac Finder and navigate the Go > Go to Folder option. You can also use the keyboard shortcut Shift + CMD + G. There will be a dialog box on the screen; type the /Library/Messages in the dialog box.
2. This would save the iMessage images but make sure you do not type anything else in the dialog box, as this could affect the iMessage.
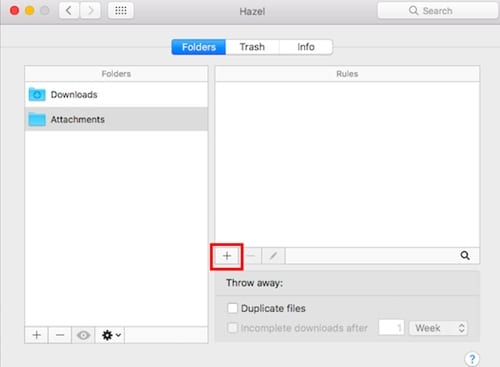
3. Once the attachments and the photos are saved, open the Hazel app and then drag and drop the saved files on the folders tab. Now create the two rules inside the hazel. To create the rule, tap on the Plus icon.
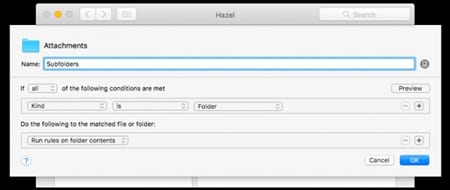
Name the first rule as Subfolders and select the following conditions as shown below. After selecting the conditions, run rules on the folder contents and finalize them by clicking OK.
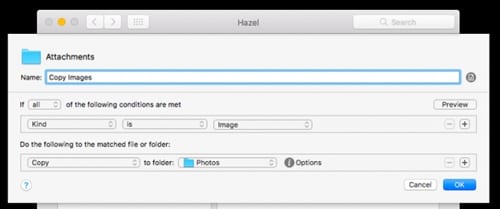
4. Now again, make the new rule and name it Copy Images, and then you will have to select some conditions given below in this step. Copy the conditions to the folder, select a folder where you wish to save your files, and then click on the OK button.
At last, you will have to run the rules. For that, click on the Settings button and then click on Run rules. This will automate the Image saving on the iMessage app on your Mac.
For iPhone
1. First, open the iMessage app on your device and then go to the conversation containing the photos you wish to save. After that, you must tap the I button to view the images and the attachments sent and received from the selected contact.
2. Long tap on the Image you wish to download or save to the device. Simply select the more option in the pop-up that appears. You will now be enabled for making the selection of multiple photos. Select all the photos you wish to save and then click on the Save “Number” Images option on your screen.
That’s it. This is not automation for the phone app, but still, it is better to save multiple images at a single time rather than a single photo at a time.
So, these are some simple steps to auto-save images from iMessage on your iPhone or computer. If you need more help on this topic, let us know in the comments below.