Screen savers, we all are familiar with this word. Almost every PC user might have used this feature. But how to set up a Website as a screensaver on Mac is our main concern here.
Mac provides several options when we talk about screen savers, and we can set lots of options to set the screen saver for Mac. And setting up the website into a screen saver is not directly possible, but it’s not that difficult.
Steps to Turn a Website Into a Screen Saver for your MAC
That is why I am writing this article to guide you with this method. And this will help you to turn any of your favorite websites into a screen saver for your Mac. So have a look at the complete guide discussed below to proceed.
1. First of all, on your Mac, download and install the tool WebViewScreenSaver 2.0 tool, which will let you turn websites into a screen saver.
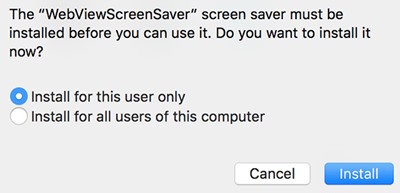
2. After downloading, double-click to extract the package then you will get a prompt message about which users you would like to install the screen saver for. In this prompt, you can choose yourself or all the Mac users, choose the option according to your wish and click on install.
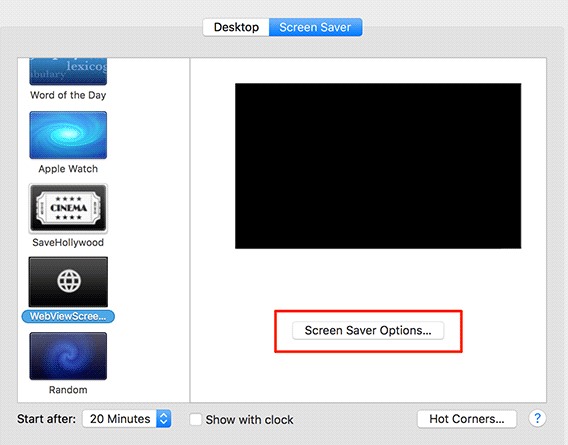
3. Now you need to move to the screen saver panel, follow the path System Preferences > Desktop & Screen Saver > Screen Saver.
4. Now, you will have the option WebViewScreenSaver, simply click on it and then click on Screen Saver Options.
5. Now you need to add the URL of the site you want to set as your PC screen saver. For that, click on the option Add URL and then fill in the address.

6. Now after entering the URL, you need to set the time interval of the screen saver that you can also set right front from the URL, and after filling in all these details, simply click on close.
That’s it! You are done with this. Now the site will be set as your MAC screen saver.
So the above discussion is all about How to Turn a Website Into a Screen Saver for Your Mac. Using this simple guide, you can easily turn any of your favorite websites into your MAC screen saver using the simple third-party tool. I hope you like the guide; keep on sharing with others too. Leave a comment below if you have any related queries about this.


