We all know very well that WiFi is not a complete network, as it has bugs, goes down, and sometimes works slowly may be due to the router being in a bad position, or it is not very powerful, as our mobile antenna is, suffer interference, and much more. This is likely the cause, and the root of the problem lies in the channels.
How To Change WiFi Channel To Improve The Signal
WiFi is not a complete network, as it has bugs, goes down, and sometimes works slowly may be due to the router being in a bad position, or it is not very powerful, as our mobile’s antenna is, suffering interference and much more. This is likely the cause, and the root of the problem lies in the channels.
So, let’s analyze the channels, know which one is using our router, which ones are best suited to use, and, of course, how to change everything directly from our Android device.
Also Read: How To Limit Internet Bandwidth Of WiFi Users
WiFi channels and interference
Let’s start with the basics, as most WiFi routers use the 2.4 GHz band, which is classic and compatible with all smartphones. This ranges from 2412 MHz to 2472 MHz and is divided into 13 channels; these 13 channels share a spectrum of 100 MHz, but each has 20 MHz.
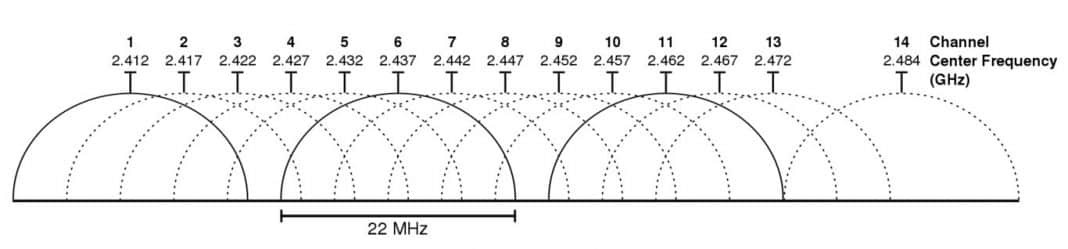
This is exactly what happens, as the channels overlap each other so that each channel occupies a part of the underlying spectrum. In the image above, you can see it more graphically, and the clearest example is channel 1, whose bandwidth reaches channel 3. That means that a router that broadcasts on channel 1 will generate interference to a router that broadcasts on channel 3, and vice versa.
One possible solution is to move to the 5 GHz band, which is less saturated since it has 25 non-overlapping channels and capacity for greater speed, but not all routers can broadcast in that band, above all the old ones. In addition, not all smartphones have an antenna compatible with the 5 GHz band, so it is not a solution.
Then what remains, then? Of course, change the channel; that’s it. But, the fact is that before changing the channel, we must have to know which one we are using right now.
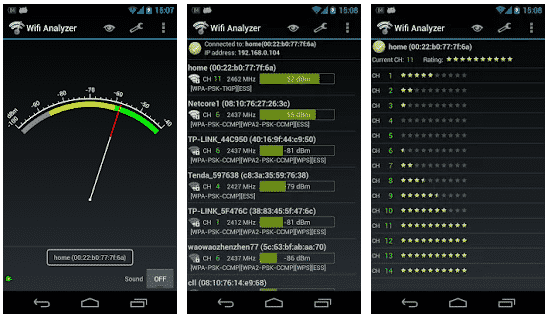
But, to which channel should we shift? Of course, the least saturated. To know what it is we can simply use a well-known application that is completely free and available on Google Play, of course, I am talking about none other than the WiFi Analyzer. This will simply show us all the WiFi routers that are broadcasting near us, their power and the channel they are using in a graph.
As you can see in the above image, we have a lot of routers emitting on our channel or overlapping with us, which can cause interference, drops, speed reductions, and much more. And with this data, we now have enough information to change the channel, but still, we can go further.
If you slide three times to the left, you will access a ranking chart, now simply click on “Choose your AP” and select your WiFi network. It will show you which channel you are using right now and which one you should change to have an optimal connection. The 14 will always come out with all the stars, but it can not be used. While in our case, we are using the 5 and we would be interested to move it to 12 or 13.
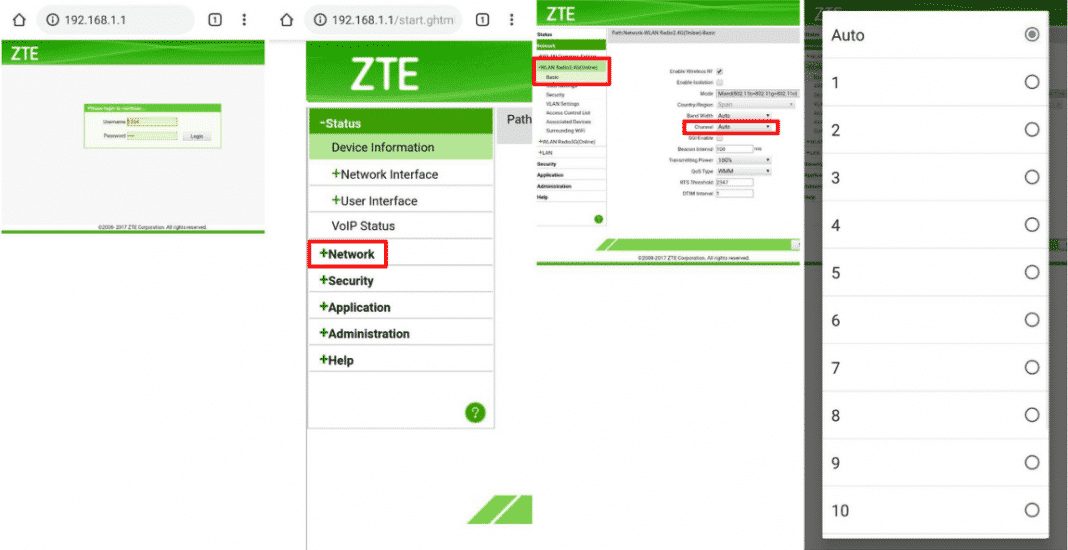
Now, once we already know the optimal channel, it’s time to change it in our router now. And to do this, simply open any web browser, either on your smartphone or computer and write the address 192.168.1.1. Now it will simply ask for some credentials (Username & Password) that, if you have not changed them, are probably admin/admin, 1234/1234 or a combination of both.
Now it will depend on the router that you have access to in one place or another, but you should look for the option to change the broadcast channel. In our case by default it is usually configured in automatic, a recommended option since, in theory, choose the one that best suits our location, but if you still want to change it, select the corresponding section (Network> WLAN Radio 2.4G) and change it.
Also Read: 25 Best WiFi Hacking Apps For Android
Once you select your desired channel now, you simply have to save the modifications that you have made. Now you should notice a small cut and then an increase in the connection. So, what do you think about this? Simply share all your views and thoughts in the comment section below. And if you liked this tutorial, then simply do not forget to share this article with your friends and family.
")

")