When Windows 10 was first introduced, it shocked many users with its amazing visual changes and fluent design. The operating system has a new form of transparency with blur and noise texture in the Start Menu, Action Center, and the apps.
While the new fluent design is supposed to improve the user experience, it may cause performance issues on certain devices. For example, if you have a low-end computer and somehow managed to run Windows 10, you may face performance issues and occasional lags if the fluent design effect is enabled.
Steps to Disable Fluent Design Effects in Windows 10
In such situations, it’s best to disable the fluent design effect completely. Hence, in this article, we are going to share some of the best and simple steps to disable the fluent design effect on Windows 10 computers. Let’s get started.
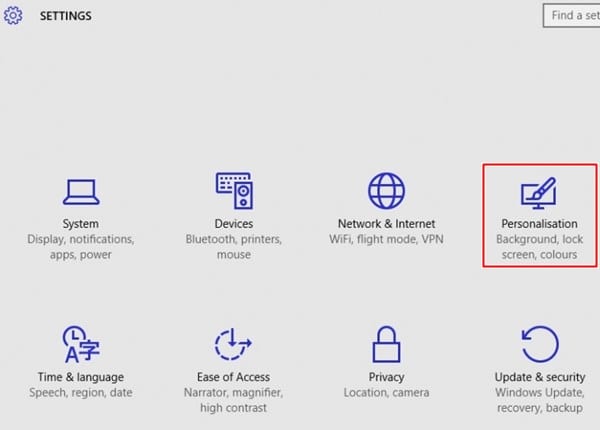
1. First, you need to access windows settings you can access this either by clicking Settings options or by pressing the Windows button and then typing settings there.
2. Once settings open you need to click on the option that is “Personalization”.
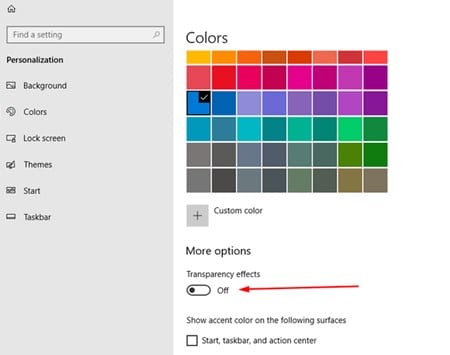
3. Now there you need to select the option “Color” as the fluent design works with the color functionality of Windows 10 and you need to edit t the same.
4. Once you are on the next screen you will see lots of options listed there and you need to select the option that is Transparency effects as that fluent effect is the transparency effect that windows add when you hover your mouse over different options.
5. Now, simply turn it off if you want to disable this.
6. You can again enable this anytime by just navigating through the same setting and then turning it on. That’s is you’re done! Now you have learned the method you can use to turn it or off on your Windows 10 PC.
So, this guide is all about how you can enable or disable windows transparency effects. If you need more help in disabling the fluent design in Windows 10, let us know in the comments below. Also, if the article helped you! Make sure to share it with your friends.


