Learn how to Fix the Windows 10 Automatic Repair Loop that will save you lots of data and time wasted when the updates start and you are unable to do anything. So have a look at the complete guide discussed below to proceed.
While the Windows is becoming more and more stable day by day and the developers have reached Windows 10 up, taking the effort for the same criteria. It is assumed by the users that the newer version of Windows shall get rid of all those crashing issues that persist in the old versions, but the fact is that almost any of the residing issues have not yet been fixed by the developers. It is not like they don’t wish to resolve it, but they try their best but fail to eliminate it.
Most of the time the tendency of the crashes and the issues are lowered to none. The windows automatic repair black screen is one of the issues that still appears sometimes at the startup of some Window. Thiss is the process that says to fix the startup issues or some other issues butactuallyt becomes the problem itself. Now the users would be trying to find the rid of this Automatic Repair, and to help the users prevent and get away from this issues quickly we have discussed all in this article. If you are keen to know about the solution to fix the Windows 10 Automatic Repair loop, you should read the whole article below!
Also Read: How to Lock Specific Apps in Windows 10
Steps to Fix the Windows 10 Automatic Repair Loop
System Restore:
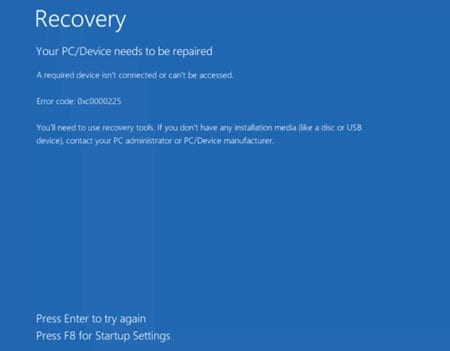
Well, users at Windows Forums claim that the official solution to fix the endless ‘Prepairing Automatic Repair’ look is to perform a full system restore. However, system restore takes a long time to complete, and it only works if you have previously had a restore point stored on your Windows 10 computer. So, check out how you can fix the preparing automatic repair black screen windows 10.
Step 1. To start up with the method, we would first introduce you to why this Automatic Repair loop commonly happens on the Windows. Whenever any user tends to shut down their system forcefully while certain operations are running behind, and if the device’s battery is not producing enough potential, then for these reasons, the Windows start to show the corrupt issues. The result is that the system shows the Automatic Repair loop on the startup or just after the crash.
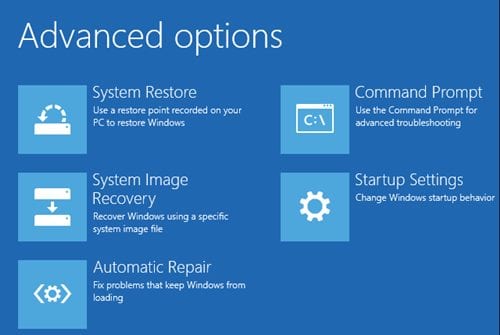
Step 2. First of all, to solve this issue, restart the device and keep on pressing the F8 key on your keyboard. You would be then pointed to the Windows Boot Manager, where you can choose the Windows to start up normally. If the Windows starts up, then go to the System Protection inside the system restore, this is to make the disk protected or get the backup for the same.
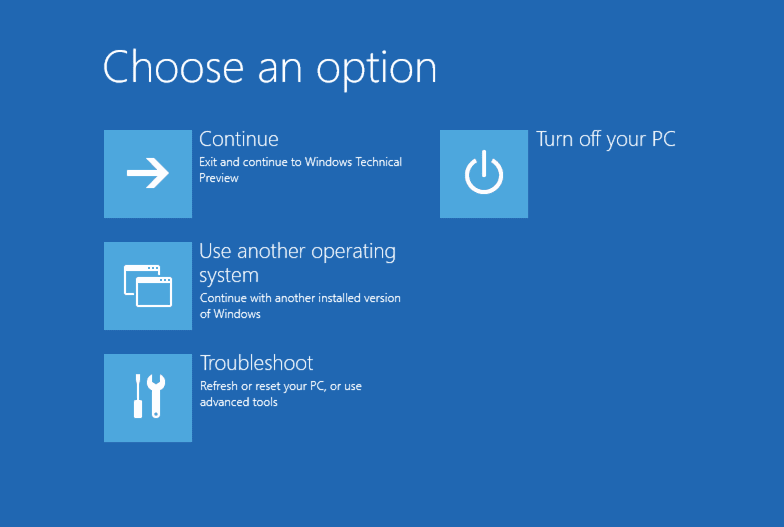
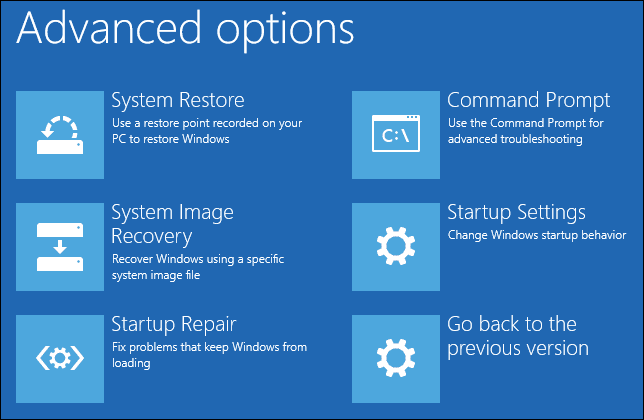
Step 3. When the blue screen occurs on your device, just head to the Troubleshoot>Advanced Options> System Restore. If you had created the system restore point in the above step before getting up the issues, then you could easily restore your Windows to that backup where the issues were not existing.
Disable the early launch Anti-malware protection:
Another best method to fix the ‘Windows 10 Automatic Repair Couldn’t repair your PC’ look is to disable the early launch anti-malware protection. There might be few files interrupted by the Anti-malware protection causing the Automatic Repair look. Therefore we need to disable the early launch anti-malware protection.
You need to press the F9 key to open the Windows Boot Manager. Now, Browse to the Troubleshoot > Advanced Options > Startup Settings. Now your computer will restart by itself, and you will see a list of options. Just choose the option ‘Disable Early Launch Anti-Malware Protection’ and restart your PC to check whether the problem persists.
Using Command Prompt:
Sometimes the ‘Windows 10 Automatic Repair Couldn’t repair your PC’ loop also occurs because of some corrupted files. You can use Command Prompt to find and delete the problematic file to fix the issue from appearing again.
Step 1. First of all, on your Windows Boot Options menu, Select Troubleshoot > Advanced Options > Command Prompt.

Step 2. Now it will open up the command prompt. You need to paste the code given below broken by the enter presses.
bootrec.exe /rebuildbcd
bootrec.exe /fixmbr
bootrec.exe /fixboot
bootrec.exe /chkdsk /r c:
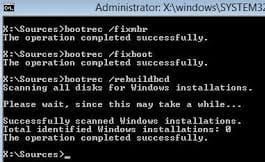
Step 3. Do any of the above two things, and your Blue screen loop starting the Automatic Repair should fade away easily. Hence you could be able to use your computer as normal then! If everything fails to help you, there is only one way out left, insert the windows installation CD inside your device and then reset your system or refresh it.
Restore Windows Registry
The Automatic Repair Loop Problem also occurs due to corrupted registry files. Since the third-party registry repair tool doesn’t work in most cases, the only solution to fix the corrupted registry file is by restoring the registry from the RegBack director. Here’s how you can restore Windows Registry to fix Windows 10 Automatic Repair Loop error.
Step 1. You need to open the Windows Boot Options menu and then head to the Troubleshoot > Advanced Option > Command Prompt.
Step 2. Now on the command prompt, you need to enter the following command.
copy c:windowssystem32configRegBack* c:windowssystem32config

Step 3. Now you will be asked to overwrite files. Type All and then press the Enter button.
That’s it; you are done! Now type exit on the Command Prompt and restart your computer. Now the Automatic Repair look will be fixed.
Finally reached the end of this post, you have got to know about the best possible ways to rid of the Automatic Repair loop happening on Windows 10. Actually, we do not assure you that the above method would solve your issues completely, but we believe that you would actually get the most accurate output out of it.
Not for every user; the Automatic Repair loop happens for the same reason so that you can skip it with the above-stated processes, but you cannot treat it with that. We hope you will benefit from this post, and maybe you would also like this post. Do try to comment regarding this post through the comments section below, we love to hear from you.


