If you are using a Windows operating system for a while, then you will know that the operating system is full of bugs. You might have already dealt with BSOD errors, network errors, partitions errors, etc. Recently, Windows users have reported that they are getting Network Adapter error which is preventing them from connecting to the internet.
Windows users are getting this error message “Windows could not find a driver for your network adapter” while connecting to the internet. So, if you are also getting the same error message while connecting to the internet, then you have landed on the right webpage.
Fix Network Adapter Errors In Windows
Here in this article, we are going to share the best few methods which would help you to fix every network adapter related errors. So, let’s check out how to fix ‘Windows could not find a driver for your network adapter’
1. Restart the router

Well, this is the very first thing which you should do to fix ‘Windows could not find a driver for your network adapter’. Not just adapters, resetting the router can fix almost all network-related issues. To Reset, turn off the router and unplug it for a few minutes then plug it again. Now, press the reset button on the router for about 20-30 seconds. That’s it, you are done! this will reset the router and will fix ‘Windows could not find a driver for your network adapter’ error.
2. Use Network Troubleshoot
For those who don’t know, Windows 10 offers a built-in troubleshooting tool that can fix most of the Windows errors. Here’s how you can use Network Troubleshoot to fix network adapter and driver-related problems.
Step 1. First of all, search for ‘Troubleshooter’ on the Windows 10 search bar and open it.
Step 2. Now you will see the ‘Troubleshooter’ page. There you need to click on ‘Internet Connections’
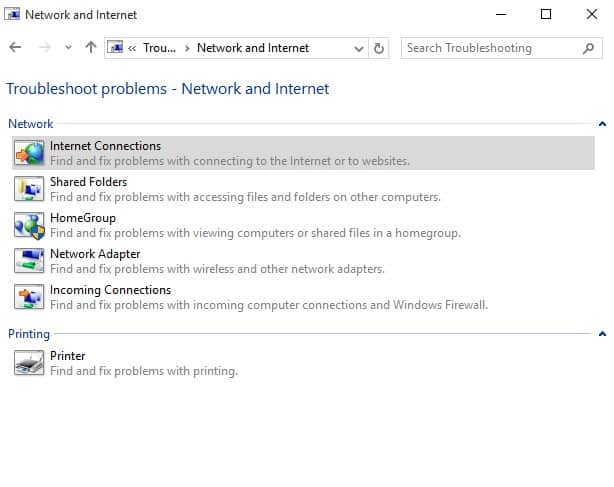
Step 3. In the next window, select the option ‘Troubleshoot my connection to the internet’

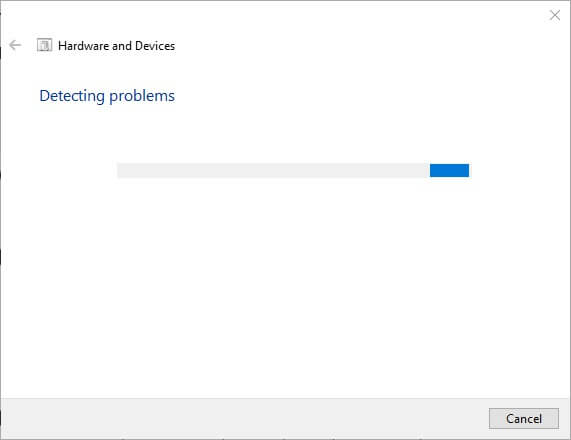
Step 4. Now, wait for few seconds until Windows Troubleshooter finds and fixes the Network adapter error.
That’s it, you are done! This is how you can use Network Troubleshooter to fix Windows could not find a driver error from Windows 10 computer.
3. Reinstall Network Driver
Well, corrupted or outdated network driver also leads to the ‘Windows could not find a driver’ error message. So, we need to reinstall or update the existing network driver to fix the error from Windows 10 computer.
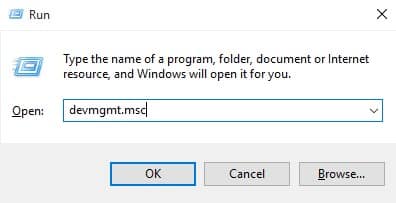
Step 1. First of all, press Windows Key + R on your keyboard and it will open up the RUN dialog box. Now on the RUN dialog box, enter ‘devmgmt.msc’ and press ‘Enter’
Step 2. Now you will see the Device Manager page.
Step 3. On the Device Manager, find and expand the ‘Network Adapter’ option.
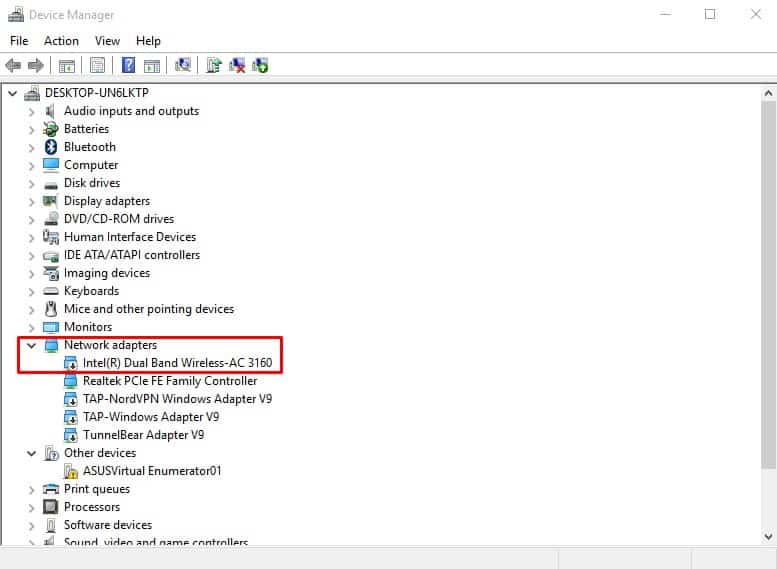
Step 4. Now right click on the current network adapter and then select the option ‘Uninstall’
That’s it, you are done! Now just restart your Windows 10 computer, and after the restart, you will get the latest network adapter driver.
4. Using Command Prompt
If the methods mentioned above have failed to fix the ‘Windows could not find a driver for your network adapter’ from your computer, then you can follow this method. In this method, we need to use the Command Prompt to reset the entire network settings.
Step 1. First of all, right-click on the Windows button and then select the option ‘Command Prompt (Admin).

Step 2. It will open the Command Prompt as an Administrator. You need to enter the following command and hit ‘Enter’
“NETSH WINSOCK RESET”
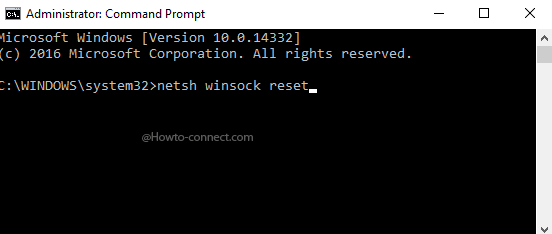
Step 3. Now command prompt will take a few seconds to complete the process. Once done you will be notified ‘Winsock reset completed successfully’
That’s it, you are done! This is how you can use the command prompt to fix Windows could not find a driver for your network adapter error message.
5. Reset Computer
Well, if all of the above-mentioned methods failed to fix the ‘Windows could not find a driver for your network adapter’ error message, then the ultimate option is to reset the computer. So, if there’s something wrong with the network setting, then System reset will most probably fix it. However, a System reset will delete all files along with the settings. So, make sure to create a proper backup before you choose to reset the system.
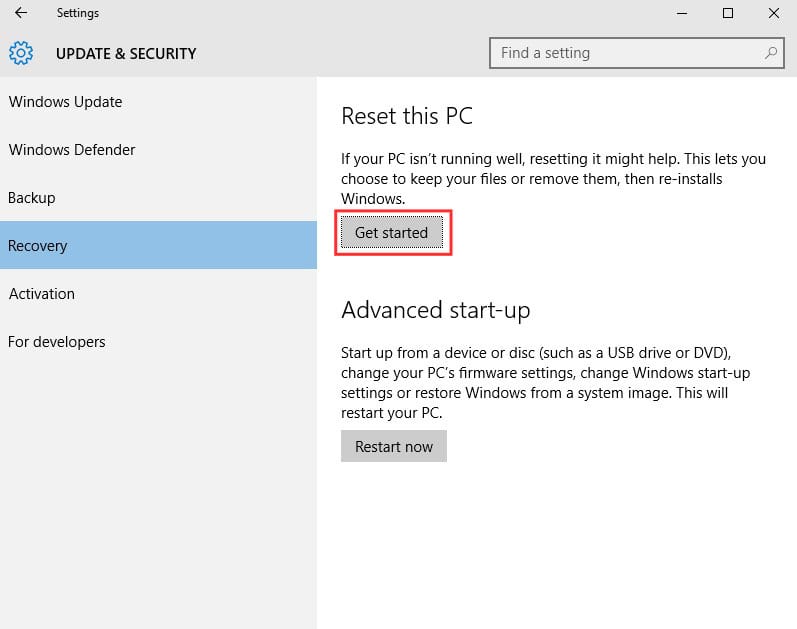
To reset your Windows 10 computer, head to the Search box and type in ‘System Reset’. Now select ‘Reset this PC’ from the list and then click on the ‘Get Started’ button.
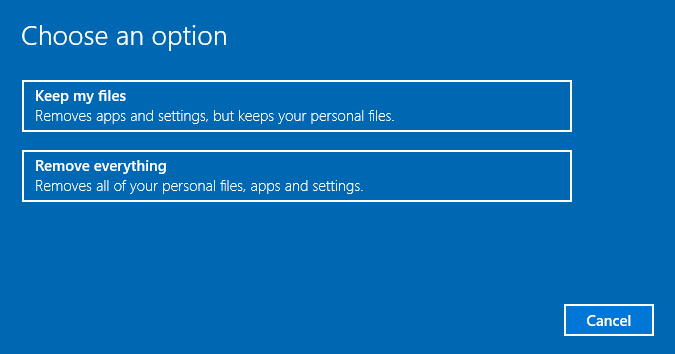
On the next page, you will see two options – ‘Keep My Files’ and ‘Remove Everything’. We recommend you to pick the option ‘Keep My Files’ because it keeps the files but deletes the settings. So, select the option and click on ‘Next’
Now, wait for a few minutes or hours until Windows 10 reset your PC. The process takes time to complete. Once done, the ‘Windows could not find a driver for your network adapter’ will be fixed.
So, these are the four best methods that can fix the Windows could not find a driver for your network adapter from your Windows 10 computer. So, what do you think about this? Share your views with us in the comments.


nice things, thanks a lot!