Domain Name System or DNS is one of the most important systems that match the domain name to the correct IP Address. When you enter a domain in your web browser, the DNS servers look at the IP Address associated with the domains.
Only after matching the IP Address linked with the domains it comments on the web server of the visiting site. You can speed up this process by changing the default DNS server of your computer.
You can switch to OpenDNS or Google DNS to get faster internet speed. This nifty DNS trick can greatly improve your internet speed. So, let’s check out how to get faster internet speed by switching DNS servers.
Best Ways to Get Faster Internet Speed By Changing DNS
Here we will set up OpenDNS on our computer to speed up the internet. The DNS server not only improves the web browsing speed but also provides features such as phishing protection, content filtering, etc.
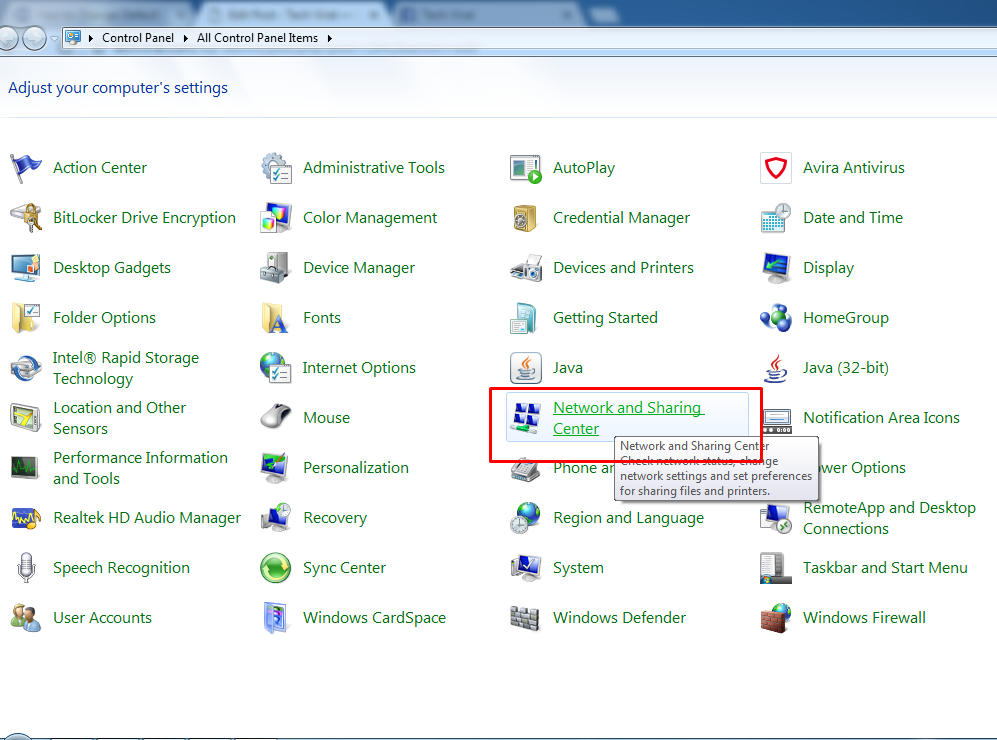
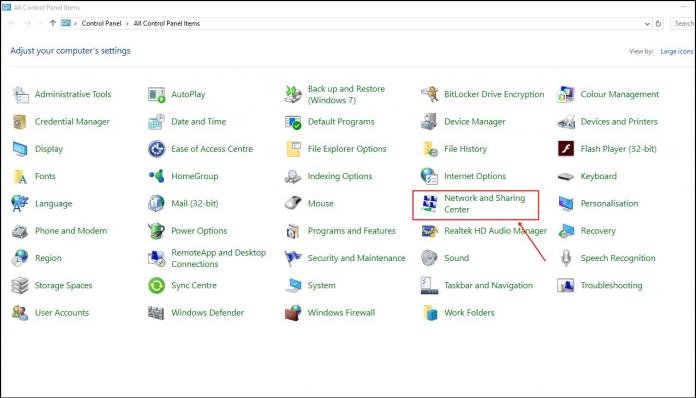
1. Go To Control Panel > Network and Sharing Center options.
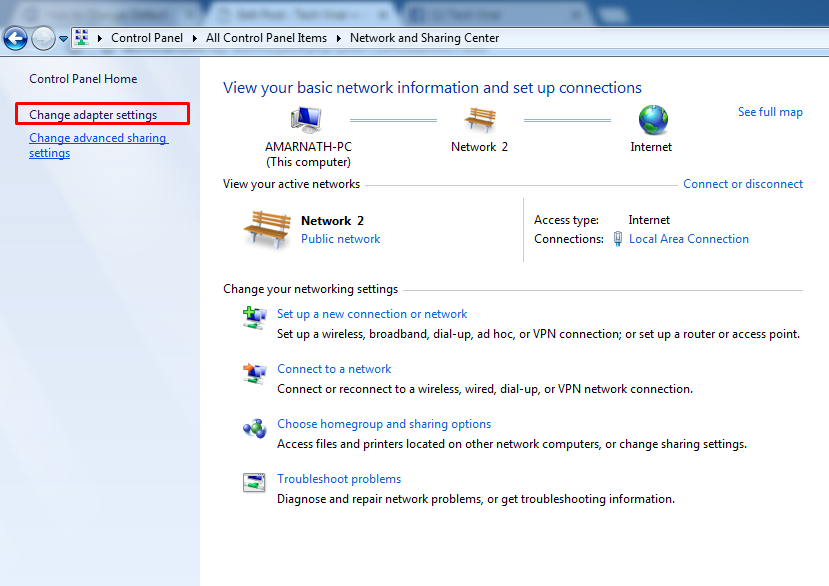
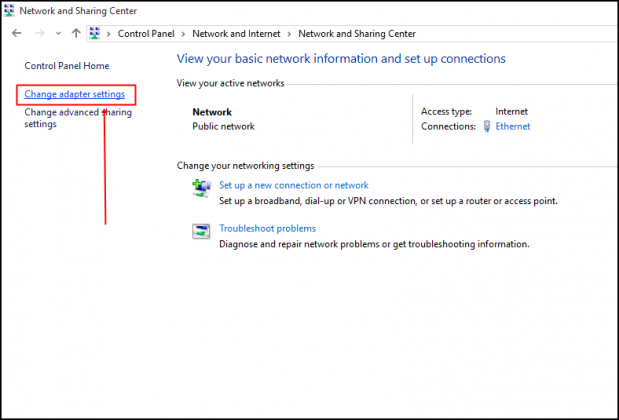
2. Now you need to click on “Change Adapter settings“
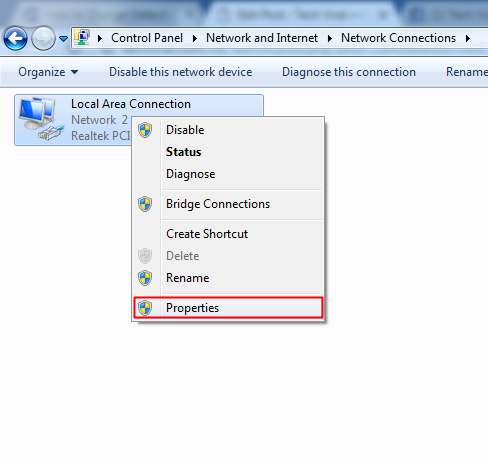
3. Now, right-click on the network adapter and select Properties.
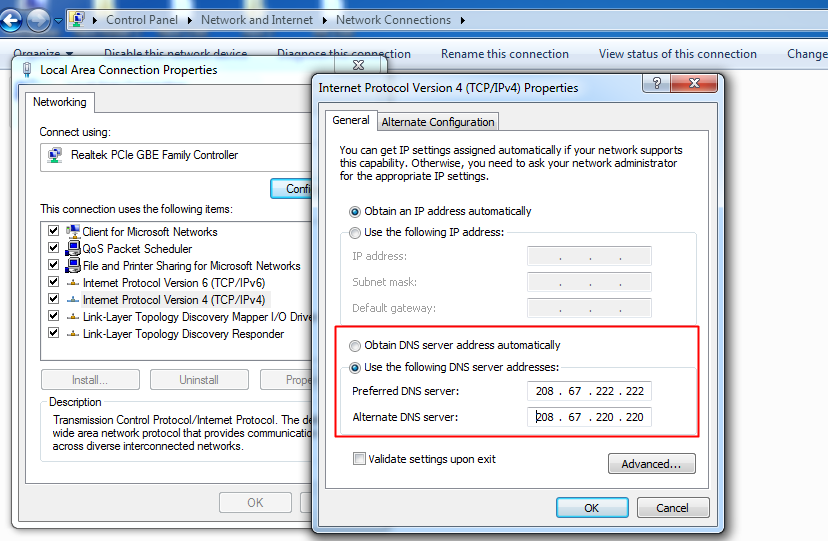
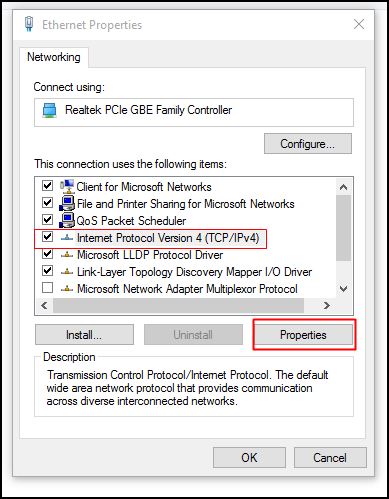
4. Now click on the Internet Protocol Version 4 (TCP/IPv4) and click on Properties. Now, choose the following DNS server addresses to get a faster internet speed
*Preferred DNS server: 208.67.222.222
*Alternate DNS server: 208.67.220.220
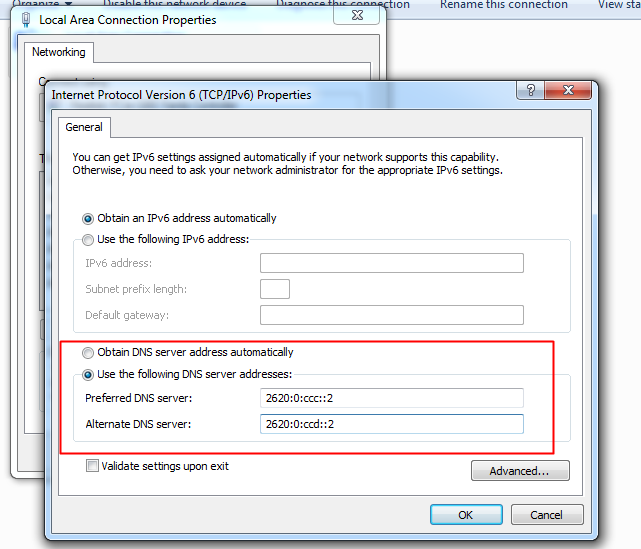
6. Now click on OK and now configure IPV6
*Preferred DNS server: 2620:0:ccc::2
*Alternate DNS server: 2620:0:ccd::2
After making the changes, click on the Ok button. That’s it! This will switch your DNS server to OpenDNS.
Change Default DNS to Google DNS for Faster Internet
The method is very simple, and you can easily change your default DNS to Google DNS to get faster internet speed.
1. Open the Control Panel and select Network and Sharing center.
2. Now you need to click on “Change Adapter Settings“
3. Here you will see your connected network. Right-click on the connected network and select “Properties“
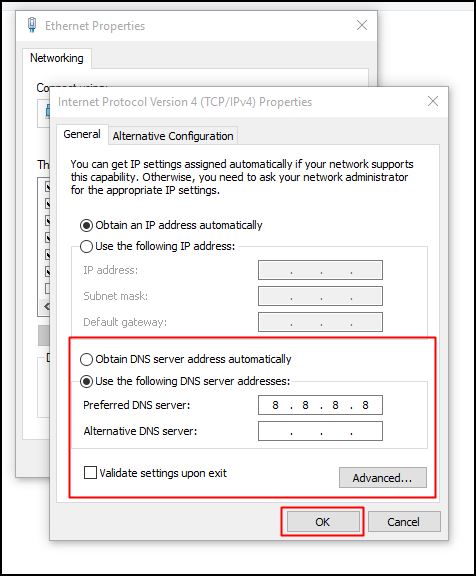
4. Now switch to the Networking tab and then under ‘This connection uses the following items‘ select the Internet Protocol Version 4 (TCP/IPv4) option and click on Properties.
5. Now under General, choose the option “Use the following DNS server Addresses”. Now, fill in the DNS value 8.8.8.8 and 8.8.4.4 and then click on “OK” then restart your network.
That’s it! Now you are switched to the Google DNS server.
Using ChrisPC DNS Switch
This is a connectivity tool that is very useful for anonymous internet browsing. With the help of ChrisPC DNS Switch, you can change your DNS server in just a click. Here’s how you can use ChrisPC DNS Switch.
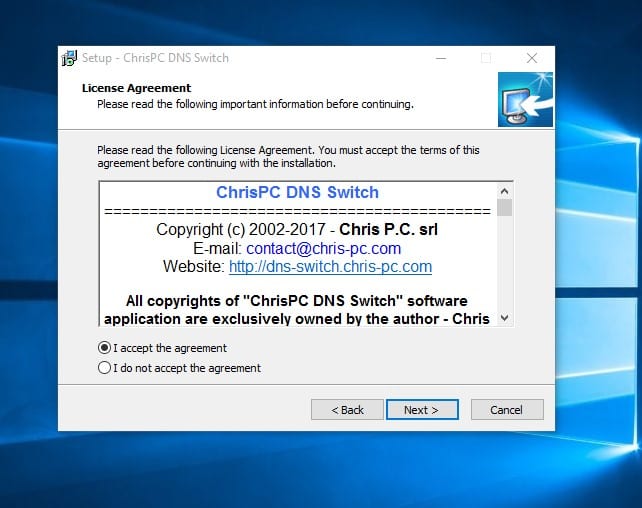
1. Download and install ChrisPC DNS Switch on your computer and launch it.
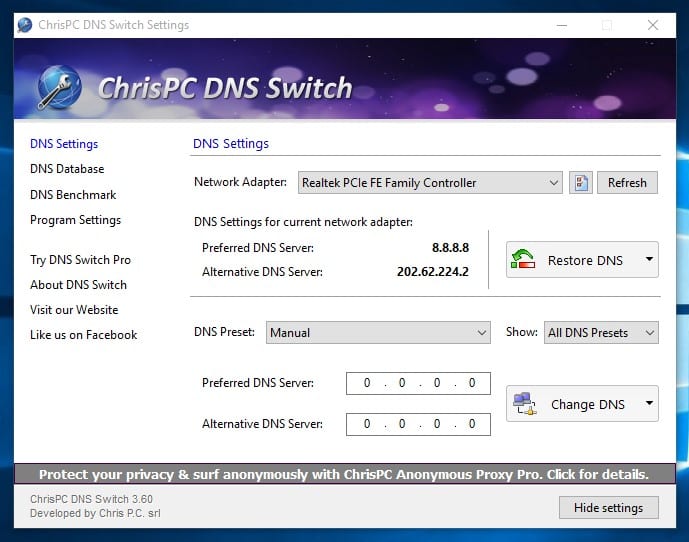
2. Next, select your connected network.
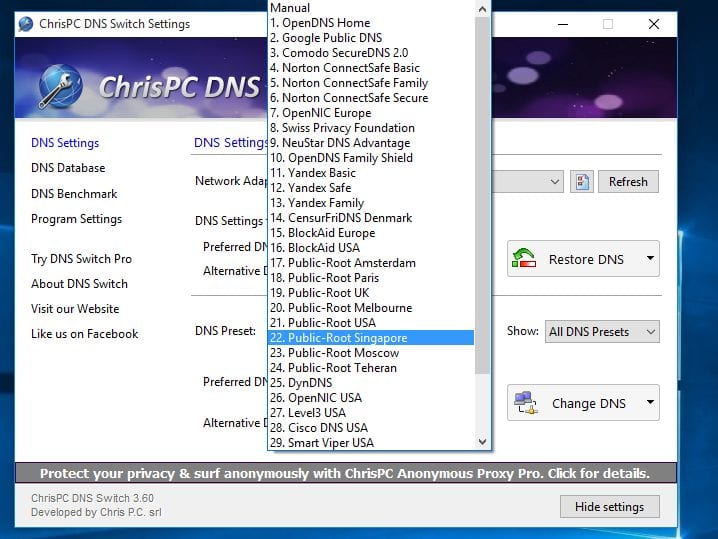
3. Now you need to click on “DNS Preset”. Here you need to select the Option “Open DNS” and click on Change DNS.
That’s it! This is how you can use ChrisPC DNS Switch to connect to the OpenDNS Server.
Using QuickSetDns
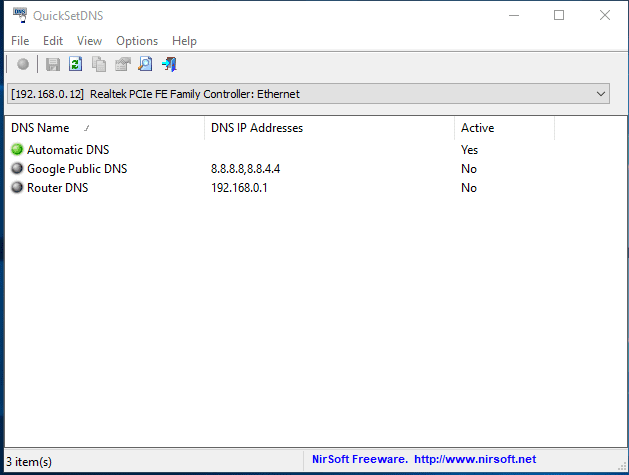
Well, this is one of the best easy-to-use tool you can have on your Windows computer. The tool is developed by Nirsoft and works great on all Windows versions. However, the tool only has one option in Public DNS: Google Public DNS.
1. First, download and install QuickSetDNs on your Windows computer from here.
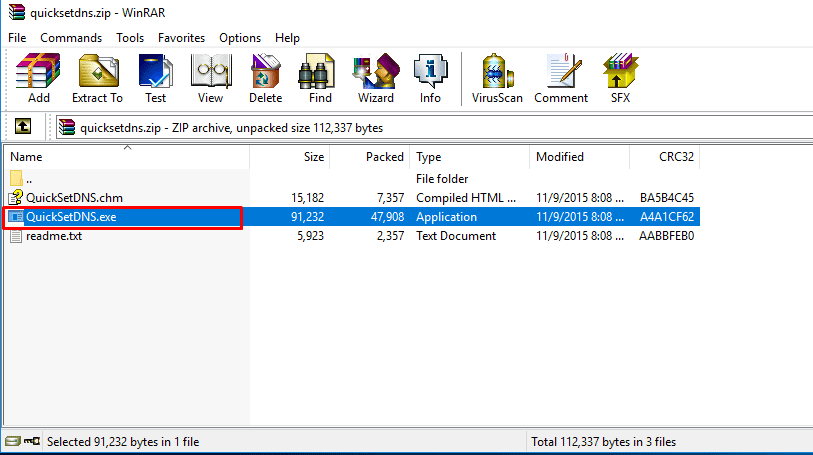
2. You need to open the compressed file and click on QuickSetDNS.exe to install it on your computer.
3. Once installed, you need to open the QuickSetDns tool on your computer.
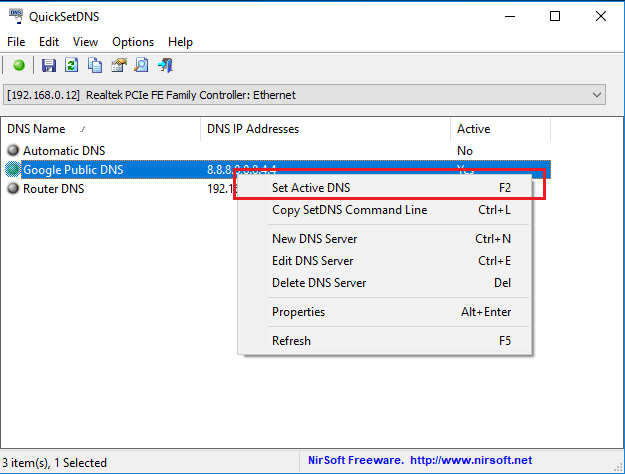
4. Now you need to right-click on “Google Public DNS’ and select “Set Active DNS”
That’s it! You can use QuickSetDNS to change your default DNS address to Google DNS.
So, these are some of the best and easy methods to get faster internet speed by switching DNS. If you need more help switching the DNS server on your computer, let us know in the comment box below.


nice one
i have a internet problem .. im planned a internet 1mbps but it was only 10.6kb can u guys help me ?
i try different kinds of dns but nothings happen