The taskbar in Windows operating system is a convenient feature as it lets you access your favorite apps, files & folders quickly. However, many users prefer to turn off the taskbar since it takes up some space on the screen.
On Windows 11, you can hide the taskbar to get some extra screen space. Even if you don’t want to turn off the taskbar completely, you can enable the auto-hide feature that keeps the taskbar hidden until you hover your mouse over it.
3 Best Ways to Hide & Show the Taskbar in Windows 11
There are several ways to hide and show the taskbar on Windows 11. And in this guide, we will list some of the best methods to hide and show the taskbar in Windows 11. You can follow whichever method you feel is easy. Let’s get started.
1) Hide & Show Taskbar in Windows 11 via Settings
In this method, we will use the Settings app of Windows 11 to hide or show the Taskbar. Here are some of the simple steps you need to follow.
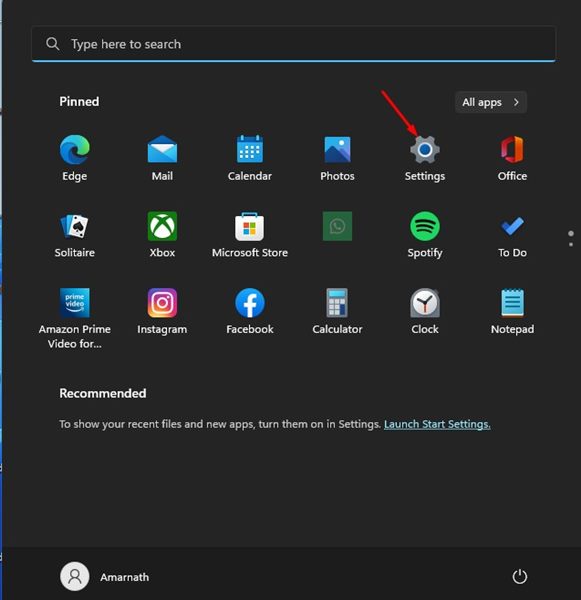
1. First of all, click on the Windows 11 Start button and select Settings.
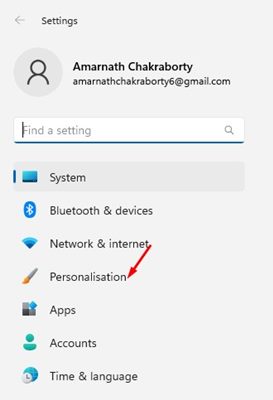
2. On the Settings app, click on the Personalization tab on the left pane.
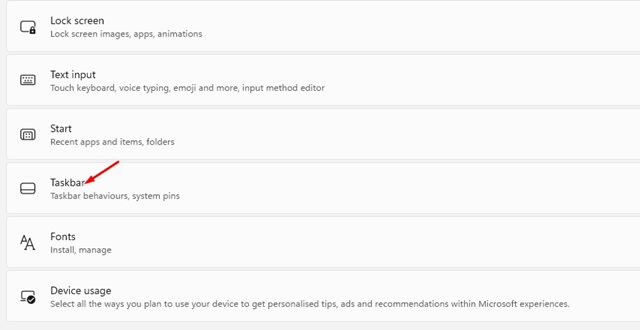
3. On the right pane, scroll down and click on the Taskbar.
4. On the Taskbar, expand the Taskbar behaviours section and check the ‘Automatically hide the taskbar’ option.
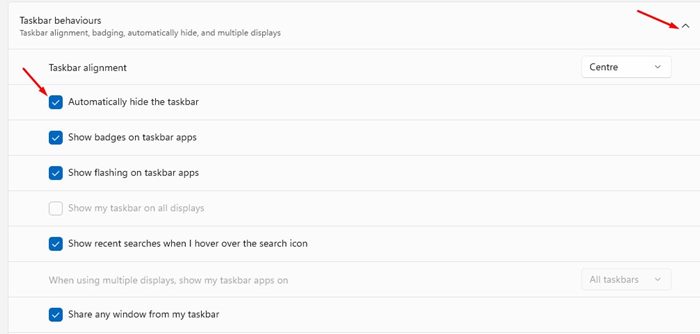
That’s it! This will automatically hide the taskbar on your Windows 11. You need to hover your mouse cursor over the taskbar area to show the taskbar again.
2) Hide & Show Taskbar in Windows 11 via Registry
If you are using a non-activated version of Windows 11, you need to follow this method to hide or show the taskbar in Windows 11. Here’s what you need to do.
1. First, click on the Windows 11 search and type in Registry. Next, open the Registry Editor from the list.

2. On the Registry Editor, navigate to the following path:
Computer\HKEY_CURRENT_USER\Software\Microsoft\Windows\CurrentVersion\Explorer\StuckRects3
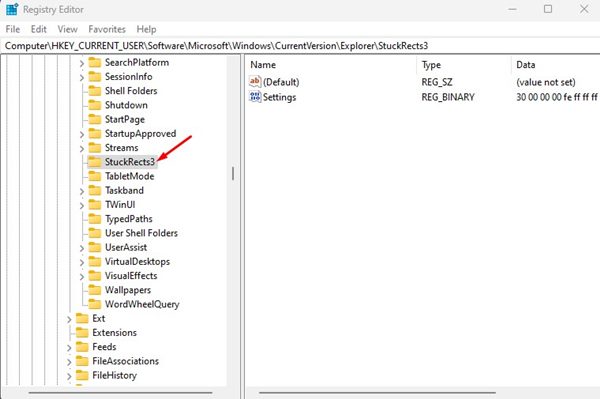
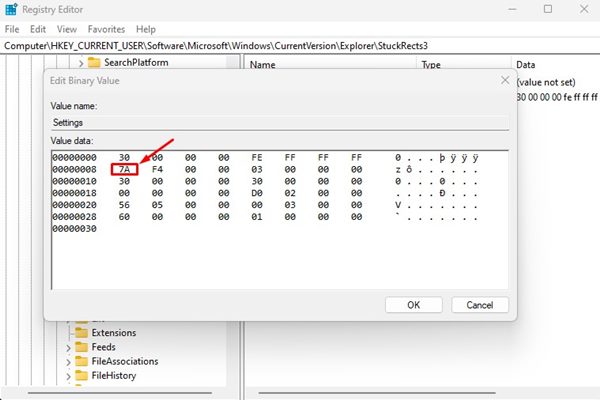
3. On the right, double click on the Settings. In the Edit binary value, double click on the first entry beside 00000008 Value Data.
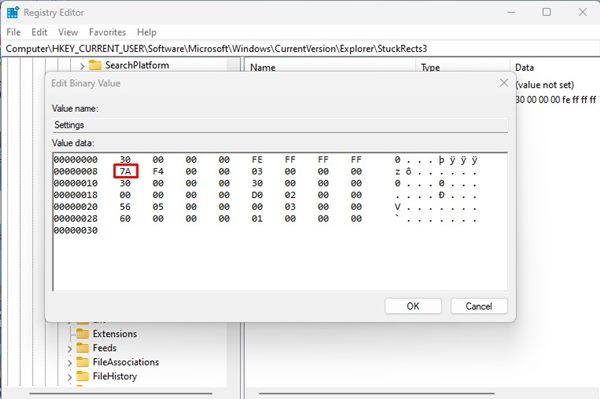
4. Replace the entry 7A with 7B. Once done, click on the Ok button.

That’s it! You are done. Now restart your computer to apply the changes. After the restart, you will no longer see the Taskbar. If you wish to show the taskbar again, repeat the steps and replace the 7B entry with 7A on Step 4.
3. Auto Hide Taskbar in Windows 11 via PowerShell
You can even utilize the PowerShell utility on your Windows 11 to enable auto-hide for the taskbar. You need to follow some of the simple steps we have shared below.
1. First, click on the Windows 11 search and type in PowerShell. Right-click on the PowerShell and select ‘Run as Administrator.’

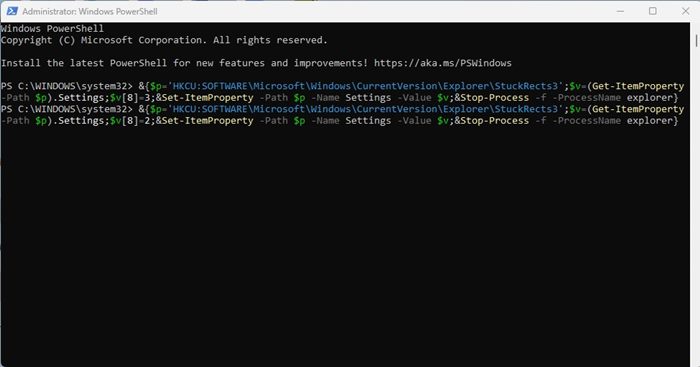
2. On the PowerShell utility, execute the command:
&{$p='HKCU:SOFTWARE\Microsoft\Windows\CurrentVersion\Explorer\StuckRects3';$v=(Get-ItemProperty -Path $p).Settings;$v[8]=3;&Set-ItemProperty -Path $p -Name Settings -Value $v;&Stop-Process -f -ProcessName explorer}
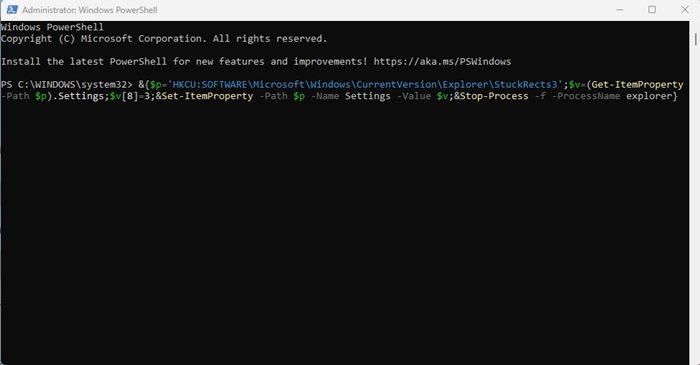
3. The above command will enable auto-hide for Taskbar on your Windows 11.
4. If you wish to disable the auto-hide feature for the taskbar, execute this command:
&{$p='HKCU:SOFTWARE\Microsoft\Windows\CurrentVersion\Explorer\StuckRects3';$v=(Get-ItemProperty -Path $p).Settings;$v[8]=2;&Set-ItemProperty -Path $p -Name Settings -Value $v;&Stop-Process -f -ProcessName explorer}
That’s it! This is how you can enable & disable auto-hide for the taskbar on Windows 11 via PowerShell.
So, these are the three best ways to hide and show the taskbar in Windows 11. The methods would work even on Windows 10 operating system. You can also use third-party taskbar customization tools to enable/disable the taskbar on Windows 11.


