Learn how to Live Stream to Facebook Pages from PC or Mac with the help of simple tool that will help you to do this in your device. So have a look on complete guide discussed below to proceed.
[dropcap]Y[/dropcap]ou could live stream to the facebook and for that, your profile is used but what if you wish to stream to the facebook pages that you manage or you are part of them? So, you want to live stream from the PC or Mac to any of your facebook pages and this is because you want to let all the members see you live at the time for some purpose. This would feel somewhat frustrating for you to complete your wish to live stream on facebook page because there isn’t any such direct option to complete up to the corresponding task. Whether if this isn’t available directly on the facebook, don’t worry because you could still do it up but for that, you just need to follow some method. Here in this article, we have stated the method through which you could easily live stream to facebook pages by using the Mac or PC. Just go and read the article to know about it.
Also Read: Encrypt Facebook Messenger and Send Self-Destruct Texts
How to Live Stream to Facebook Pages From PC or MAC
The only thing you need is OBS Studio software, Facebook Page you manage, High-speed Internet Connection. So follow the below steps to proceed.
Also Read: How to Edit your Photo on Facebook Website and App
Steps To Live Stream to Facebook Pages From PC or MAC:
1. The very first thing that you would need to know is that you should install the OBS Studio software on your computer and not the previous version of the software named OBS Classic and if you do install the previous version, you won’t be able to perform up the task of live streaming Facebook because it isn’t supported.
2. Now open the Facebook, log in to your account and then go to the page you want to live stream on. After reaching on the page click on the “Publishing Tools” option from there which you could easily find upon above of your screen.
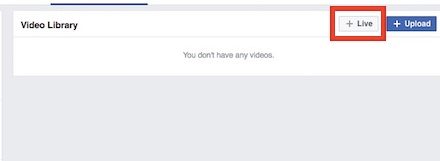
3. Select the “Videos” option from the sidebar that appears after you have applied the above step. Next to that click on the button saying “Live” option and thereafter proceed for the further steps.
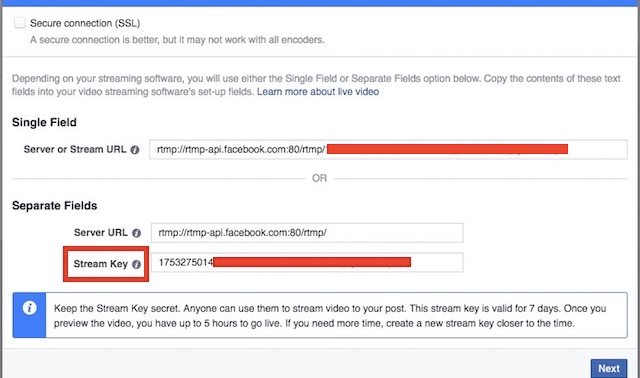
4. You will now see that there comes above the pop-up which would be carrying the Stream key, just copy that Key from there. Keep in mind that you correctly copy that key because this will be required while using the OBS Studio. After copying the Key press on the Next button.
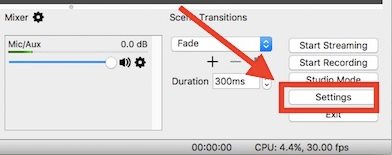
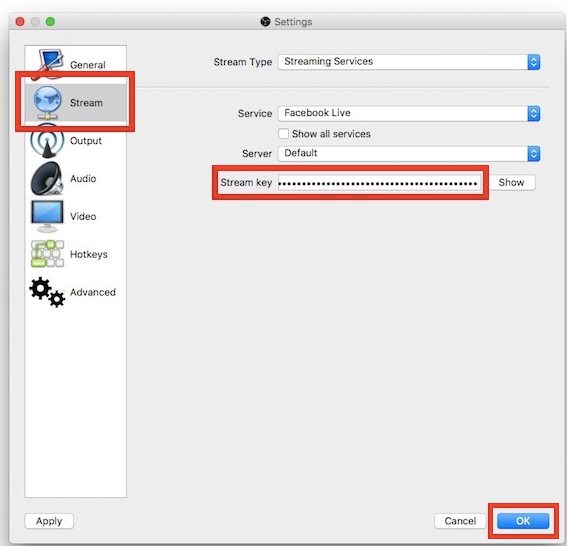
5. Launch the OBS Studio and then from there Click on the Settings, from there look for the Stream option in the sidebar that appears. Just paste the Stream Key you just copied in the previous steps inside the box that appears on your screen. Select “Facebook Live” option under the Service tab and then click on the OK button.
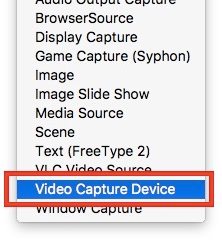
6. After all that you would need to add the sources to the OBS Studio like Webcam or any video placed inside any folder which would be live streamed. To do that just click on the “+” icon under the Sources box inside the software. From the List menu that appears just select up the Video Capture Device option and then name it, click on the OK button after that.
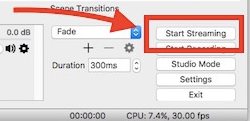
7. In the next window that appears just select your Video Capture device you just named in the above step, and then after that click on the OK button. You would now see your video capture device’s input inside the OBS studio which would be Live Streamed to the Facebook Page, to begin the streaming just click on the Start Streaming Button.
Also Read: How to Hide My Last Seen From Facebook Chat (Working Method)
Now you have got the method through which you could easily live stream to the Facebook pages anytime whenever you wish to do so and there would be no restrictions for doing that. The method is also not very complex and any of you could easily apply it just within minutes. If you haven’t yet applied the method on your PC or Mac then go and do it now so that you could also enjoy live streaming on facebook pages.
