If you are a tech geek, you have probably heard of Processor Overclocking. Overclocking means tampering with the clock speed to achieve better performance. Just like CPU Overclocking, Monitor overclocking also exists.
When you overclock your monitor, you get better performance. Overclocking a PC monitor can help you achieve a better refresh rate than what your monitor supports. This way, it can draw more frames on the screen per second.
Steps to Overclock Your PC Monitor
Hence, if you are interested in overclocking your PC monitor, you have landed on the right page. Below, we have shared some simple steps to let you overclock your PC monitor. Let’s check out.
1. Install the AMD/ATI Pixel Clock Patcher, which will patch your video drivers to unlock higher refresh rates for your monitor.
2. When you run it, it should detect your graphics card, then ask if you want to “Patch found values.” Say Yes, and it should tell you the values have been patched successfully after a couple of seconds.
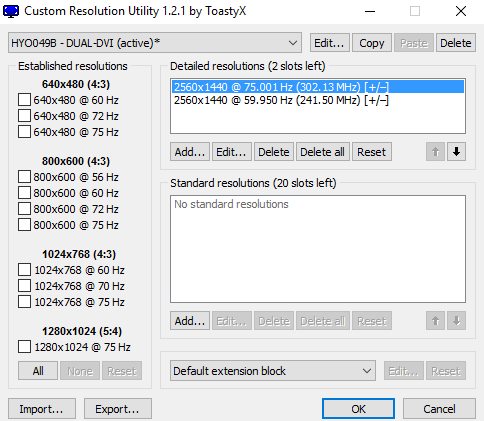
3. Next, install ToastyX’s Custom Resolution Utility (CRU), which will allow you to set your monitor refresh rates. (And resolutions, though we’re not focusing on that stuff today, so don’t tinker with it unless you know what you’re doing!)
4. Once you’ve installed CRU, open it and select your monitor from the drop-down menu at the top-left.
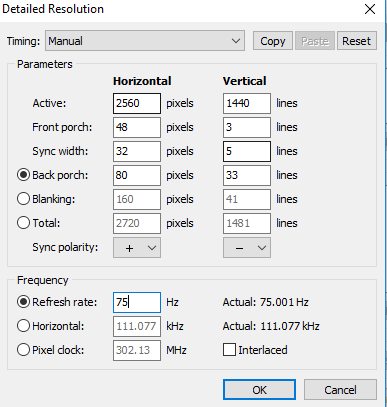
5. Next, click “Add” under the “Detailed resolutions” box, and in the new window, change the refresh rate number to something a bit higher than your current one.
6. The recommended increasing bit is 10hz or so. (If it works well, you can increase it by another 10hz after rebooting your PC, then another, and pretty much keep going until you encounter instability, at which point you can decrease it again to a more stable refresh rate.) So here, the refresh rate increased from 60hz to 75hz.
7. Click OK, then click the upwards arrow under the “Detailed resolutions” box to make it your first-choice resolution.
Reboot your PC, and it should be running in the new resolution. Remember, if you see a strange visual unstable performance at a given refresh rate, decrease it to something lower by editing it in CRU.
Testing Your New Refresh Rate:
- To test out your fancy new refresh rate, you can use the motion test tools at Blurbusters. Look at moving images corresponding to several frame rates, including the one you’ve just overclocked.
- You should see that the highest “fps” image moves most smoothly, and if the tests don’t detect any frame skips, you’ll get a big green “VALID” indicator at the bottom of the monitor.
- If you get frame skips, go back to CRU and lower the refresh rate by increments of 1hz, reboot your PC, and test it until it’s stable.
- Upping the refresh rate can also have a negative effect on the brightness and colors of your display.
- To fix these things, go to “Radeon Settings -> Preferences ->Radeon Additional Settings -> Display Color” then adjust the Saturation, Brightness, and Contrast to make your monitor display appear how you want it.
For gamers, overclocking your monitor is the most noteworthy thing for improving gaming performance. If you need more help overclocking your PC Monitor, let us know in the comments. Also, if the article helped you, make sure to share it with your friends as well.


I do not even know the way I ended up right here,
but I thought this publish was great. I don’t understand who you might be however
definitely you’re going to a famous blogger if you aren’t already.
Cheers!