Windows 11’s redesigned Taskbar may have caught your attention. The taskbar icon is now displayed in the center, and it looks great. The new Windows 11 operating system also includes a redesigned Start menu.
When you install Windows 11 for the first time, you will notice some new icons on the Taskbar. You will see a new purple button, the icon for the new Chat app. The Chat app is part of the Microsoft Teams consumer version bundled with Windows 11.
For those who don’t know, Microsoft Teams is a proprietary business communication platform developed by Microsoft. However, not everyone uses Teams; and many would like to remove the Chat icon from the Taskbar.
Also read: Windows 11 Keyboard Shortcuts
3 Ways to Disable & Remove Microsoft Teams in Windows 11
Like every other preinstalled Windows 11 apps, the Teams app can be easily removed from Windows 11. Hence, this article will share the few best methods to disable Microsoft Teams in Windows 11. Let’s check out.
1) How To Disable Microsoft Teams
Since Microsoft Teams ships with Windows 11, it runs in the background all the time. Also, it starts up Automatically when Windows 11 loads. However, the good thing is that you can prevent Microsoft Teams from running in the background. Here’s what you need to do.
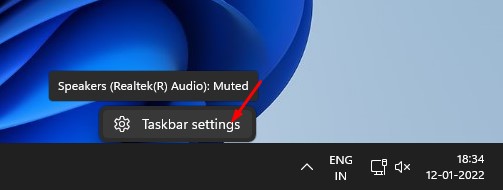
1. First of all, right-click on the Taskbar and select ‘Taskbar Settings’.
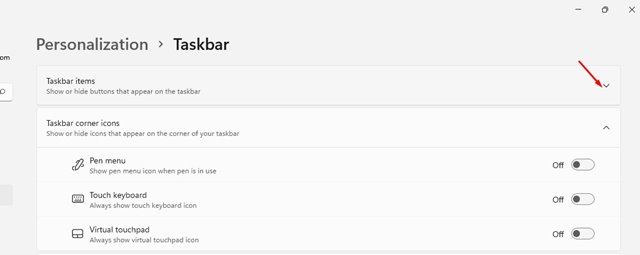
2. On the Taskbar settings, expand the Taskbar items.
3. You need to disable the Chat app, as shown in the screenshot below.
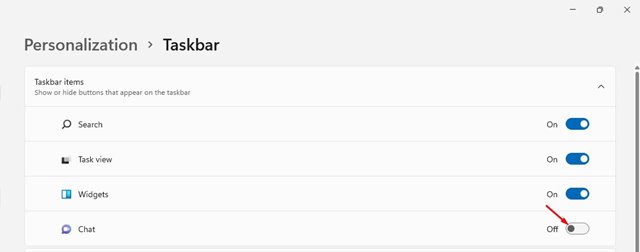
That’s it! You are done. This will remove the Chat app icon from the Taskbar.
2) How to Remove Microsoft Teams from the Startup
After removing the Chat icon from the Taskbar, you need to remove Microsoft Teams from the Startup option. Here are some of the simple steps you need to follow.
1. First, press the Windows Key + I button to open Windows 11 settings.
2. On the Settings app, click on the Apps option on the left sidebar.

3. On the right pane, click on the Startup option as shown below.

4. On the Startup apps, find and disable the Microsoft Teams option.

That’s it! You are done. This is how you can prevent Microsoft Teams from running on the Startup.
3) How to Uninstall Microsoft Teams
If you want to get rid of Microsoft Teams altogether, you need to follow some simple steps below. Here’s how to uninstall Microsoft Teams from Windows 11.
1. First, press the Windows Key + I button to open the Windows 11 settings.
2. On the Settings page, click on the Apps option.
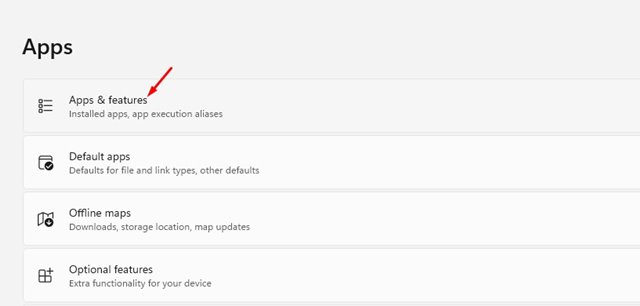
3. Click on the Apps & features option on the right pane.
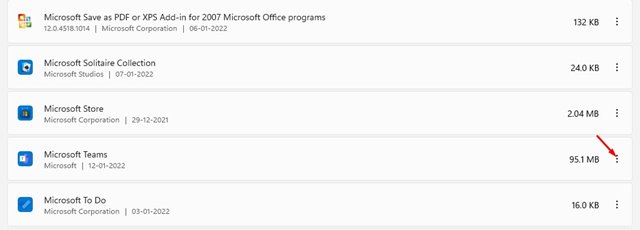
4. On the Apps & features, find the Microsoft Teams app and click on the three dots as shown below.
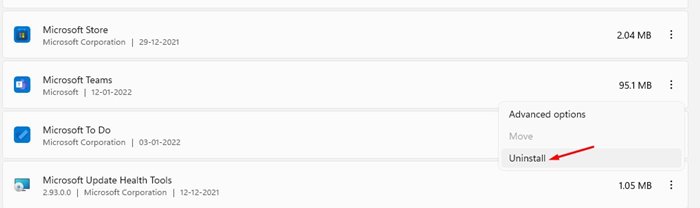
5. From the list of options, click on Uninstall.
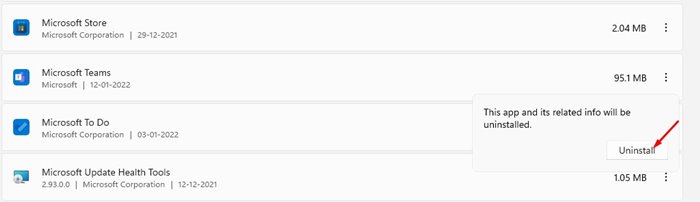
6. On the confirmation prompt, click on the Uninstall button again.
That’s it! You are done. This is how you can uninstall the Microsoft Teams app on Windows 11.
Removing Microsoft Teams from Windows 11 is pretty straightforward. You just need to implement the methods as we have directed. I hope this article helped you! Please share it with your friends also. If you have any doubts related to this, let us know in the comment box below.


