How to Repair & Reset the Settings App in Windows 11

Microsoft removed several useful features on Windows 11, like the Control Panel, System information page, etc. While there are ways to regain the missing features on Windows 11, there’s no need for it. Windows 11 introduced a redesigned Settings app that includes all Settings and options you will likely change.

You can control almost all aspects of Windows 11 via the Settings app. However, the Settings app can misbehave due to bugs and glitches. A few Windows 11 users have recently reported problems while using the Settings app on Windows 11.

How to Repair & Reset the Settings App in Windows 11

Few users have reported that the Settings app is not opening at all, whereas some said that the Settings app is taking a long time to list the options. If you are also experiencing problems while accessing the Settings app on Windows 11, you need to repair or reset the Settings app manually. And here are the best ways to repair or reset the Settings app in Windows 11.

1. Repair the Settings app on Windows 11

Before resetting the Settings app, you need to try the repair option.
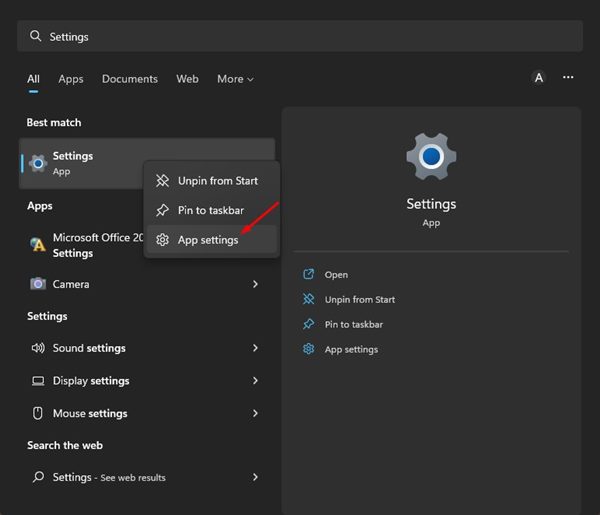
 Here’s how to repair the Settings app on Windows 11.

1. First, click on the Windows 11 search and type in Settings.

2. Right-click on the Settings app and select App Settings.

App Settings

3. On the App Settings screen, click on the Repair button as shown below.

Repair

That’s it! Now, Windows 11 will attempt to repair the Settings app. This won’t affect any app data.

2. Reset the Settings app on Windows 11
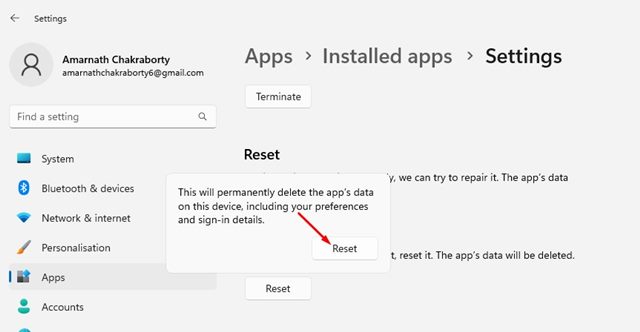
If the Setting app is still not working correctly, reset it. Resetting will delete every app data stored on your device. Here’s how you can reset the Settings app on Windows 11.

1. First, click on the Windows 11 search and type in Settings.

2. Right-click on the Settings app and select App Settings.

App Settings

3. On the App Settings screen, click on the Reset button.

Reset

4. On the confirmation prompt, click on the Reset button again.

Reset

That’s it! This will reset the Settings app on your Windows 11. You need to re-add your sign-in methods and Microsoft account again.

3. Reset the Settings app via PowerShell in Windows 11

If even the App Settings page is not opening, you must rely on the PowerShell utility to reset the Settings app on Windows 11.
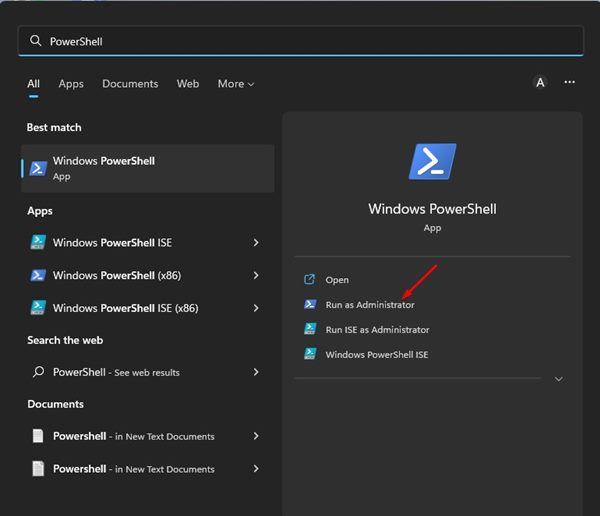
 Here are some of the simple steps you need to follow.

1. First, click the Windows 11 search and type in PowerShell. Right-click on PowerShell and select Run as administrator.

Run as administrator

2. On the PowerShell Window, execute the command shared below and hit the Enter button.

Get-AppxPackage *windows.immersivecontrolpanel* | Reset-AppxPackage

execute the command shared below

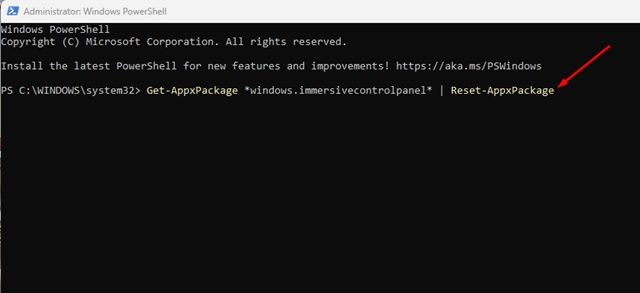
3. Executing the above command will immediately reset your Settings app.

That’s it! This will reset your Settings app on Windows 11. After the reset, make sure to restart your computer.

4. Reset Settings App Using Command Prompt

Like the PowerShell utility, you can also use the Command Prompt command line tool to reset the Settings app.
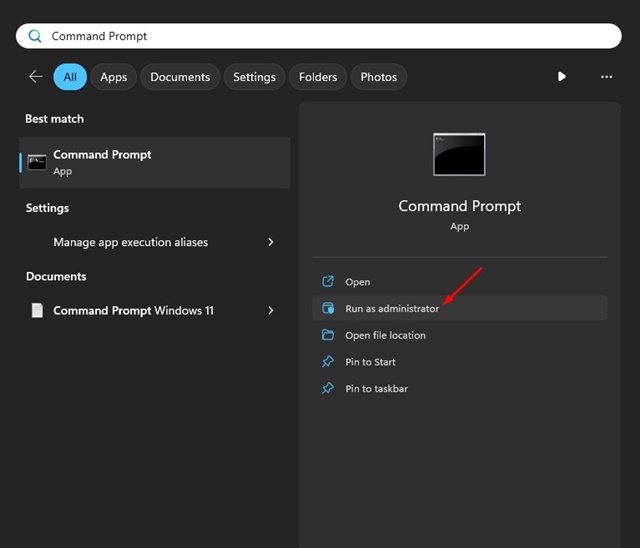
 Here’s how you can Reset the Settings app on Windows 11.

1. Open the Windows 11 search type Command Prompt. Right click on the Command Prompt and select Run as administrator.

Run as administrator

2. When the Command Prompt opens, paste this command and press Enter.

PowerShell -ExecutionPolicy Unrestricted -Command "& {$manifest = (Get-AppxPackage immersivecontrolpanel).InstallLocation + '\AppxManifest.xml' ; Add-AppxPackage -DisableDevelopmentMode -Register $manifest}"

paste this command

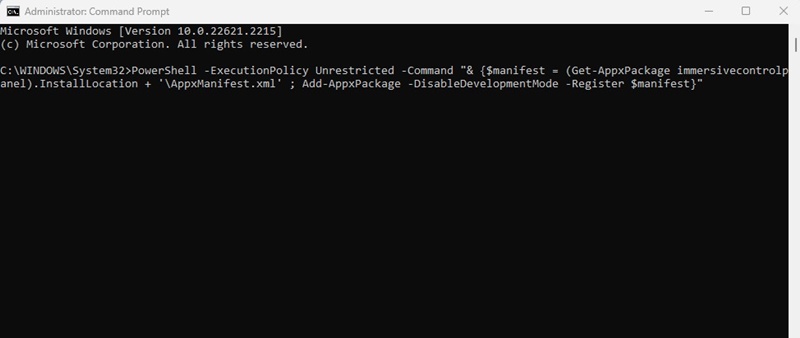
3. You must wait until the command resets the Settings app. Don’t close the CMD until you see the confirmation message.

That’s it! This is how you can use the Command Prompt utility on Windows 11 to reset the Settings app.

So, these are the best ways to reset the Settings app in Windows 11. We are sure these three methods will resolve almost all Settings app-related common issues on your Windows 11. Yet, if you still face problems while accessing Settings on Windows 11, it’s recommended to uninstall the recent updates.

LEAVE A REPLY

Please enter your comment!
Please enter your name here