Network issues tend to appear sometimes while using the internet on the computer and this is not always due to the break of the actual network. Sometimes it is also due to the inflicting of the drivers or the network settings. This is to be noted that more often the causes for the network are due to the malfunctioning of the network drivers or the settings.
The great thing is that Windows 10 provides users easy troubleshooting options to fix most of the network-related issues. For instance, you can easily reset network settings on Windows 10, easily flush the DNS settings, etc.
So, in this article, we have decided to share some of the best methods to reset network settings on Windows 10. By resetting the network settings, you can fix most of the Windows 10’s network-related problems.
How to Completely Reset Network Settings on Windows 10
Below, we have shared two best methods to fix Network issues on Windows 10. So, let’s check out how to completely reset network settings in Windows 10.
Using Windows 10 Settings
Well, the settings app of Windows 10 does allow you to reset the entire network settings. Follow, some of the simple steps given below to completely reset Windows 10 network settings.
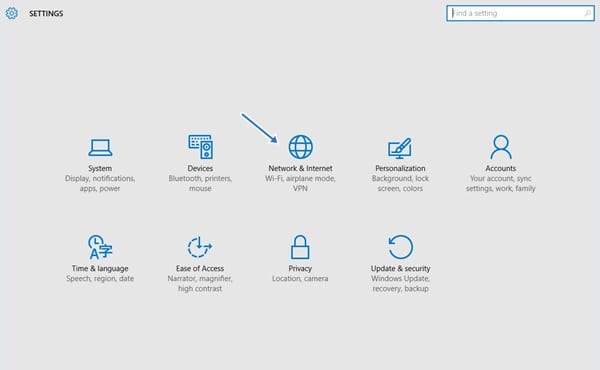
Step 1. To begin up with the method to reset the Windows 10 network settings, first of all, click on the Start button placed in the bottom corner. On clicking this button you would see the options and from there you need to click on the Cog button or generally known as the settings gear icon. On the settings page, click on ‘network and internet’
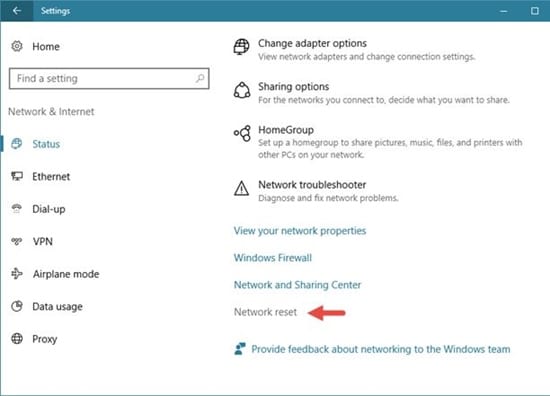
Step 2. On the Settings page, you need to select the ‘Status’. Next, click on the ‘Network Reset’ button.
That’s it! You are done! This is how you can reset Windows 10 network settings via Settings app on Windows.
Using Command Prompt
The great thing about the Windows 10 operating system is that it allows users to reset Network settings through CMD. So, if you are unable the access the Network settings for any reason, then you can use the below-given method to reset Network settings.
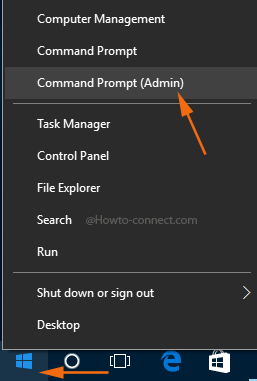
Step 1. First of all, open Command Prompt on your Windows 10 computer. Simply, right-click on the Windows button and select ‘Command Prompt(Admin)’
Step 2. Under the Command Prompt, enter the following commands without the quotation mark and hit ‘Enter’
“netsh winsock reset”
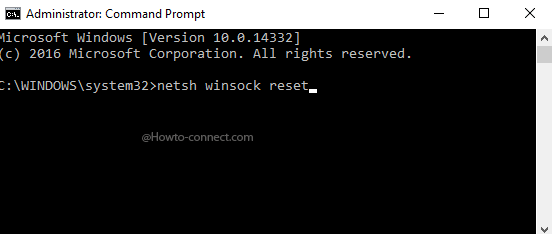
Step 3. Now it will take a few seconds. Once done, you will be notified with a note “Winsock reset completed successfully.
That’s it, you are done! Just restart your computer to make the changes. If you have any other doubts, then discuss it with us in the comments.
So, this is all about how to completely reset the entire network settings on Windows 10 PC. If you have any other doubts related to this, let us know in the comment box below. I hope this article helped you! Share it with your friends also.


