From the past few days, lots of Windows users have messaged us on our Facebook page regarding the ‘system cannot find the file specified’ error message. So, we have decided to throw some lights on the error code. This is a standard Windows error, and users usually get the error while copying the data stored on a hard drive.
There is a wide range of factors that can trigger ‘The system cannot find the file specified’ error message. You might be getting the error message because your system files are missing or corrupted, required files for the specific software are missing or damaged, disk failure, partition problems, incorrect file information, etc.
How To Fix ‘The System Cannot Find the File Specified’ Error
Fortunately, we have found some best methods which can fix the ‘The system cannot find the file specified’ error message in no-time. So, here we are about to share the five best methods to fix ‘The system cannot find the file specified’ from Windows 10 computer.
1. Install Windows Updates
The ‘The system cannot find the file specified’ error message mostly occurs on the older version of Windows. So, the solution for the error message also lies in the Windows Updates installation. So, to install Pending Windows updates, follow some of the simple steps listed below.
Step 1. First of all, press Windows Key + I on your keyboard
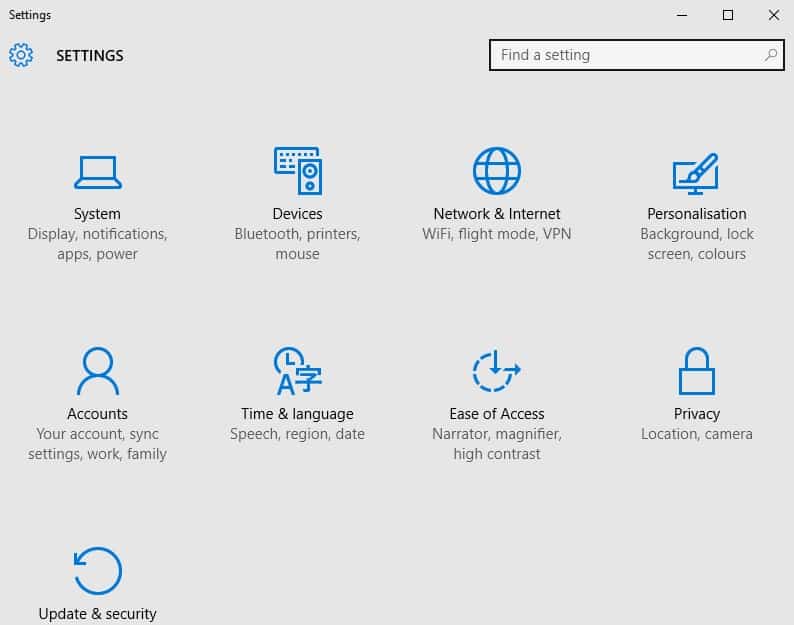
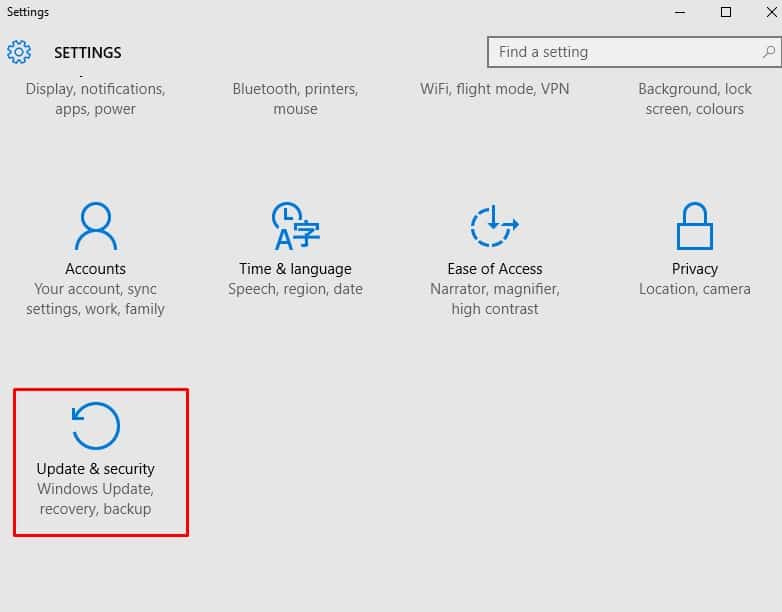
Step 2. This will open up the ‘Settings’ page. There you need to click on ‘Update & Security’
Step 3. In the next window, you need to click on the ‘Check for updates’ button.
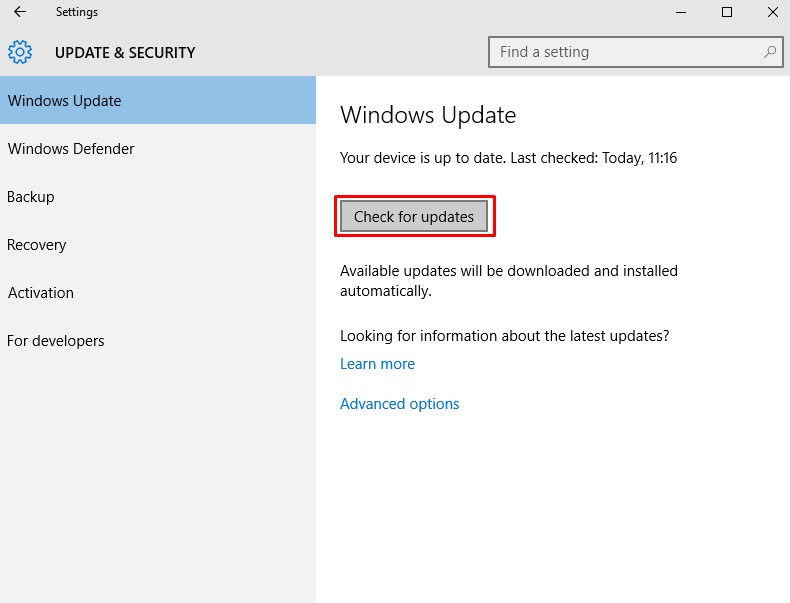
That’s it, you are done! Now the Windows update utility will check for pending updates, if it finds any, it will install it on your computer.
2. Update the drivers
If you are getting the “The system cannot find the file specified” error message due to driver issues, then you need to update the old drivers. You can either uninstall & reinstall the drivers from the Device Manager, or you can rely upon a third-party tool to update the drivers. We recommend you to use a third-party tool to update all drives because manually updating all drivers is a troublesome task. So, in this method, we are going to use Snail Suite to update the drivers.
Step 1. Visit this link and download Snailsuite on your computer. Once downloaded, install it on your computer.
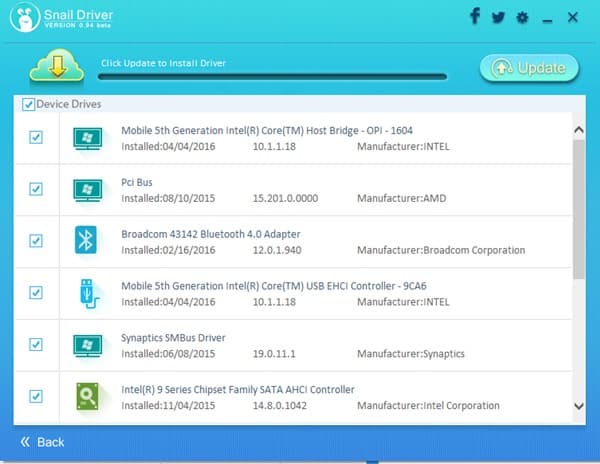
Step 2. Now open the software, and you will see an interface like below.

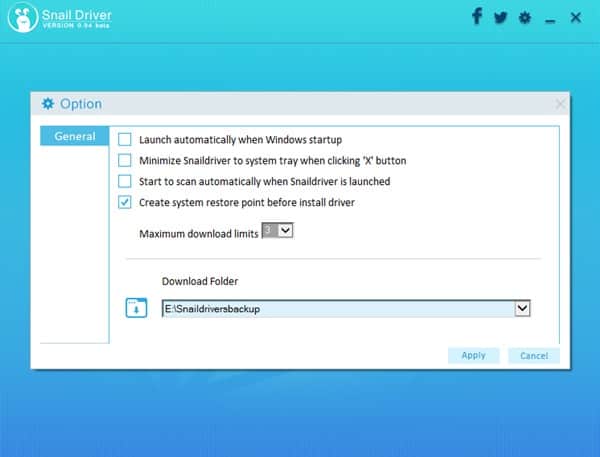
Step 3. Next, click on the gear icon to make a few settings.
Step 4. Now you need to tap on the ‘Scan’ button to scan for outdated drivers. Once scanned, it will list all outdated drivers. Simply select the drivers which you want to update and click on ‘Update’
That’s it, you are done! This is how you can use snailsuite to update all drivers at just one click. You can also use other free driver updating tools like Driver Booster, Driver Easy, etc to update drivers.
3. Update Hard Disk Driver
Well, lots of users have claimed that they have fixed the ‘System cannot find the file specified’ error by updating the hard disk driver. Also updating the hard disk driver would fix most of the disk-related errors. So, follow some of the simple steps given below to update the hard disk driver on Windows 10.
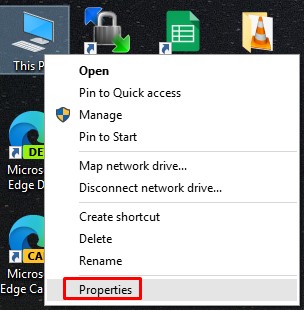
Step 1. First of all, right-click on ‘My Computer’ and select ‘Properties’
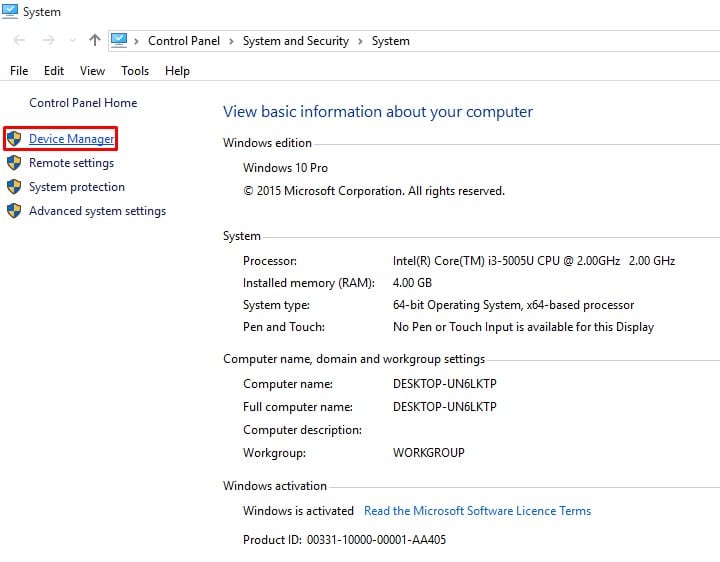
Step 2. From the left-hand side panel, click on the ‘Device Manager’
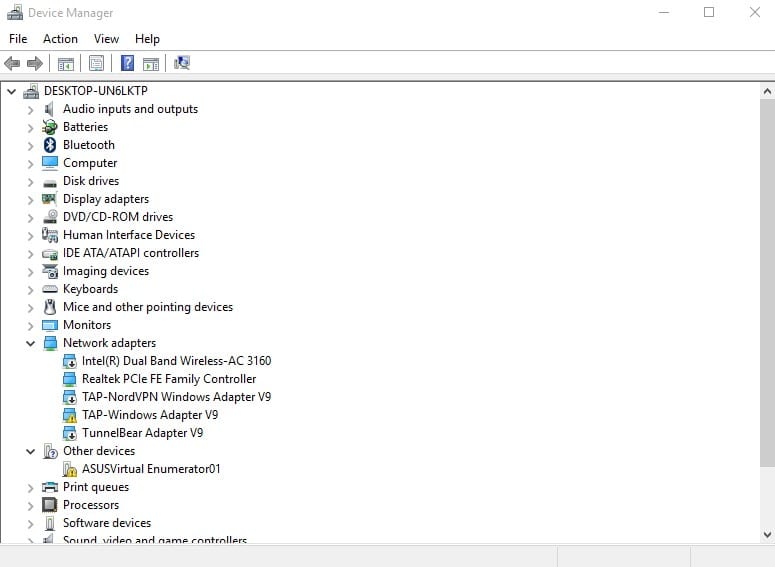
Step 3. Next, expand the ‘Disk Drives’ option.
Step 4. Right-click on the Disk and select ‘Update Drivers’
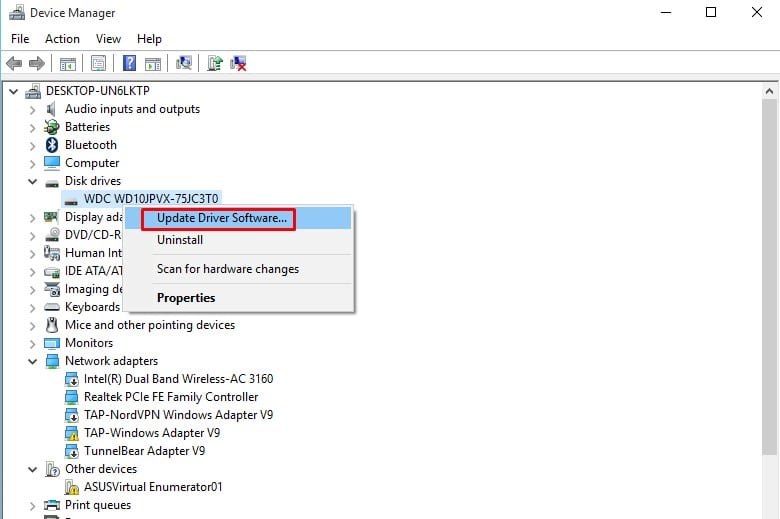
That’s it! You are done. This is how you can update the hard disk driver to fix ‘The System cannot find the file specified’ error.
4. Using Powershell
In this method, we need to use Powershell to fix The system cannot find the file specified error message. Here we will be using the System File Checker (SFC) to fix corrupted Windows files. So, let’s check out how to use the SFC command on Powershell.
Step 1. First of all, open the Windows 10 search bar and search for Powershell. Right-click on the Powershell and select ‘Run as Administrator’
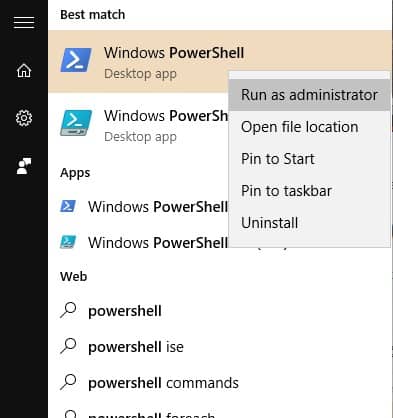
Step 2. Now you will see the Powershell window. There you need to enter the following command ‘sfc /scannow‘ and press Enter.
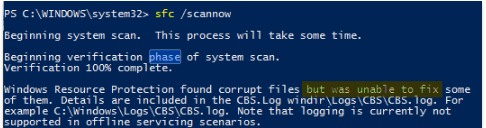
Step 3. Now, wait until the System File Checker utility (SFC) completes the scan.
That’s it, you are done! Make sure to restart the computer after the scan completes. This will most probably fix ‘The system cannot find the file specified’ error from your computer.
5. Check The System Log
If all of the above-listed methods fail to fix The system cannot find the file specified from your computer, then we suggest you to check the System log files for the errors. Here are the steps which you need to follow.
- Head to the C:/Windows/INF file directory and open the INF folder
- On the INF folder, search for the setupapi.dev.log file and open it.
- Now press CTRL+F and search for ‘cannot find the file’ and press Enter.
- Now you will get the missing file. Simply, copy & paste it into the Windows/INF folder.
That’s it, you are done! Now just restart your computer to fix ‘The system cannot find the file specified’ from Windows 10.
5. Delete The ProfileImagePatch Key
Well, if you are getting the error message ‘The System Cannot Find the File Specified’ while creating the system’s image or backup, then you need to try this method. The problem occurs when Windows cache the old Profile image path. So, follow this method to fix the ‘The System Cannot Find the File Specified’ error message from Windows 10.
Step 1. First of all, press Windows Key + R to open the Run Dialog box. On the RUN Dialog box enter ‘regedit’ and press Enter.

Step 2. Now on the Registry editor, you need to browse to the patch HKEY _LOCAL_MACHINE\\SOFTWARE\\Microsoft\\Windows NT\\CurrentVersion\\ProfileList
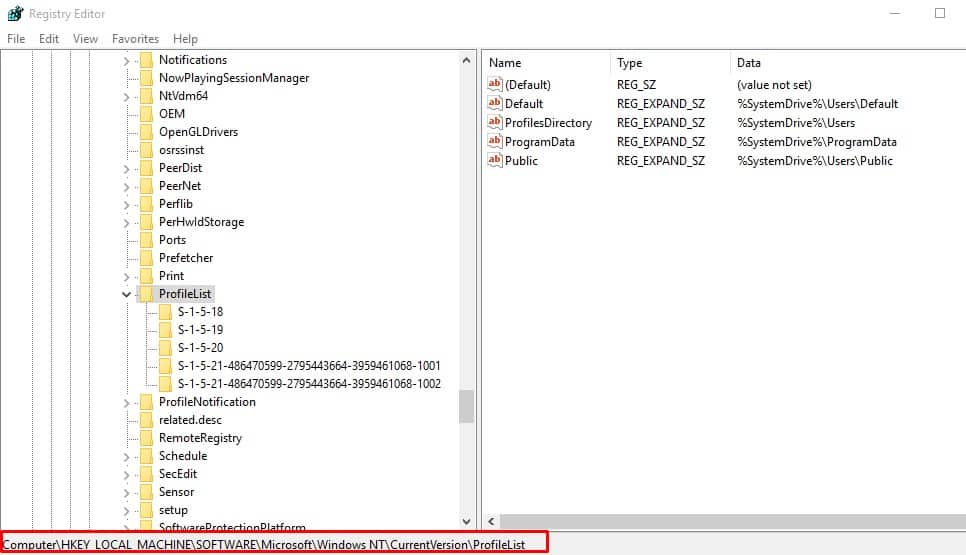
Step 3. Now expand the ProfileLisk key and check all sub-keys whether they have ProfileImagePatch value on the right-side panel.
Step 4. If you find any sub-keys which do have the ProfileImagePath value, then remove it.
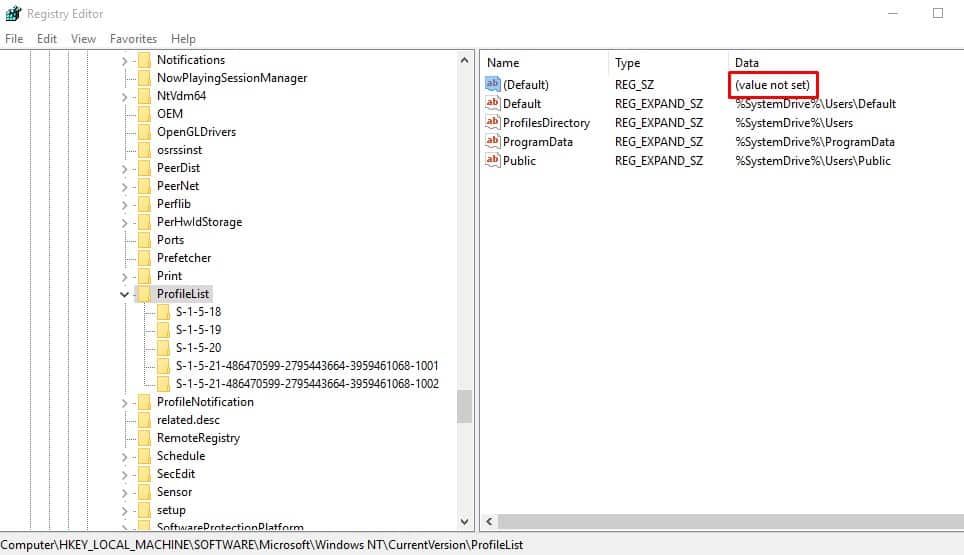
That’s it, you are done! Now just restart your computer and the ‘The System Cannot Find the File Specified’ will be fixed.
6. Scan for Virus & Malware

Malware and Virus sometimes corrupt essential system files. So, The system cannot find the file specified error can also occur due to threats and viruses. So, if you are using any Antivirus program, then run a deep scan. If you don’t have any antivirus tool, then you can install the free trial of Malwarebytes to remove threats from your computer.
So, these are the best methods to solve the ‘The system cannot find the file specified’ from Windows 10 computer. If you know any other working method to fix the error, then let us know in the comment box below.


