Well, if you are using the Windows 10 operating system for a while, then you might know that Microsoft doesn’t provide users much privacy options. In fact, Windows is never transparent with the amount of data that it sends to Microsoft. From the bug reports to crash checks, everything was sent to Microsoft’s Server.
However, these things have been fixed with Windows 10 April 2018 update. With April 2018 update, Microsoft allowed users to view the exact diagnostic information that Windows PC is sending to Microsoft. What’s more interesting is that Microsoft even allowed users to view, save, and delete the diagnostic data.
For viewing the Diagnostic data, Microsoft introduced a new Privacy Dashboard which is attached to the Microsoft account. But, the diagnostic data is not easy to understand and it’s not meant for regular users.
Also Read: How to Hide Any Drive in Windows Using CMD
Steps to View & Save Windows 10 Diagnostic Data
However, if you have a little bit of technical knowledge, then the Diagnostic data can help you discover a lot about the workings of Windows PC. So, in this article, we are going to share a working method that would help you to view & save Windows 10 Diagnosis Data.
Step 1. Getting Windows 10 Diagnosis data is pretty easy, you just need to click on the Start button and then click on the Settings icon that appears on left.
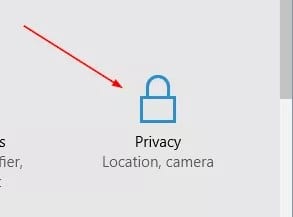
Step 2. This will open the Windows 10 settings where you gonna explore this option. Now in the Windows settings, just click on the “Privacy”.
Step 3. Now under the privacy settings, open the Diagnostics and feedback as this is the Windows module that gets all the logs of the diagnosis reports that your OS send to Microsoft.
Step 4. There you will see the option Diagnostic data viewer that will be by default inactive, you just need to activate that option.
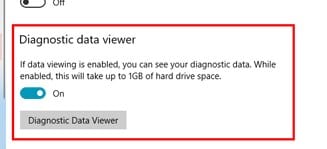
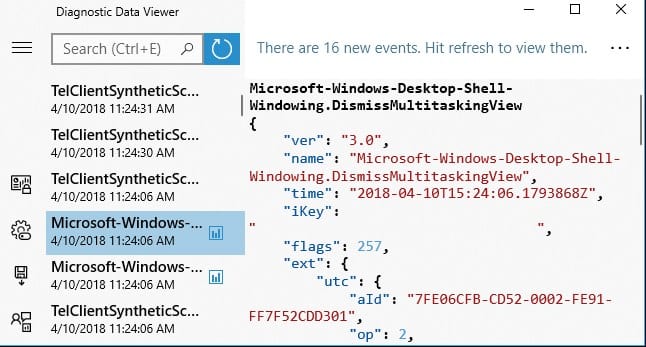
Step 5. Once that is active you need to click on Diagnostic Data viewer and you will see the number of logs there that is the diagnosis reports that your OS is sending to Microsoft.
Step 6. There will be a number of logs you can use the Filter option also if you want to explore any of the particular logs. If you want to save them permanently then you can do that also.
Step 7. To save the Diagnostic data, click on the ‘Export’ option. This will save the Windows 10 diagnosis data on your computer.
That’s it, you are done! This is how you can view & save Windows 10 Diagnosis data.
Change how much data you send to Microsoft
Well, by default, Windows 10 collects full diagnostic data and sends it to Microsoft. However, the good thing is that Windows 10 also allows you to select how much data you want to share with Microsoft. To make Windows collect less diagnostic data, head to the Settings > Privacy > Diagnostic & Feedback. On the left-hand side pane, select ‘Required Diagnostic data’
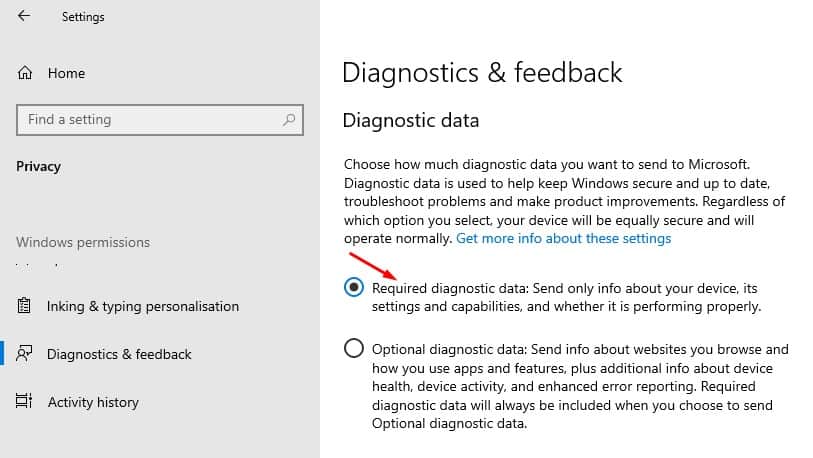
If you have selected to send only ‘Required Diagnostic data’, Windows will send only info about your device, its settings, and capabilities.
Delete PC’s Diagnostic Data from Microsoft’s Server
Windows 10 also allows users to delete the diagnostic data that’s have been collected. To delete the diagnostic data, head to the Settings > Privacy > Diagnostic & Feedback.
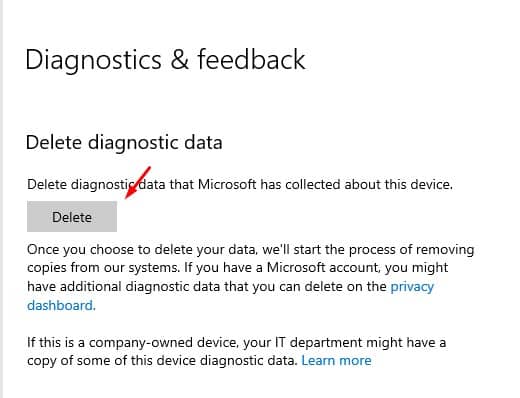
Now scroll down and find the option ‘Delete Diagnostic Data’ and then click on the ‘Delete’ button. This should erase all diagnostic data that has been collected by Microsoft from your device.
So, this article is all about how to view and save Windows 10 Diagnostic data. The diagnostic data viewer feature is only available on the Windows 10 operating system. Hope this article helped you share it with others also.


