Microsoft’s new operating system, Windows 11, is already available as a beta download. Also, the operating system is set to arrive at compatible PCs this fall. If you are using Windows 11 for a while, you might have noticed many new features like Snap Layouts, Virtual Desktops, etc.
In this article, we are going to talk about the Virtual Desktop feature of Windows 11. Actually, the feature was introduced in Windows 10, with the built-in Task View button on the taskbar.
Virtual Desktop feature is also seen on Linux operating system. If you don’t know, Virtual Desktop is basically a feature that lets you set up different desktop experiences and switch between them easily. This means you could make separate desktops for work, school, and personal use.
Also read: Download Official Windows 11 ISO Files (Latest Version)
Steps to Use Virtual Desktops On Windows 11
On Windows 11, Microsoft has improved the experience of the Virtual Desktop feature. Hence in this article, we will share a detailed guide on how to use Virtual Desktops on Windows 11 operating system. Let’s check out.
Step 1. To create a Virtual desktop, hover your mouse over the Task View button on the taskbar. A new menu will pop up. Next, you need to click on the ‘New Desktop’ option.

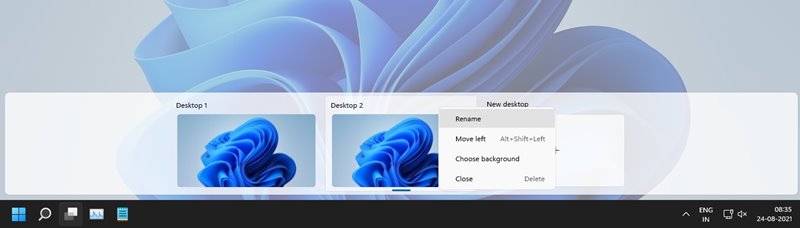
Step 2. This will create a new virtual desktop. You can now create a work environment in it. For example, here, I have two virtual desktops running different apps.

Step 3. Windows 11 also lets you rename a virtual desktop. For that, you need to right-click on the virtual desktop and select the ‘Rename‘ option.
Step 4. If you wish to move Windows between Virtual desktops, you need to click on the task view button and hover the cursor over the Window which you want to move. Next, right-click on the Window and select ‘Move to’ and then select the desktop.

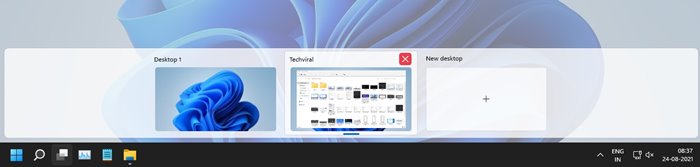
Step 5. To close a Virtual desktop, you need to hover over the desktop you want to close and click on the ‘X’ button, as shown in the screenshot.
That’s it! You are done. This is how you can create and use Virtual Desktops on Windows 11.
So, this guide is all about how to create and use Virtual Desktops on Windows 11. I hope this article helped you! Please share it with your friends also. If you have any doubts related to this, let us know in the comment box below.


