You connected your display to your computer via HDMI cable and noticed that the screen looked out washed, black & grayish, and the color collaboration was ruined.
If this happened, the issue is not your display but your graphics card that isn’t converting or processing the colors quite well.
If you are willing to calibrate your computer display and fix it from rendering the washed-out colors, just read this article, as you will find the easy fix there.
Steps to Avoid Washed-Out Colors When Using HDMI on Your PC
The TV screens or the PCs show the “RGB Full” colors where the value for the colors is set to 0-255. The 0 represents the lowest value for the blackest black, while the 255 represents the whitest white color production for the screen.
If you are facing the issue where the screen of your computer connected via HDMI shows washed-out colors, then the possible reason might be that the graphics card of your PC is processing 16-235 colors, i.e., RGB Limited colors where the value for the blackest black is the 16 and for the whitest white color is the 235.
This could be compared to the 0-255 color production, and the levels are washed out for your screen. To correct your display colors, you need to set it up to 0-255 colors; let’s take a look at how this could be established for various graphic cards:
Set up RGB Full on NVIDIA Graphics Card
First of all, right-click on the desktop background on your PC and then from the list menu that appears, look forward to the option named “NVIDIA Control Panel” and just click on it.
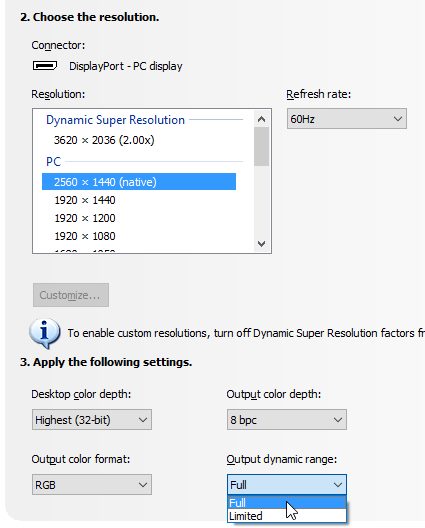
You will see that the NVIDIA Control Panel window will launch. From there, select Display and then, Change Resolution options.
On the next screen, click on the “Output Dynamic Range Box” and select “Full.” That’s all; the graphics would then process up RGB Full colors for your display!
Set up RGB Full on AMD Graphics Card
First of all, right-click on the desktop background on your PC, and then from the list menu that appears, look forward to the option named “AMD Radeon Settings” and just click on it.
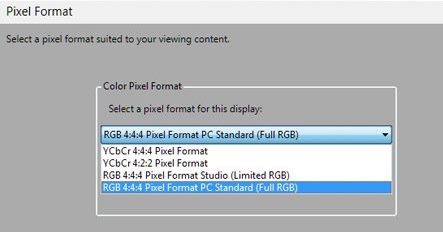
Next, select Display, and then Preferences > Pixel Format. On the next screen, click on the “Color Pixel Format” box and select “RGB 4:4:4 Pixel Format PC Standard (Full RGB)“. That’s all; the graphics would then process up RGB Full colors for your display!
Set up RGB Full on Intel Graphics Card
First of all, right-click on the desktop background on your PC, and then from the list menu that appears, look forward to the option named “Graphics Properties” and just click on it.
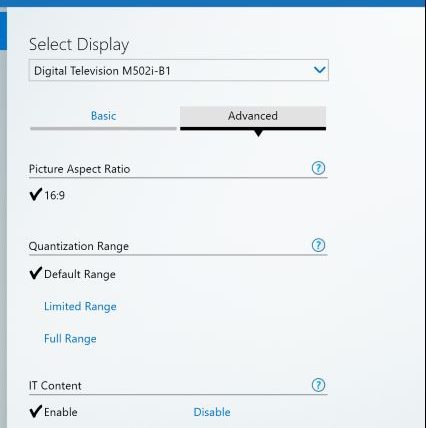
You will see that the NVIDIA Intel Graphics Panel window will launch. From there, select Display > General Settings > Advanced.
On the next screen, click on the “Full Range” option under the Quantization Range. That’s all; the graphics would then process up RGB Full colors for your display.
So you have now got the method by which the screen connected to the PC via HDMI producing washed-out colors could be fixed. If you need more help related to this, let us know in the comments below.


