On iOS 11, Apple switched its default camera formats for photos and videos from JPG to HEIC. Apple introduced such changes to save space on your iPhone. Compared to the JPG format, the HEIC format takes up lesser space.
So, whenever you capture a photo with your iPhone, it’s automatically saved in the.HEIC format. Although HEIC is a highly efficient file format, it still has some drawbacks.
Once you share your iPhone photos and videos to your Windows laptop, you will realize that it can’t open the files because of the HEIC Format. By default, Windows operating system doesn’t support HEIC format, but you can use a third-party photo viewer to view those files.
Also, you can rely on image converters to convert your HEIC images into JPG or any other compatible format. But, unfortunately, all these things can take up lots of time. So, to reduce such hassles, iPhone now allows you to switch formats.
Also Read: How to Convert a JPG File to a PDF On Windows 10/11 PC
Steps to Capture/Save Photos in JPG Format on iPhone
So, if you are interested in saving photos in JPG format on iPhone, you are reading the right guide. Below, we have shared some easy steps to switch image file format on iPhone. Let’s check out.
1. First of all, open the Settings app on your iPhone.
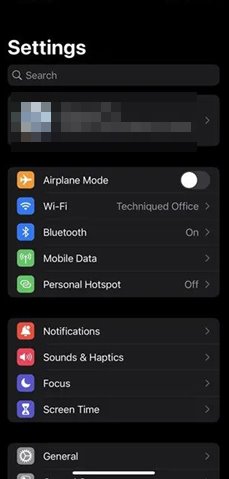
2. On the Settings app, scroll down and tap on the Camera option.
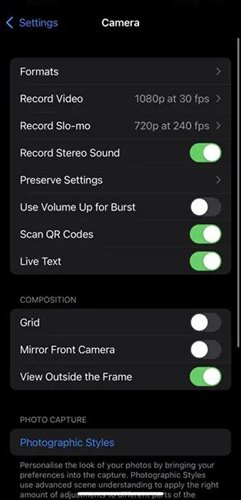
3. Now, on the Camera app, find the Formats option. Next, tap on the right arrow button behind the formats.
4. Under the Formats, you need to select the Most Compatible option.

That’s it! You are done. Now all iPhone images will be captured as JPEG files and will be stored in the same format.
So, this guide is all about how to save Photos in JPG format on iPhone. I hope this article helped you! Please share it with your friends also. If you have any doubts related to this, let us know in the comment box below.


