We usually focus on software to improve the system performance, but it was the hardware that decided how fast your computer will be. It doesn’t matter whether you are using a premium tool or free tool to improve the system performance; if you don’t care about the hardware, you will end up with disappointments.
Talking about the hardware of a computer, it was the CPU that handles all data processing stuff. Just like RAM and HDD, the processor is equally important. One of the most common issues that users face is the CPU overheat. While you use your computer, the CPU keeps on accumulating head. If it gets heated above the limit, the CPU will fail.
So, it’s always best to keep a check on the CPU temperature while using the computer. Therefore, in this article, we have decided to share a few best working methods to check the CPU temperature on the Windows 10 computer. With these tools, you can actively check the CPU temperature in real-time.
Check the CPU Temperature in Windows
You must know before that what is the better temperature range under which the CPU does not exhaust or show any damaging signs. The more prominent temperature for the laptops is 30 degrees to 60-degree Celsius, while above that temperature will invite troubles.
Using the Open Hardware Monitor tool
Open Hardware Monitor is a great solution for the Windows users as through this you will be able to quickly get the whole information regarding the temperature and various other aspects related to the CPU of Laptop or of Computer.
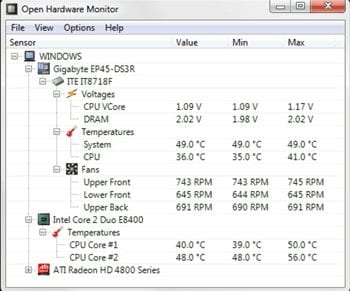
This app shows the core temperature information of your device, the whole load temperature as well as the temperature at which it will be stable. You will get to see the full list of options telling you about the various temperature levels of your PC or laptop computer.
To remain attached to the temperature information and get access to it quickly you need to open this app and then pin it to the taskbar. Just right click on the software icon and then select the option Pin to Taskbar. The quick launch option will be added instantly.
There are although several apps on the internet that can be used for getting access to the Temperature details of the computer but Open Hardware Monitor is the most reliable and accurate one and it does show the detailed info too. Start by using it or go for any other app for the purpose and keep on checking your device so that it may not burn!
Using Core Temp (open hardware monitor)
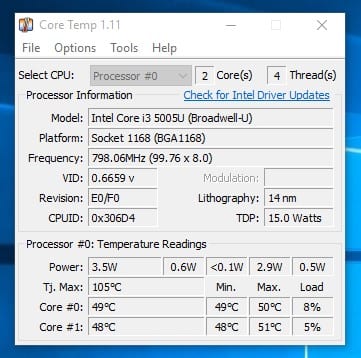
Core Temp is a simple and lightweight app that runs in your system tray and monitor’s the temperature of your CPU. The best thing is that it doesn’t consume many resources and it also comes with a few customization options.
Step 1. First of all, download and install Core Temp on your Windows 10 computer and launch it. (Make sure to uncheck bundled tools that comes with the software)

Step 2. Once launched, it will automatically detect your Processor and will show you the Model number and Platform. You can see the Core temperature at the bottom.
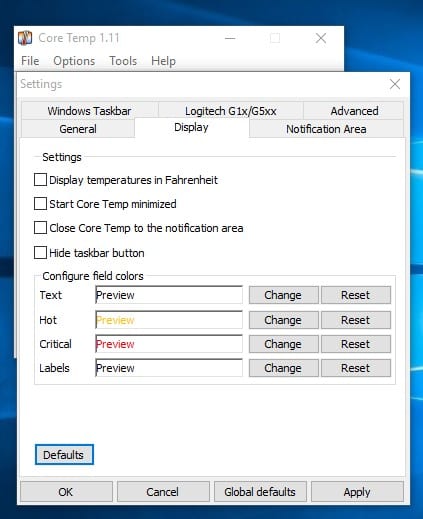
Step 3. Now for customization options, you need to click on “Settings” and then go to “Display” tab. There you can set the color as per your wish.
Step 4. Simply minimize the app and then open the system tray. There you will see the current CPU temperature.

That’s it, you are done! This is how you can use Core Temp to show CPU temperature on Windows 10 computers.
Using HWMonitor
Well, HWMonitor is one of the best and advanced CPU temperature monitoring tool that you can use today. The great thing about HWMonitor is that it shows the temperature of Motherboard, graphics card, CPU, and hard drives. HWMonitor is also one of the most advanced CPY temperature monitoring tools that you can use today. Apart from just showing the temperature of different components, it also shows fan speed and some other important values.
Step 1. First of all, download HWMonitor on your Windows 10 computer. You can get the download link from here.

Step 2. Once downloaded, open the app and install it usually. The tool might ask you to grant the admin access. So, make sure to allow the admin access.
Step 3. Now open the tool, and it will show you the table of temperatures. You will get to see a similar interface.
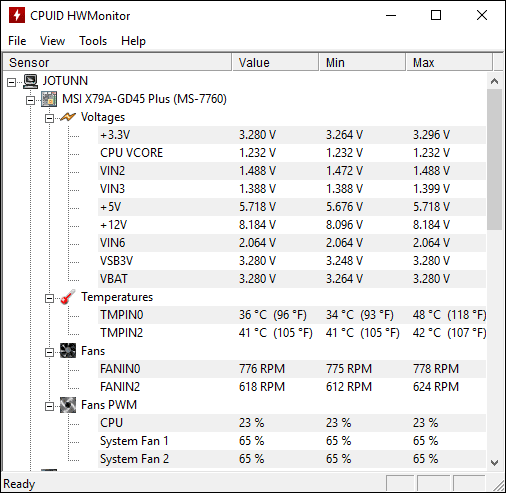
Step 4. To check the CPU Temperature, you need to expand your processor. Now you will get to see the CPU Core temperature.

That’s it, you are done! This is how can use HWMonitor to see temperatures of different components in your system. The app also packs a few other exciting features which you can explore while using the app.
Best Windows CPU Testers
Just like the above three software, there are lots of other Windows CPU Testers available on the web. These tools will let you know the temperature of the CPU and other components. So, let’s check out the best Windows CPU testers.
1. SpeedFan
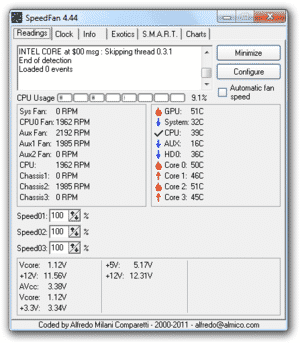
It is one of the best and most used CPU temperature checkers for Windows 10. The great thing about SpeedFan is that it can monitor fan speeds, voltage, and processor temperature as well, Not just that, but SpeedFan also access the S.M.A.R.T information to check the hard disk temperature as well.
2. Real Temp
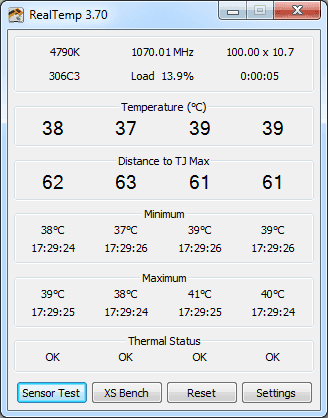
As the name of the utility says, Real Temp is an app that is meant to monitor the temperature of various components. Guess what? it can check the temperature for all single, dual and quad-core processors. Not just that, but Real Temp also shows the load of the processor.
3. CPU Thermometer

Well, CPU Thermometer is lightweight and it’s incredibly easy to use. Guess what? CPU Thermometer can show you the temperature of each CPU core. Not just that, but the CPU Thermometer also allows users to switch between Fahrenheit and Celsius as well.
So, this article is all about how to check the CPU temperature on Windows 10. I hope this article helped you! Share it with your friends also.


