Windows Defender Antivirus is indeed a great free tool that you can rely upon as it provides robust real-time protection. However, Windows Defender also blocks app installation that poses a very low risk. That’s the most probable reason why people want to disable Windows Defender. So, here we have shared two working methods to disable Windows Defender
Well, if you are using the Windows 10 operating system, then you might be well aware of the Windows Defender Antivirus. Windows Defender Antivirus comes pre-built with Windows 10 and it provides protection against various threats like viruses, ransomware, spyware, etc.
Windows Defender Antivirus is indeed a great free tool that you can rely upon as it provides robust real-time protection. However, it consumes lots of RAM and Disk resources. Furthermore, the security tool from Microsoft is not as advanced compared to others.
So, is Windows Defender Powerful?
Windows Defender which was once known as Microsoft Security Essentials is indeed a powerful security tool. However, the security tool from Microsoft is not as powerful compared to others like Norton, TrendMicro, Kaspersky, etc.
Since it comes pre-built on Windows 10 pc, it eventually blocks all malicious activities. Sometimes, Windows Defender also blocks app installation that poses a very low risk. That’s the most probable reason why people want to disable Windows Defender.
Also Read: How to Exclude Files & Folders from Windows Defender
3 Best Methods To Disable Windows Defender
Normally, Windows 10 users don’t get a pre-built option to disable the security tool completely. You can pause it, but it will again start itself after a few minutes or hours. So, if you want to disable the Windows Defender on Windows 10 completely, you need to play with the registry file.
Before editing the registry file, make sure to keep a full backup of your most important files and folders. So, let’s know how to disable Windows Defender on Windows 10.
1. Using Registry
Step 1. First of all, open the Run Dialog box on your Windows 10 computer. For that, press the Windows Logo Key + R.
Step 2. On the run dialog box, type in ‘Regedit’ and then click on ‘Ok’
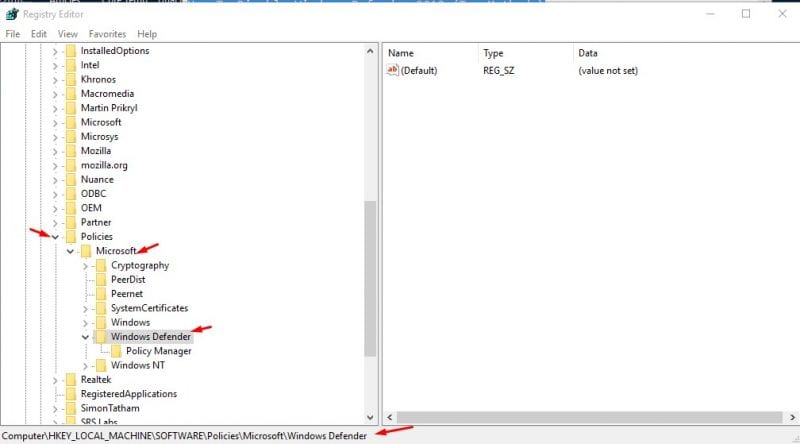
Step 3. Next, locate the following file HKEY_LOCAL_MACHINE>SOFTWARE>Policies>Microsoft>Windows Defender. Or else, you can copy and paste the following command on the Registry Search Bar – HKEY_LOCAL_MACHINE\SOFTWARE\Policies\Microsoft\Windows Defender
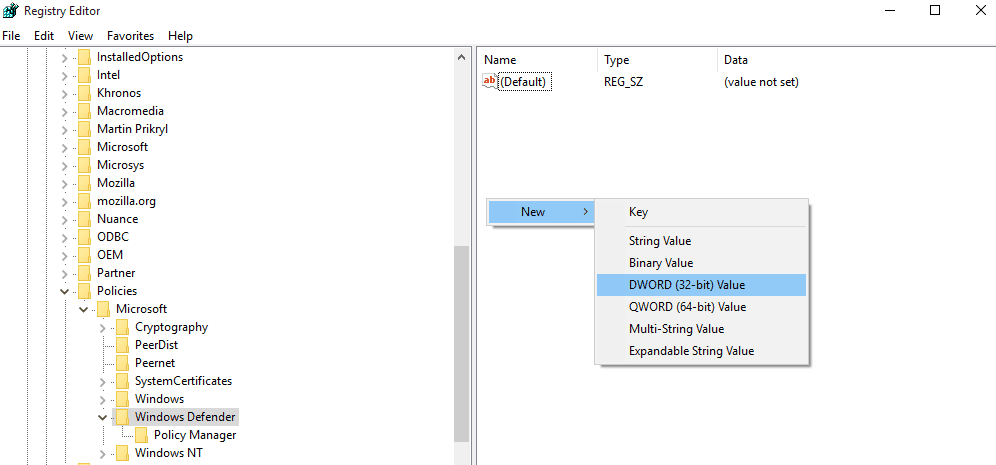
Step 4. Now right click on the Window panel on the right-hand side and then Select New > DWORD (32-bit) value.
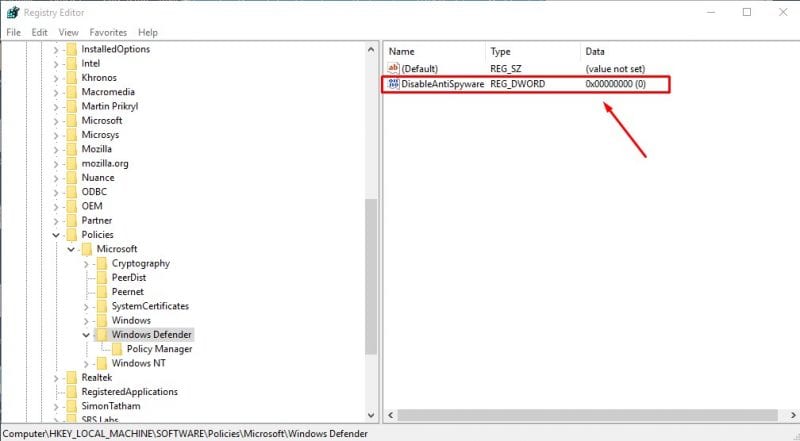
Step 5. Name the newly created key as ‘DisableAntiSpyware’ and then press the Enter button.
That’s it, you are done! Now just restart your Windows 10 computer and you have successfully disabled the Windows Defender on your computer. If you wish to enable the Windows Defender, simply delete the newly created DWORD file from the registry file.
2. Disable Windows Defender From Local GroupPolicy
Well, you can only disable Windows defender from Local Group Policy if you are using Windows 10 Pro, Enterprise, or Education. So, if you are using Windows 10 Pro, Enterprise, or Education, then follow some of the simple steps given below to disable Windows Defender from Local Group Policy.
Step 1. First of all, press Windows Key + R and it will open up the RUN dialog box.
Step 2. In the RUN dialog box, type in gpedit.msc and hit enter. This will open up the Local Group Policy Editor.
Step 3. Now on the Local Group Policy Editor, head to the following path
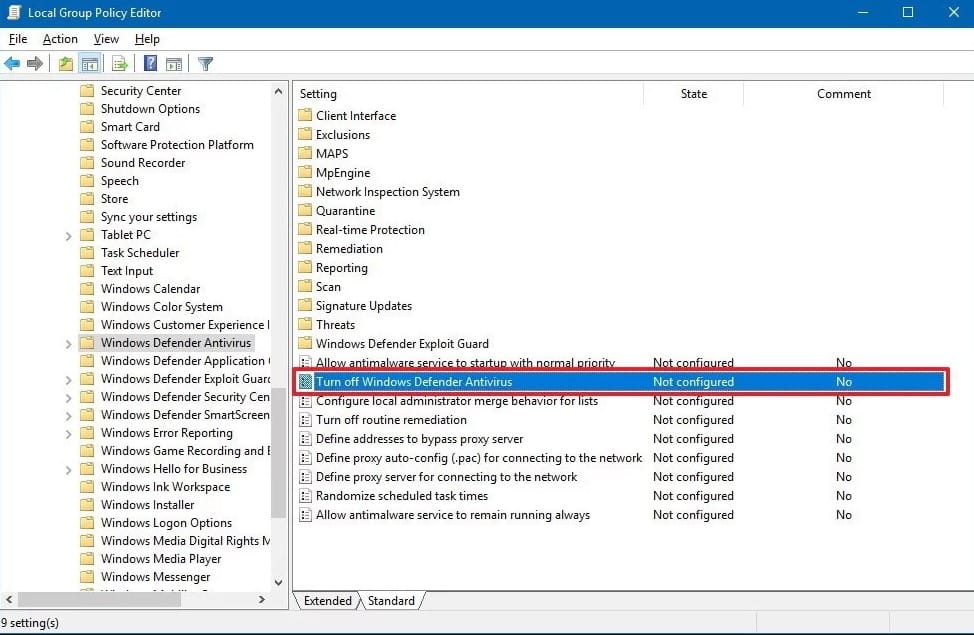
Computer Configuration > Administrative Templates > Windows Components > Windows Defender Antivirus
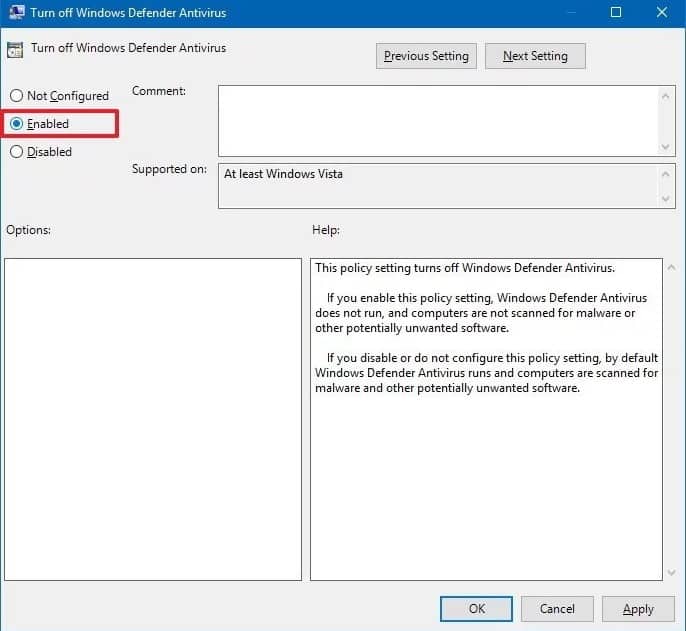
Step 4. Once located, double click on the ‘Turn off Windows Defender Antivirus’ from the right side menu.
Step 5. In the next window, you need to select ‘Enabled’ and then click on ‘Apply’
That’s it, you are done! You just need to tap on ‘Ok’ to exit the Local Group Policy editor. So, this is how you can disable Windows Defender from Local Group Policy.
3. Temporary Disable Windows Defender (Settings)
Well, we understand that not everyone is comfortable with Windows Registry editing. Therefore, in this method, we will be using System Settings to temporarily disable Windows Defender. So, let’s check how to temporarily disable Windows Defender in Windows 10.
Step 1. First of all, type in ‘Virus and Threat Protection’ in the Windows Search bar.
Step 2. Now on the ‘Virus & Threat Protection Settings’ select ‘Manage Settings’
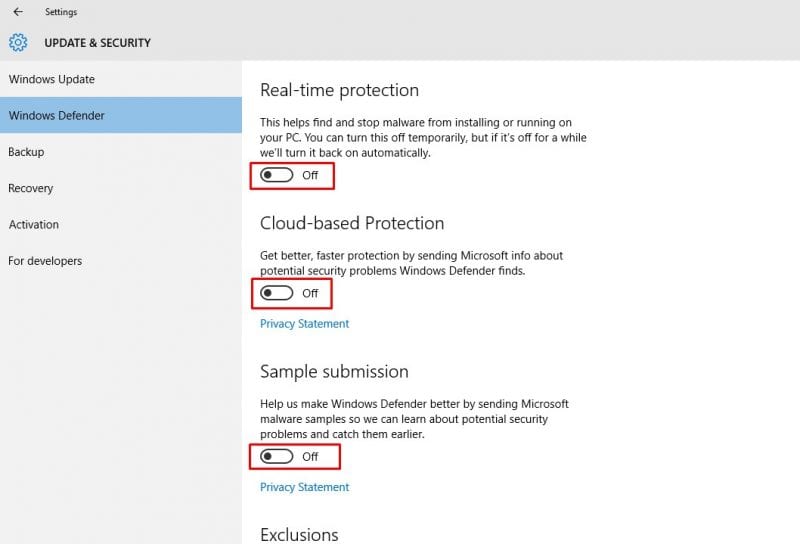
Step 3. In the next step, turn off the ‘Real-time Protection’, ‘Cloud-Delivered Protection’, ‘Automatic Sample Submission’
That’s it, you are done! This is how you can temporarily disable Windows Defender from your Windows 10 computer. Now just restart your computer for the changes to take effect.
So, these are the two best methods to disable the Windows Defender from Windows 10 computers. If you have any other doubts regarding the methods given above, then make sure to discuss it with us in the comments.


