Rooting an Android Device has become very common; many Android users have tried this out and rooted their phones. Rooting gives the admin access to the phone, and you can perform lots of cool tweaks on your Android.
And first thing to do after you root your Android is try out lots of cool apps that don’t run on non-rooted phones. But many beginners don’t know that anything wrong while rooting can brick their Android phone.
Best Ways to Install Custom Recovery On Android
And the only thing that can save your android device to come back to the initial stage is the nandroid backup, but this can only be done if you have custom recovery in your android device. So in this guide, we will be discussing the same, that is, the method to install custom recovery on your rooted android device.
Benefits of Custom Recovery In Android:
- With custom recovery, you can easily take a backup of your current ROM, which can be easily restored to revert the Android to that state, even if the device got brick.
- You can flash many custom ROMs and many more system zip files of updates, patches, and tweaks.
Installing CWM recovery Using ROM Manager Tool
This is one of the most commonly used methods and one of the best and safest methods to get the Clock Work Mod recovery on your android device. So follow the below steps to proceed.
- First, download and install the ROM manager app on your android device.
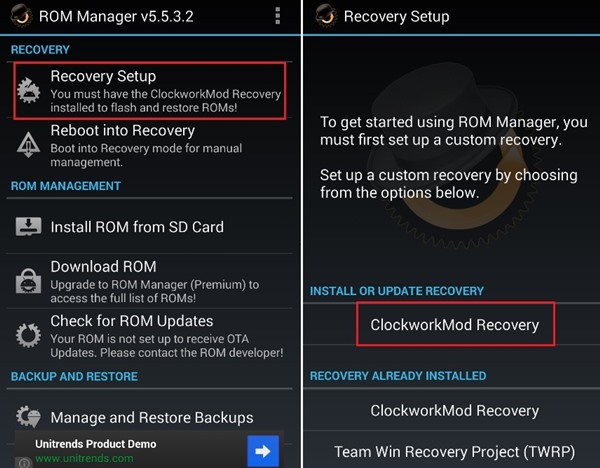
- Now launch the app, tap on Recovery Setup, and select ClockworkMod Recovery under Install or Update Recovery option.
- Confirm your device, and on the next screen, tap on Flash ClockworkMod Recovery.
- Now the app will start downloading the recovery from the internet and then ask you for Superuser access. Simply grant access.
- Now you need to return to the ROM Manager main screen and tap on Reboot into Recovery option there.
- Now the device will get a boot into the Clockwork mod recovery.
Installing TWRP recovery Using GooManager Tool
You can use this to have the custom recovery on your Android. And I only prefer this method because the above method does not work for you as some advanced users like me prefer to use the CWM rather than go for TWRP. So follow the below steps.
- Firstly download and install the app GooManager on your rooted android device.
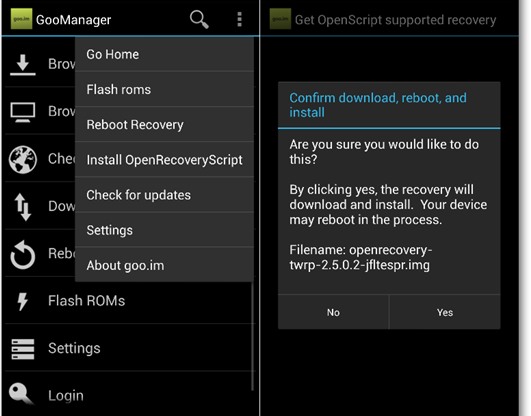
- Now open the GooManager app, click the Menu button there, and tap on Install OpenRecoveryScript from the pop-up menu.
- Now you need to confirm your action by following the screen instruction.
- Now from the list, select the right device.
- Now the app will download a .img file of TWRP and install it on your device.
- After the process is complete, reboot in recovery, and you will see custom Recovery installed on your device.
Installing Custom Recovery On MTK devices Using Mobile Uncle Tool
This is one of the cool and easy ways to get the custom recovery, and I used it many times in many of my MTK devices. So follow the steps to proceed with this method.
- First, download and install the app Mobile Uncle Tools.
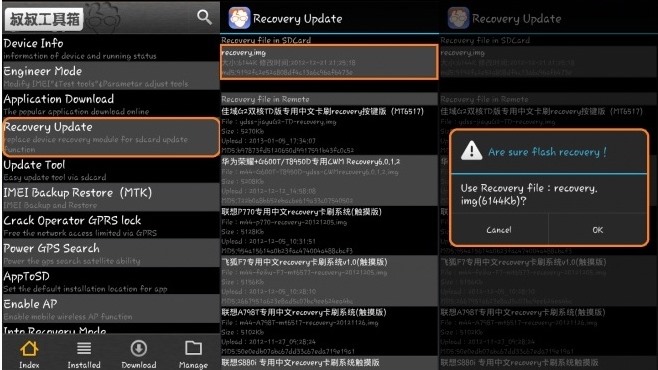
- Now launch the app and then select install Custom Recovery.
- Now the app will search for the img file compatible with your device and show you; you need to click on that.
- Downloading of the img file will start, and when it’s completed, click on it, your device will get rebooted, and the custom recovery will get flashed on your device.
So above guide was all about How To Install Custom Recovery On Android. Above, we discussed all the possible ways that you can use to install the custom recovery on your rooted Android. I hope you like this, do share with others too. Leave a comment below if you have any related queries about this.


