Android is an operating system that is mainly known for its endless sets of customization options. Like there are millions of apps available for Android that lets you perform many tasks.
Similarly, some apps enable Dolby Atmos on your Android smartphone. Dolby Atmos is a sound feature mainly seen on expensive smartphones; In contrast, the sound system requires compatible hardware; a similar sound effect can be achieved by installing a dedicated Dolby Atmos app for Android.
Steps to Install Dolby Atmos On Android
Hence, if you are looking for ways to enable Dolby Atmos on your Android smartphone, you are reading the right guide. Below, we have shared a step-by-step guide on enabling Dolby Atmos on an Android. Let’s get started.
1. First, you need to download the Dolby Atmos.zip file and boot your device into TWRP mode. You must press and hold the Volume Down and Power buttons until the device reboots.
2. Once in TWRP mode, you will see many options; you must be very careful here, as a single mistake can lead to data loss. Tap on the install option, and you will see storage files.
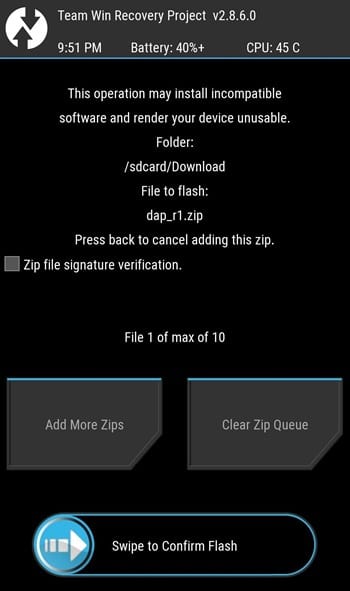
3. You need to locate the zip file you downloaded earlier. Once you select the file, you will see an option to install that file.
4. Proceed with the zip file installation; once you confirm the installation process will start, an app will get installed with the system files.
5. Now, you need to reboot your android phone. Once your device starts, you will see the Dolby Atom app on your android phone.

Now you just need to tap on the app and do any type of customization you want, and you will see that sound output will get enhanced.
So, these are some easy steps that will enable Dolby atmos on your rooted and non-rooted Android smartphone. The tool works best on a rooted Android smartphone. If you need more help enabling Dolby Atmos on Android, let us know in the comments below.


