Learn how to record your Mac’s Webcam Video without using any third-party tool, as the tool is already inbuilt into Mac operating system. All you need to access that tool to record the screen in HD, So follow the guide.
Do you know about macOS’s built-in QuickTime video player? If not, then it’s time to explore this cool feature of your MAC OS. Sometimes we need to record our video or audio when we use our webcam while video calling with some clients, friends, family, or any other then; you must be thinking about what to use to record that screen. As some of the screen recorders stop at that time when your webcam is enabled.
So if you want to record a video or audio to a local disk while using Mac’s webcam, then here is a great player: the QuickTime player, which provides the feature for recording a video or audio while using Mac’s Webcam. QuickTime is a very quick player in macOS which can be used to record a video, but it is a primitive option. So in this tutorial, we will be focusing on our topic. So have a look at the complete guide discussed below to proceed.
Also Read: How To Turn Your Android Device Just Like Mac OS
Record Your Mac’s Webcam Video
QuickTime comes with every Mac as a default video player. It can be used to record videos and audio and is commonly used to watch videos on every Mac.
You can make quick and simple video recordings of your webcam’s video feed using QuickTime Player. Follow the below steps to proceed.
Also Read: How to Fix Youtube Videos not Playing on Android, iPhone, PC, or MAC
1) Record Your Mac’s Webcam Video:
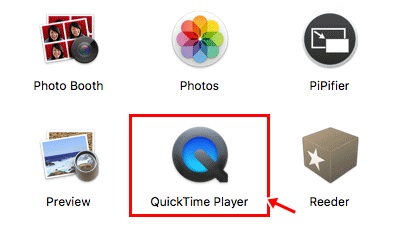
- First, you need to open QuickTime player from applications in your Mac OS.

- Then close the window by clicking the Done button and asking if you want to open a new file.

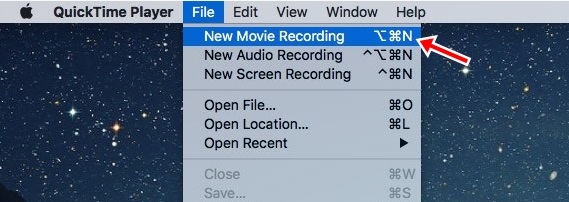
- Choose the “New Movie Recording” option from the “File” menu.

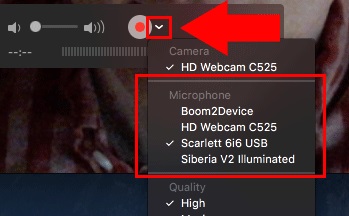
- After all these things, a new QuickTime window previews what your webcam will capture. Then click on the “Record” button and adjust yourself and your webcam to ensure everything looks perfect.
- Now click on the drop-down arrow next to the “Record” button, and there you can choose the audio options if you don’t want to record audio or anything else with the audio recording.

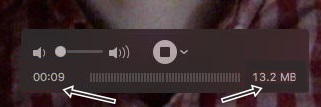
- Now click the red colored “Record” button when you think you are ready for the recording, and a timer will begin showing the length and the file size of your recording. You’ll also see a live stream of your video on your screen as it’s recorded.

- Now click on the gray colored “Stop” button to stop the video when you’re done with your recording.

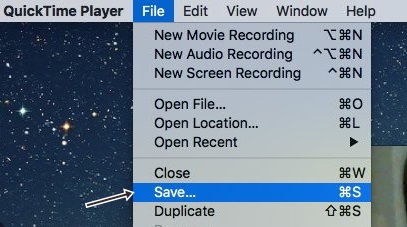
- The finished video will appear in its QuickTime Player window; choose “Save” from the “File” menu to save the file.
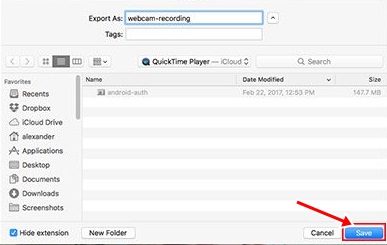
- Browse and Choose the location where you want to save your file, and finally, click the “Save” button.


2) Recording Your Webcam’s Video with VLC
If you want more features and advanced options, you need to try VLC Player. It has more advanced options as compared to QuickTime players. You can check out the advanced feature of the VLC player through the below step-by-step guide. Here are the steps to record your webcam video with a VLC player.
1. First, Install the VLC player from the developer’s website.
2. Now, Open the VLC player from the applications.
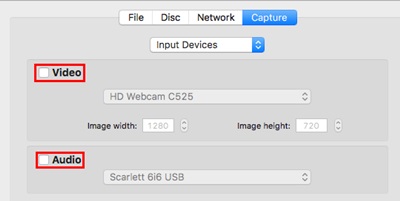
3. Open the “File” menu in the menu bar and choose “Open Capture Device.”

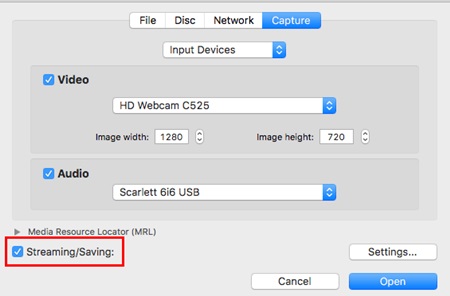
4. Another window is open, where you have to tick the checkboxes next to “Video” and “Audio.” Choose the correct audio and video input options from the drop-down list per your requirements.

5. And don’t forget to tick the checkbox next to “streaming/saving.”(This feature enables the saving of the webcam’s video)
6. You must open the “Settings” option above the “Open” button.
7. A pop-up window is open where most of VLC’s work is done. Here you can change the video settings as per your requirements.
8. Now open the drop-down list next to “Encapsulation Method” and choose your recording type. And one more thing, if you want a .mov file, then choose “QuickTime” mode.
9. Choose the location where you want to save your video by clicking on the “Browse” button.
10. Now tick the box next to “Display the stream locally” if you want to see your recordings as it happens.
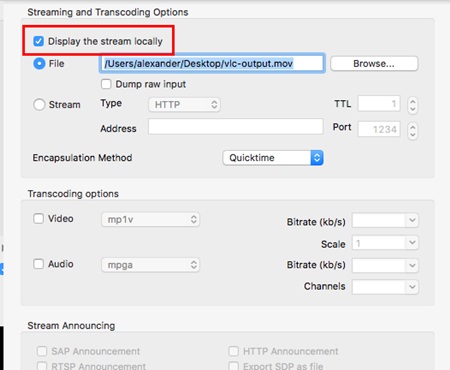
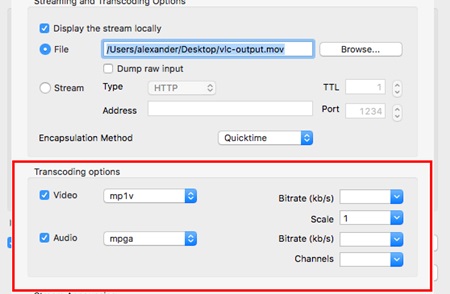
11. Use the transcoding option to compress or transcode your video file after recording.
12. Click the “OK” button when you are done with everything.
13. Click the “Open” button to begin the video recording.
14. Click the “Stop” button when you finish your recording.
Also Read: Best Security Implementations To Do On MAC
So above guide was all about how you can record a video of the webcam using the great tool QuickTime Player.
As it is the easiest way to record the video and is an inbuilt feature of your MAC, you can easily access it by following the simple steps discussed above. I hope you like the guide; keep on sharing with others too. Leave a comment below if you have any related queries about this.
")

