During the COVID-19 pandemic, many video conferencing services have recorded massive growth. Video conferencing or meeting services have become an essential productivity tool for communication and collaboration.
If we have to pick the best video conferencing or meeting service, we will pick Zoom. Zoom is a video conference service that allows people to remotely host or participate in online meetings.
Compared to other video conferencing services, Zoom offers many valuable features to its users, such as screen sharing, high-quality audio, and more. Although Zoom meeting is mainly used for business meetings & conferencing purposes, it can be used for personal one-on-one video chats with family and friends.
If you are a student or an employee and often have to attend a meeting on Zoom, at some point, you might want to record the Zoom meetings. Hence, in this article, we will share a step-by-step guide on recording a Zoom meeting. Let’s check out.
Types of Recording Options
If you are an active Zoom user, you might know that the video conferencing service provides you with two different types of video recording options – Local and Cloud. The Local option is available for every user, and the Cloud one is limited to premium accounts only.
There’s a massive difference between local and cloud recording. Local one saves your video on your system, whereas the cloud recording saves the recording to Zoom’s server.
Things to know before Recording a Zoom Meeting
There are a few things that you should know before you record a Zoom meeting. First, if you are a participant, you can’t record the Zoom meeting.
Only the host of the Zoom session can record the meeting. However, you can ask your host to permit you to record the screen.
If you are a host and want to permit a participant to record the session, you must click on the Participants button > More. Next to the Participant’s name, select the Allow Record option. Similarly, to revoke the permission, right-click on the participant’s name and select Forbid Record.
Steps To Record a Zoom Meeting
It’s pretty easy to record a Zoom Meeting, especially on the desktop operating system. You need to follow some of the simple steps we have shared below.
1. First of all, open the Zoom desktop client on your PC and sign in to your Zoom account.
2. Now, you need to host a new meeting or join an existing one as a host.
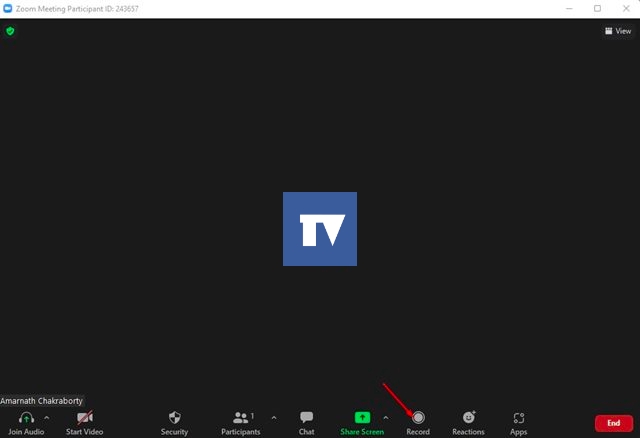
3. Now, click on the Record button during the meeting, as shown in the screenshot below.
4. If you have a Zoom premium account, you will get an option to select between Local and Cloud recording.
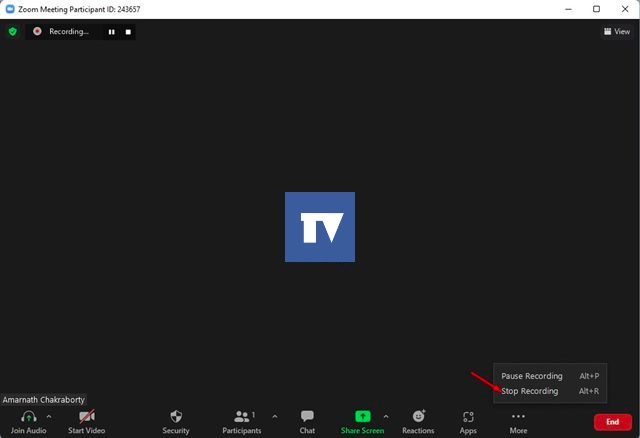
5. To stop the recording, click on the Stop button, as shown in the screenshot below. Or else, click on the More button and select Stop Recording.
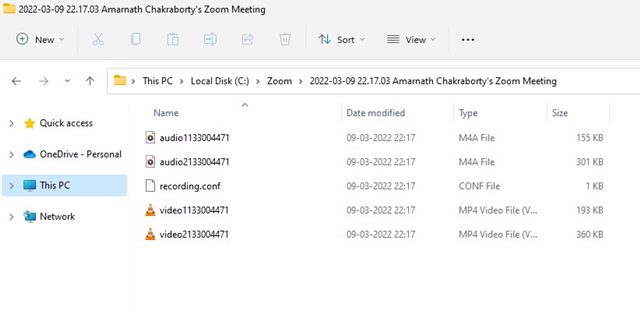
6. As you stop the recording, the clip will be saved to the C: Drive > Zoom folder on your system. You can open that folder to view the recording.
7. If you have picked the cloud recording option, visit zoom.us and log in with your account. Then, open the Recording tab to view the saved recordings.
How to Record a Zoom Meeting without permission
If you are a participant and the host is not allowing you to record the Zoom Meeting, you need to look for other ways to record a screen.
To record a Zoom meeting without permission, you need to utilize third-party screen recording softwares. As of now, there are many screen recording softwares available for Windows PC; you can use any of them to record your entire screen.
If you are going for a premium screen recorder, make sure that the screen recorder supports audio.
It’s pretty easy to record a Zoom meeting, provided you have the permission. I hope this article helped you! Please share it with your friends also. If you have any doubts about this, let us know in the comment box below.


