If you are using the trial version of Windows 10, you might have noticed an ‘Activate Windows’ watermark on the bottom-right corner of your screen. The watermark appears on every Windows and app you open on the operating system.
You can’t personalize your desktop or get Windows Defender updates without activating Windows. Also, the Activate Windows watermark everywhere looks irritating. What if I tell you that you can remove the activation watermark without really activating the operating system?
5 Methods to Remove the Activate Windows Watermark on Windows 10 & 11
It’s possible on Windows 10, but you need to make some changes to the Windows registry. So, in this article, we will share a detailed guide on how to remove the Windows 10/11 activation watermark. Let’s check out.
1. Remove Activate Windows Watermark via Powershell
Well, in this method, we are going to use Windows Powershell to remove the activation watermark. Here are some of the simple steps that you need to implement.
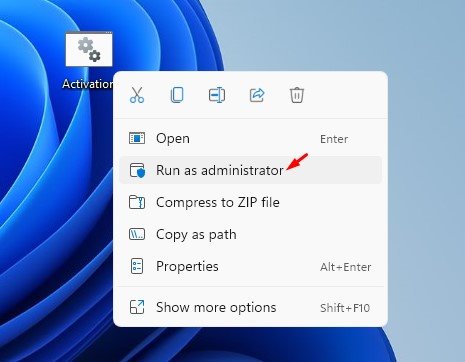
1. First of all, open Windows search and type in Powershell. Right-click on Windows Powershell and select Run as administrator.

2. On the Windows PowerShell Window, you need to execute the command given below and hit the Enter button.
slmgr /renew
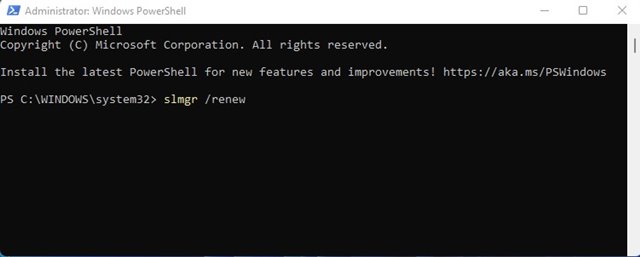
3. Once done, restart your computer.
This will renew the trial period offered by the company. You won’t see the Activation watermark on your screen within the trial period.
2. Remove Activate Windows Watermark via Registry
In this method, we will utilize the Windows Registry to remove the Activate Windows watermark. Here are some of the simple steps you need to follow.
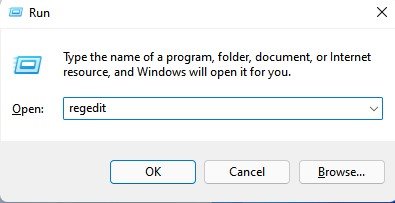
1. First, press the Windows Key + R button to open the Run dialog box. On the RUN dialog box, enter regedit and hit the Enter button.
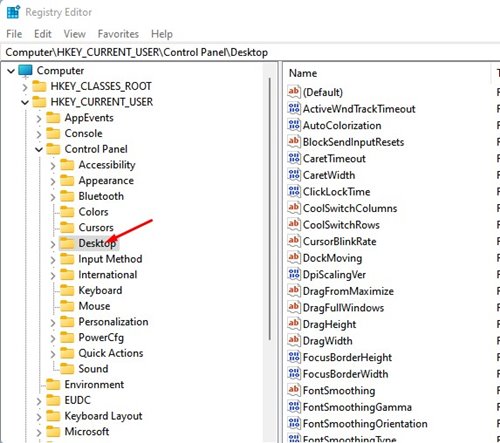
2. On the Registry Editor, navigate to the following path: Computer > HKEY_CURRENT_USER > Control Panel > Desktop.
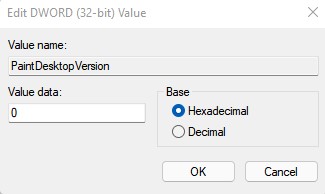
3. On the right panel, find the PaintDesktopVersion key and double click on it.
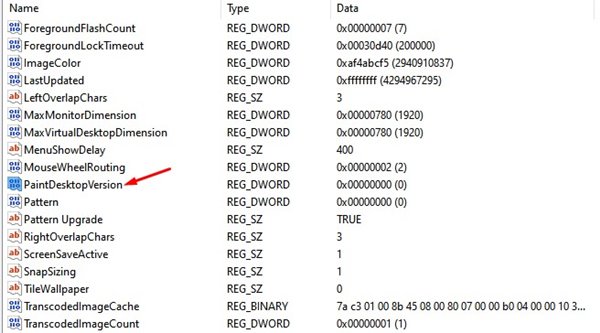
4. On the Value data field, enter 0 and click on the ‘Ok‘ button.
That’s it! You are done. After making the changes, restart your PC to remove the Activate Watermark Window.
3. Remove Activate Windows Watermark via Notepad
Well, Notepad might be a simple tool, but it’s really powerful for power users. Notepad can be used to get rid of the Activate Windows watermark. Here’s what you need to do.
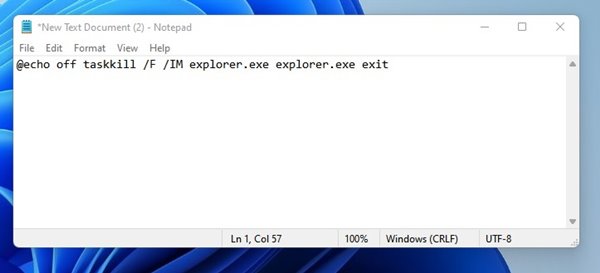
1. First of all, open a Notepad and enter the script shared below.
@echo off taskkill /F /IM explorer.exe explorer.exe exit
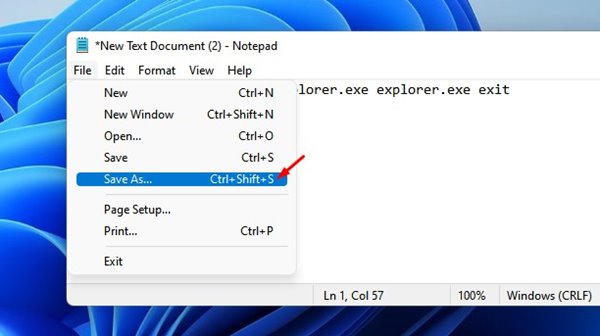
2. Now click on the File > Save as option.
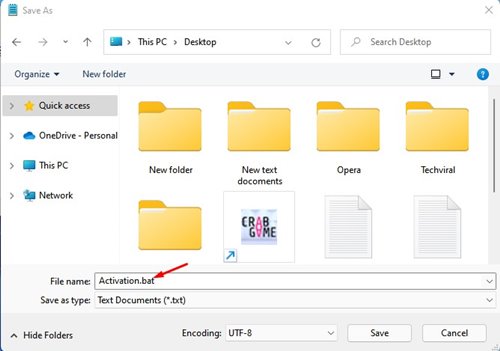
3. You need to save the Notepad with .bat extension. For example, activate.bat.
4. To remove the Activate Windows watermark, right-click on the .bat file and select Run as administrator option.
That’s it! You are done. The script will refresh your computer and will remove the activate windows watermark.
4. Purchase a License Key
Since the Activate Windows watermark appears when the Windows version is not activated, you can purchase a license key to remove the watermark.
This seems to be the easiest option to remove the activation watermark on Windows. You can purchase the digital key from the Microsoft Store directly.
You can also purchase an activation key from Amazon. The standard home version of Windows 10 costs around $139. The Windows 10 professional edition costs around $200.
5. Enter the Activation Key on Windows
If you already have a Windows Product key, you can enter it on the Windows Update settings to permanently remove the Activate Windows Watermark.
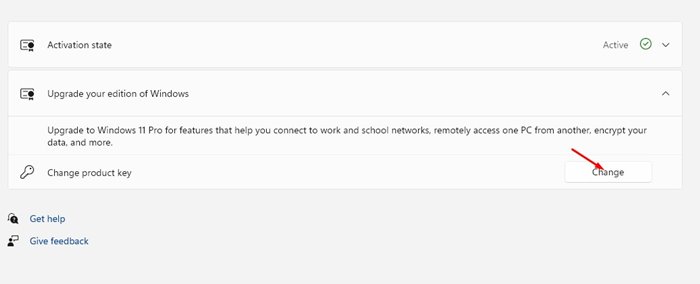
You need to head to the Settings > Updates & Security > Activation to activate Windows.
Now, on the Activation Windows, you need to click on the Change Product key option and enter the product key.
That’s it! This will activate the Windows 10 operating system.
We are pretty sure that these methods will help you get rid of the Activate Windows watermark. However, some methods listed in the article might not work with the very latest version of Windows.
I hope this article helped you! Please share it with your friends also. Also, if you have any doubts related to this, let us know in the comment box below.


