The Spotify desktop app usually works well and has fewer bugs, but it sometimes shows you some problems. Recently, many Spotify users have faced problems while playing local music files. According to the users, Spotify local files not showing on Windows 11.
Spotify not showing local files on Windows 11 can surface for various reasons. It may fail to show the local music files due to incorrect settings, corrupted cache data, corrupted app installation data, etc. Whatever it is, if you are dealing with the same problem, follow these methods to troubleshoot it.
1. Restart your Windows 11 PC

Before you follow the next methods, it’s recommended to restart your Windows 11 computer. Restarting is usually the first choice for dealing with bugs and glitches that prevents the app from functioning correctly.
If the Spotify app is not showing local music files due to a bug, a restart may fix it. To restart Windows 11, navigate to the Windows 11 Start button > Power Menu > Restart.
2. Make Sure Local Files are Turned on
Spotify doesn’t show the local files by default; there’s a setting in the app that needs modification to show the local files. Here’s how you can show local files on the Spotify app for desktop.
1. Click on the Windows 11 search and type Spotify. Open the Spotify application from the list of matching results.
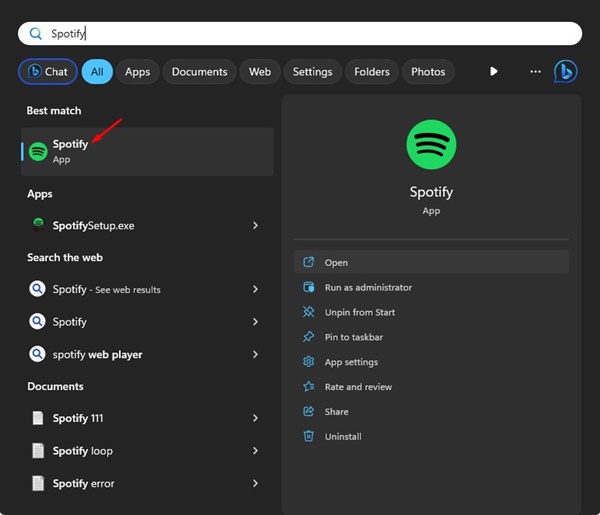
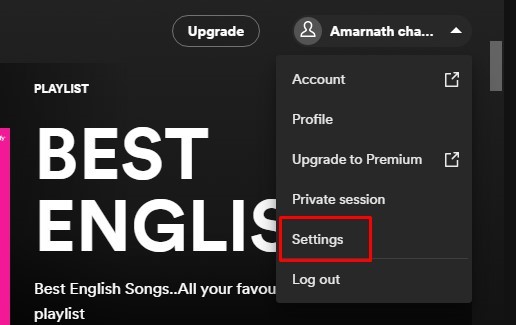
2. When the Spotify app opens, click the profile icon at the top right.

3. Select Settings on the list of menu options that appear.

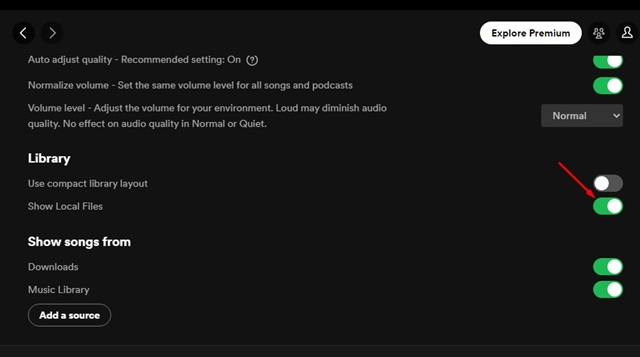
4. On the Spotify settings, scroll down to the Library. Enable the toggle next to Show Local Files.
3. Add Music Folders to Spotify Manually
You must manually add the source folder after enabling the Show Local Files option. Here you must select the folders where you’ve stored the music files on your PC. Here’s what you need to do.
1. Click on the Windows 11 search and type Spotify. Open the Spotify application from the list of matching results.
2. When the Spotify app opens, click the profile icon at the top right.
3. Select Settings on the list of menu options that appear.
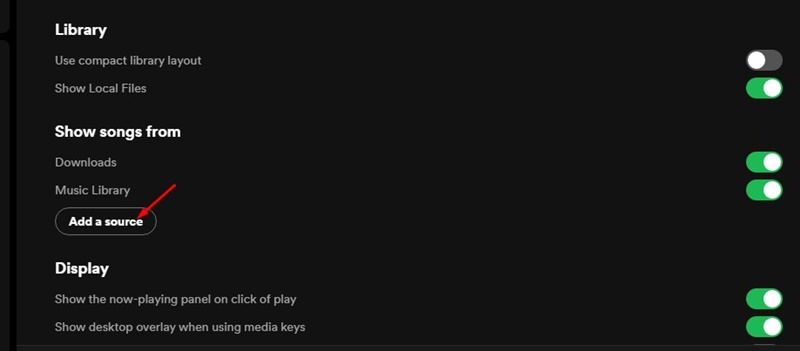
4. Underneath the Show Songs from section, click on Add a source.
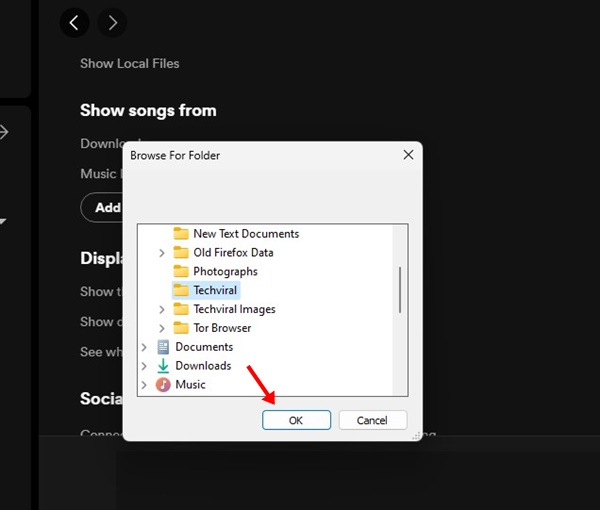
5. Select the folder where your local music files are saved and click Ok.
After making the changes, Restart the Spotify app for desktop. After the restart, the local music files should appear in the Spotify desktop app.
4. Remove the Index.bat in Spotify’s Storage Folder
Spotify app creates an index.bat file during the installation. It’s responsible for locating and playing music both online and locally. If this file is corrupted, local music files won’t show up, or you may experience playback issues. So, removing the index.bat file from Spotify’s storage folder is best to force the app to rebuild it.
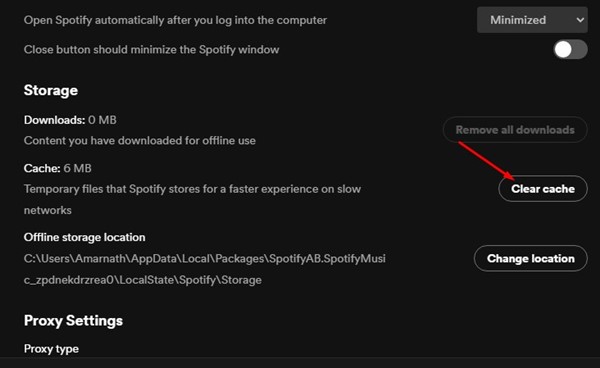
1. Open the Spotify app and navigate to Profile > Settings > Storage > Offline Storage location.

2. Note down the offline storage location and navigate to its location from your PC’s file explorer.
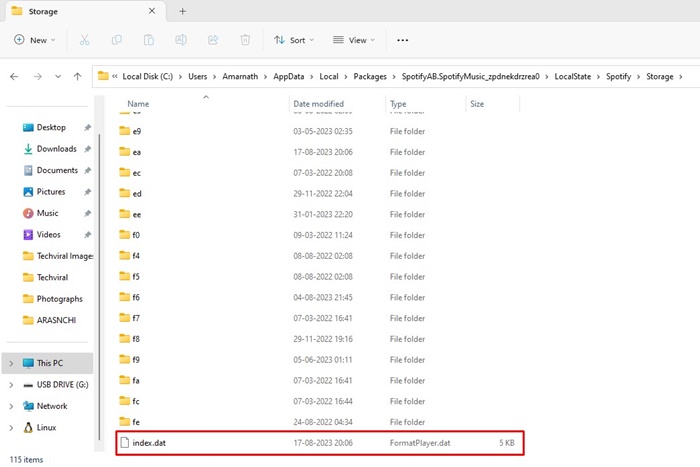
3. Find the index.dat file, right-click, and select Delete.
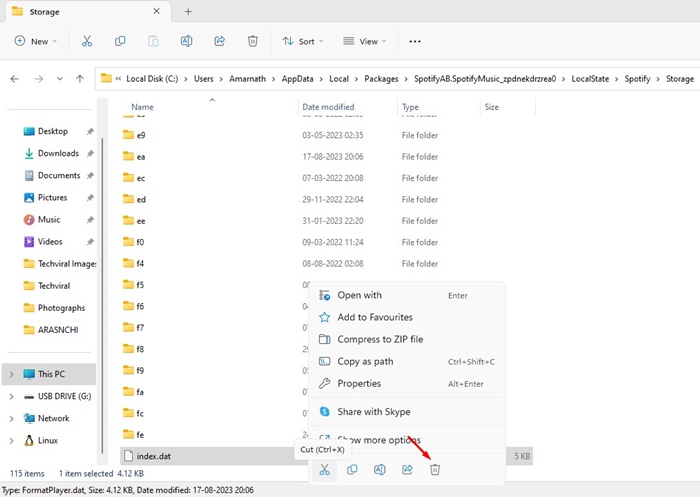
Now restart the Spotify application and check if the local files are showing.
5. Allow Spotify through Windows Firewall
Firewall or Antimalware programs can sometimes block the Spotify app from accessing the local files. If this happens, you must allow Spotify through your Windows Defender Firewall. Here’s what you need to do.
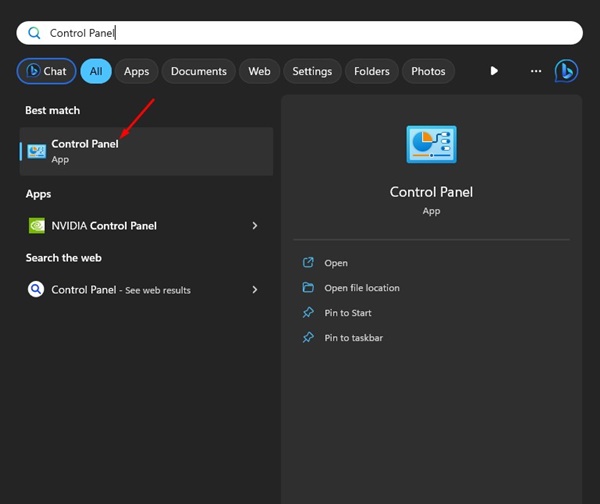
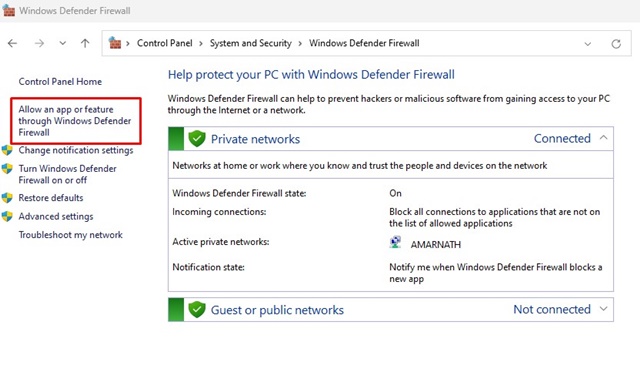
1. Type in Control Panel in the Windows Search. Open the Control Panel app from the list of matching results.
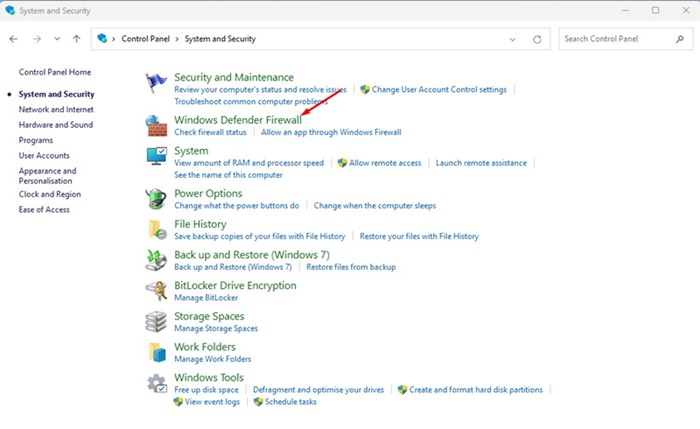
2. On the Control Panel, select System and Security > Windows Defender Firewall.
3. On the right side, click on the Allow an app or feature through Windows Defender Firewall link.
4. Now click on the Change Settings button.
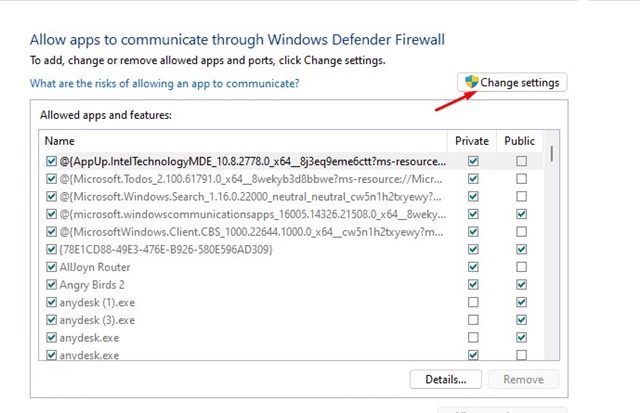
5. Find and check the Spotify music and click Ok to save the changes.

After making the changes, make sure to restart your computer. The change will apply only after you restart your computer.
6. Make sure the Music file formats are compatible
Spotify is compatible with only a handful of music file formats. Currently, it supports audio formats like MP3, MP4, M4A, so if the music files are saved on your local storage or any other format, they won’t appear.
So, you need to make sure your files are in a Spotify supported format. You can use video converter apps for PC to convert those audio files into MP3, MP4, or M4A.
Once converted into a compatible format, they should appear in the Spotify application.
7. Clear the Spotify App Cache
Like every desktop and mobile app, the Spotify app also creates and stores cache data to enhance the user experience. If this cache data is corrupted, the desktop app may behave weirdly.
It can start showing playback issues, connectivity issues, etc. Chances are that Spotify not showing local files on Windows 11 is because of the corrupted cached data. Hence, it’s best to clear the Spotify cache data to fix the problem.
1. Launch the Spotify app, click on your profile icon at the top right.

2. On the menu that appears, select Settings.
3. On the Spotify Settings, scroll down to the Storage section.
4. Now click on the Clear cache button beside Cache.
5. On the Clear Cache? Confirmation prompt, click on the Clear Cache.
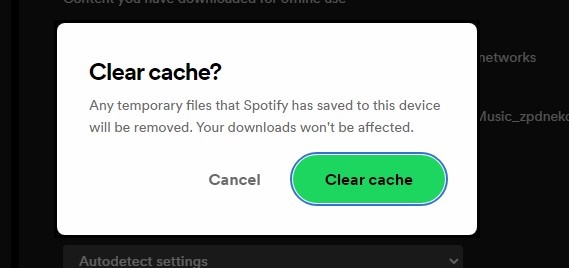
This will clear all saved Spotify cache files. Make sure to restart the Spotify app after clearing the cache.
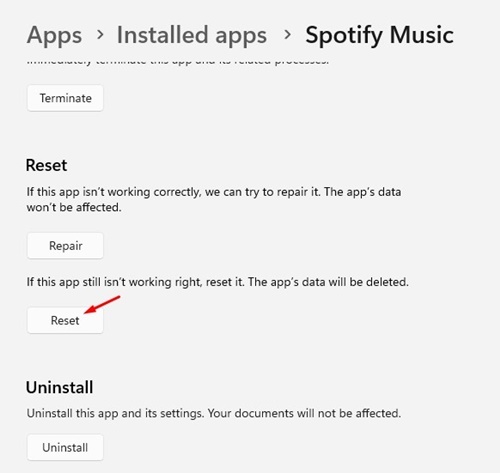
8. Repair & Reset the Spotify app
Many users on the Microsoft & Spotify forums have claimed to resolve Local files not showing on Spotify issues by resetting the app. You can do the same if the issue is still not fixed. Here’s how to repair & reset the Spotify desktop app.
1. Press your keyboard’s Windows + 1 button to open Windows 11 Settings.
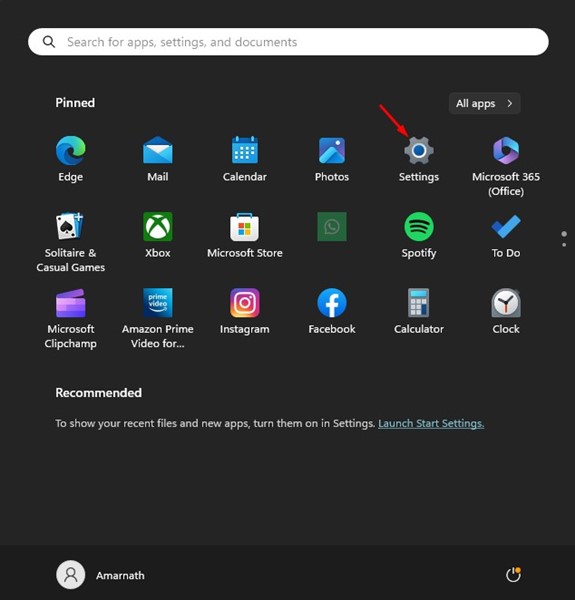
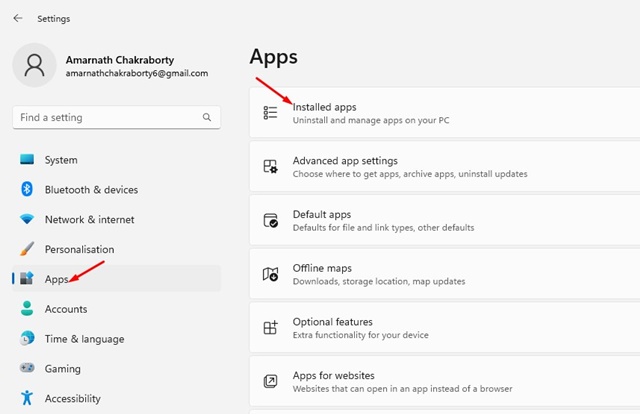
2. On Settings, navigate to Apps > Installed Apps.
3. Find Spotify Music; click the three dots beside it. On the menu that appears, select Advanced options.
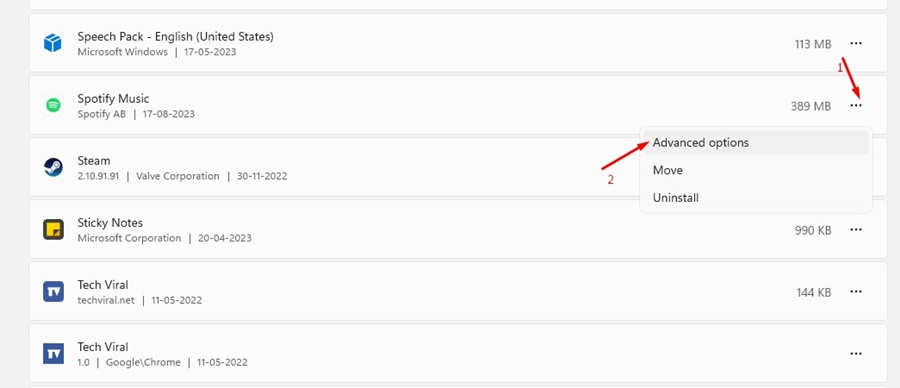
4. Scroll down to the Reset section and click the Repair button.
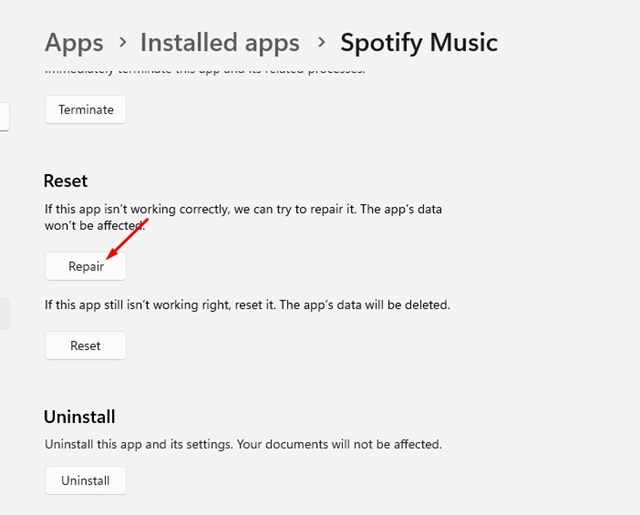
5. If repairing didn’t work, click on the Reset button.
This is the easiest way to repair & reset the Spotify application on a Windows 11 computer.
9. Update the Spotify App
If Spotify still can’t find the local files, downloading all pending Spotify app updates is the next best thing to do. Here’s how you can update the Spotify desktop app.
1. Launch the Spotify app, click on the profile icon.
2. On the menu that appears, check whether any update is pending. If any update is available, you will see Update available. Restart Now option.
That’s it! This will update the Spotify desktop app to the latest version and fix local files not showing issue.
10. Reinstall the Spotify App
If you’ve followed all the methods shared until now, chances are that Spotify local files not showing might have already been fixed.
However, if the Spotify app is still not showing the local files, you have hard luck. There are not many options left apart from reinstalling the Spotify application or contacting the support team.
You can uninstall Spotify from the Control Panel and install it again. You can even try contacting the Spotify support team for further help.
These are the best & working methods to fix Spotify not showing local files on Windows 11. These are general troubleshooting tips that can resolve many Spotify problems. Let us know which method worked for you to fix local files not showing on Spotify.

