Here in this article you will come to know about the method by which you can add your own ringtones and notifications in android. Adding your own notifications and ringtones can be a great fun, it makes your device feel more of yours whenever you get any new notifying sounds or when your phone rings.
Android is the popular platform for smartphones or smart devices as it provides great control over almost every aspect of the functioning etc. You can change everything on this device from wallpaper to even launcher, change the ringtones, notification tunes etc. If you are the one who wants to play with every aspect on the phone then you may also be the one who would like to change the default ringtones and notifications.
Also Read: How to Create & Restore Nandroid Backup for Rooted Android
How to Add your Own Ringtones and Notifications Sound on Android
Follow up the steps below to know how to add your own ringtones and notifications.
Steps To Add your own Ringtones and Notifications:
1. Firstly, download the media or the sound file that could be any song or any beat that you wish to be your notification or ringtone. You will have to locate the file to the particular location that could be accessed later on. You can also skip this step if you have the media already stored on your local storage. Keep one thing in mind that the media or the sound file should have .mp3, .m4a , .wav formats only.
2. Cut the sound clips from the sound files if you wish to play particular part of the sound file. You can use any Tool to do so on android as there are many tools that are available out there. After that you have to store the cut out to the particular location that you can access later on.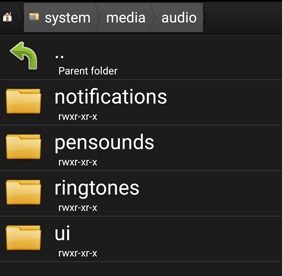
3. Now surf up the storage on your device and check for the Ringtones or Notifications folder out there. If it is present there then copy all your sound files and paste them all in this folder. If there is no folder named as such then you can make your own with the same name and then paste the sound clips that you made till step 2.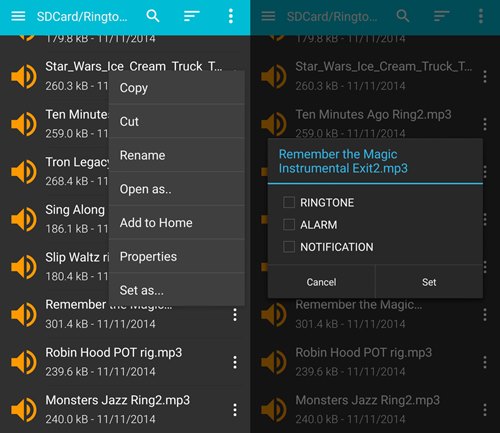
4. What all you have do now is to reboot the phone and then open up the settings of your android device and head towards the notifications or ringtones settings. Your device will now identify the sound clips that you have saved in the step 3 and you will just have to choose from the list. You can select the desired sound clip from the list and make it your notification or ringtone.
Also Read: Best Android Tricks 2016 & Android Hacks
So this is the method that you can apply to make your own ringtones or notifications. Just follow the steps and you can easily add the desired sound files to the list of your notifications or ringtones. Next time you will just have to surf through the simple settings to make up the changes to your notifications or ringtones.


