If you have been using the Windows operating system for a while, you might know that the operating system names every newly created folder as New Folder. ‘New Folder’ is the default name of every folder that you create on the operating system.
Once created, users have the option to rename the folder. Renaming folders in Windows 10 is relatively easy; right-click on the folder, select the ‘Rename’ option, and type in the new name. If a user doesn’t assign any name to a folder, it will appear as ‘New Folder’
Some may not like the default folder name and want to use their preferred name or something unique. If you also want to change the default name for new folders in Windows 10, you are reading the right article. In this article, we will share the best method to change the default New Folder name on Windows 10. Let’s check out.
Also Read: How to Allocate More RAM to Specific Programs On Windows 10
Steps to Change the Default New Folder Name in Windows 10 PC
Important: To change the default new folder name, we need to use the Registry editor. So, make sure to follow the steps carefully to avoid any errors.
Step 1. First of all, hold Windows Key + R on your keyboard to open the RUN dialog box.

Step 2. On the Run dialog box, enter ‘Regedit‘ and hit the Enter button.

Step 3. This will open the Registry Editor on your Windows 10 PC.
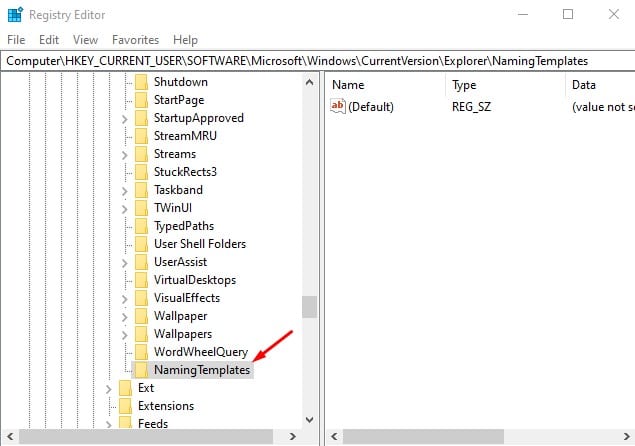
Step 4. Now, navigate to the following path – HKEY_CURRENT_USER\SOFTWARE\Microsoft\Windows\CurrentVersion\Explorer
Step 5. Under the current directly, find the option ‘NamingTemplates’. If you don’t see the directory, right-click the ‘Explorer’ directory and select New > Key. Enter the new key as ‘NamingTemplates’ and press Enter.
Step 6. Select the ‘NamingTemplate’ directory. On the left pane, right-click anywhere on a blank space and select New > String Value.
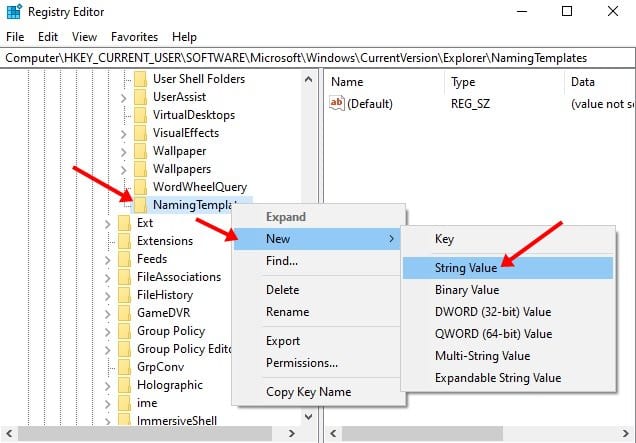
Step 7. Next, type in ‘RenameNameTemplate‘ as the name for the new string value, and press the ‘Enter’ button.
Step 8. Double click on the ‘RenameNameTemplate’ entry, and on the Value Data, enter the name you want to assign. For example, here we have entered ‘Techviral’. So, every new folder that I will create will be named ‘Techviral’
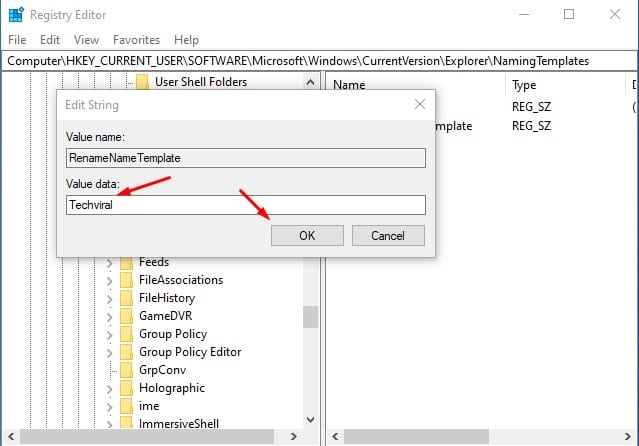
Step 9. Once done, click on the ‘Ok’ button to save the changes.
Step 10. Once done, open task manager and find Windows Explorer. Right-click on it and select ‘Restart’

Step 11. If you wish to revert the changes, delete the registry value you created in Step no.5.

That’s it! You are done. This is how you can change the default new folder name on Windows 10 computer.
So, this article is all about how to change the default new folder name in Windows 10 computer. I hope this article helped you! Please share it with your friends also. If you have some doubts related to this, let us know in the comment box below.
")

")