Learn to customize the Manufacturer Info for your Windows PC with the help of a simple registry hack that will allow you to change the info according to your wish, So follow the tutorial to proceed.
If you’ve ever utilized a PC worked by an expansive maker, for example, Dell or HP, you’ve likely seen the custom data in the System segment of the Windows Control Panel. Producers regularly include a PC’s make and model, a custom logo, and bolster data to this window keeping in mind the end goal to help clients.
However, if you’ve fabricated your PC, or introduced a perfect duplicate of Windows, this data is absent. Gratefully, clients can include or alter this data reasonably effectively, which can prove to be useful in case you’re building PCs for others or on the off chance that you essentially need to add a touch of identity to your Windows PC. Here’s how to customize the manufacturer and support information in Windows.
Also Read: How to Fix Problem of Windows 10 Bluetooth Not Working
Steps to Customize the Manufacturer Info for Your Windows PC
Below we have discussed some ways by which you can easily customize the manufacturer for your Windows PC.
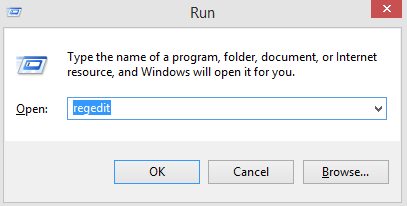
- To alter your registry, first, open the “Run” window by right-tapping on the lower-left corner of the Desktop and picking “Run” or by propelling the Start Screen and writing “Run.” (Windows 7 clients will discover “Run” on their Start Menu).
- Type “Regedit” and press Enter or snap “Ok” to open the Windows Registry Editor. You might be provoked for regulatory access by User Account Control; click “Yes” to concede approval.
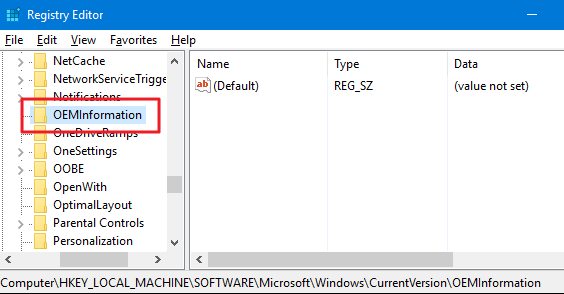
- Next, explore to the accompanying key:
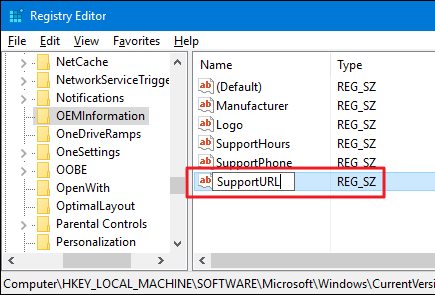
HKEY_LOCAL_MACHINE\SOFTWARE\Microsoft\Windows\CurrentVersion\OEMInformation - If your PC as of now has manufacturer and support data, you’ll see various strings recorded: Logo, Manufacturer, Model, SupportHours, SupportPhone, and SupportURL.
In case you’re working with a clean introduction of Windows, these qualities will probably be missing. The names are clear as crystal in this way, once you choose what sort of data you need to be recorded in your Control Panel, just make values for each wanted to field.
- To make another esteem, with the OEMInformation key chose on the left, right-tap on the correct side of the Registry Editor window, and picked New > String Value. Give it one of the names recorded above relying upon what esteem you’re making. For instance, to include a manufacturer name, name it “Manufacturer” and press Enter.
- Next, double tap on the esteem to open the Edit String window and sort your custom data into the Value Data box. In our illustration, we’ll recognize the PC’s custom producer as TekRevue.
- Press OK to save the value and after that launch Control Panel > System. You’ll see your new Manufacturer data recorded under the “System” segment of the window. On the off chance that you include different qualities, for example, a bolster phone number or site, they’ll show up in a different “Support” segment of the window.
As should be obvious from our case, you can likewise utilize a custom logo picture. For best outcomes, diminish the span of your picture to close to 150 pixels wide or tall and spare it as a 24-bit bitmap (BMP) picture record. You can spare this picture anyplace and just point the “Logo” esteem to the way on your drive where it lives, yet the default name and area of a logo document is:
C:\Windows\System32\oemlogo.bmp
Take note that you’ll require managerial benefits to adding records to this organizer or adjust a current document.
With these straightforward strides, you can make totally custom framework data for your PC. As specified before, this can prove to be useful in case you’re building PCs for others, or if you simply need to include an interesting and custom angle to your framework.

