YouTube is possibly the most popular video-sharing/streaming site out there, and the reason behind that is simple: compared to other video sites, YouTube has more content. Even though YouTube is mostly bug-free, many users still encounter errors while watching videos on the platform.
Recently, many users have messaged us asking how to fix the ‘Audio Renderer Error’ on YouTube’s video player interface. So, in this article, we will discuss everything about the Audio Renderer error on YouTube and how to fix it.
What is Audio Renderer Error on YouTube?

Well, the Audio Renderer Error appears while you are trying to play videos on YouTube. Users see a blank screen on the YouTube video player with the phrase Audio Renderer error. Please restart your computer.
The error message is not limited to only one or two videos; it appears whenever users try to play a video on the site. Also, the problem appears on different web browsers such as Opera, Edge, Firefox, and even Google Chrome.
How to Fix Audio Renderer Error on YouTube
Several factors lead to audio renderer errors on YouTube. Below, we have shared different things known to trigger audio-rendered errors while watching videos on YouTube.
- Audio Driver Problem
- A problem with the web browser
- A problem in BIOS or Outdated BIOS Version
- System File Corruption
These are the possible causes known to trigger Audio Renderer’s error on YouTube. Below, we have shared a few of the best methods to help you fix the problem.
1. Replug the headphones

Many users have reported that the Audio Renderer error has been fixed after unplugging the headphones and plugging them back in. It’s a simple step, but it can fix the problem for you.
Therefore, if you are experiencing problems like Audio Renderer error on YouTube, you need to unplug/plugin the headphones cables. If the method doesn’t work for you, you must try the following methods.
2. Restart your Windows 11 PC

If you read the error message carefully, you will find that the error itself says to restart the computer. A simple restart stops all background processes and allows your system to cool down.
Therefore, make sure to restart your Windows 11 PC to resolve the ‘Audio Renderer error. Please restart your computer’s error message.
3. Update Your Audio Driver
Outdated drivers are often the common reason for many Windows errors. So, the next best thing you could do to fix the Audio Renderer Error in Windows 11 is to update your Android driver.
An outdated audio driver sometimes leads to an ‘Audio Renderer error’; hence, you need to update your audio driver to fix the YouTube audio problem. To update your Audio driver, follow some simple steps shared below.
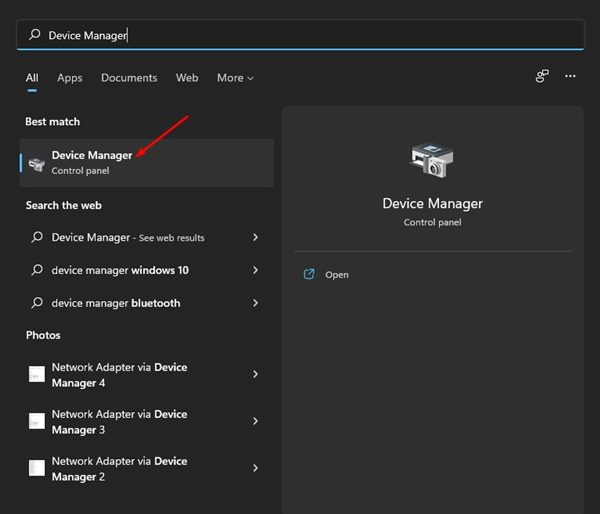
1. Open the Windows 11 search and type in Device Manager. Next, open Device Manager from the list.
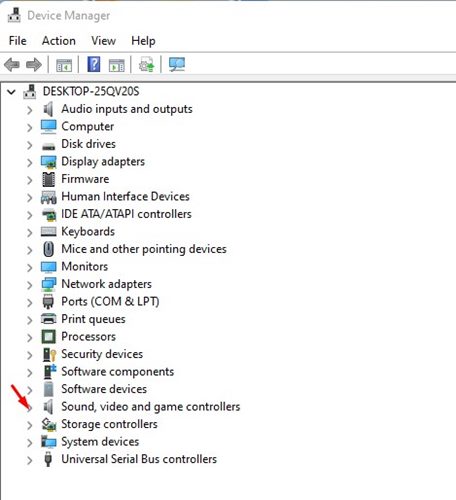
2. On the Device Manager, expand the Sound, Video, and game controllers section.
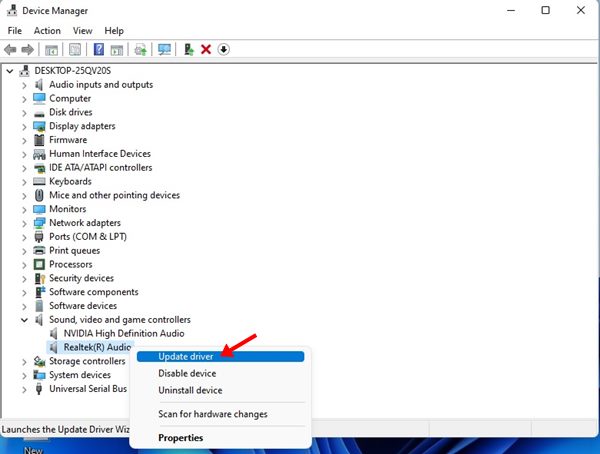
3. Now, click on the Audio device and select Update Driver.
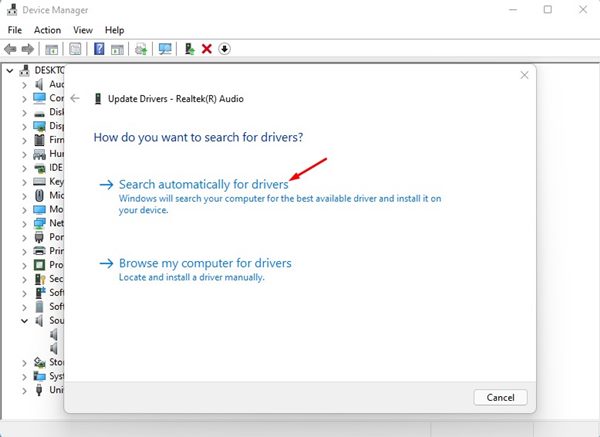
4. On the Window that pops up, click on the Search automatically for drivers.
That’s it! You are done. This will update the Audio Device driver on your Windows 11 computer.
4. Uninstall the Audio Driver
If the above method fails to fix your problem, uninstall the audio driver. Uninstalling the audio driver will force Windows 11 to reinstall the audio driver during the restart, which might fix the error for you.
1. Open the Windows 11 search and type in Device Manager. Next, open Device Manager from the list.
2. On the Device Manager, expand the Sound, Video, and game controllers section.
3. Right-click the Audio device and select the Uninstall device option.
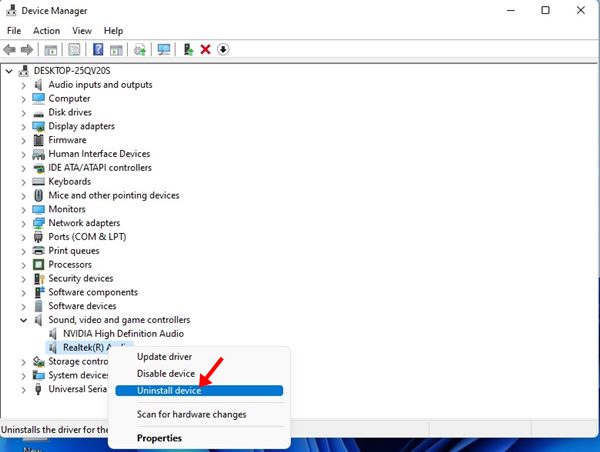
That’s it! You are done. This will uninstall the Audio driver. After uninstalling, restart your PC to reinstall the latest version of your audio adapter.
5. Re-Enable the Audio Device
If the methods we shared failed to fix the YouTube Audio Renderer Error on Windows, you must re-enable your audio device. It’s pretty easy to re-enable an audio device on Windows 11; follow the below steps.
1. Open the Windows 11 search and type in Device Manager. Next, open Device Manager from the list.
2. On the Device Manager, expand the Sound, Video, and game controllers section.
3. Now, right-click the Audio device and select the Disable Device option. This will disable the audio device.
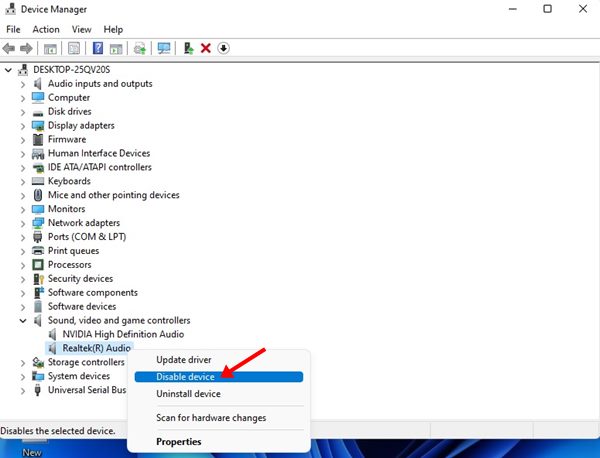
4. Now, wait a few minutes, right-click on the Audio Driver, and select the Enable Device option. This will enable the audio device again.
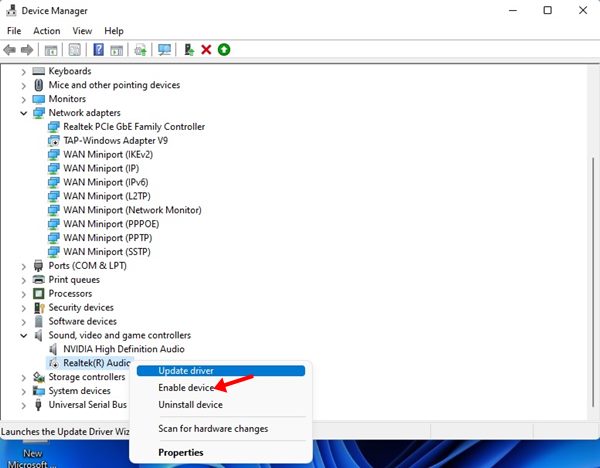
That’s it! You are done. This is how you can re-enable an audio device in Windows 11 operating system.
6. Run the Audio Troubleshooter
If all methods fail to fix the Audio Renderer Error on YouTube, you must run the Audio Troubleshooter. This will most probably scan your PC for audio-related problems and resolve them. Here’s what you need to do.
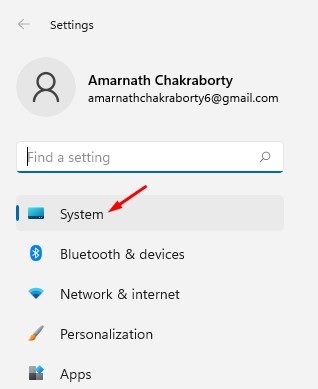
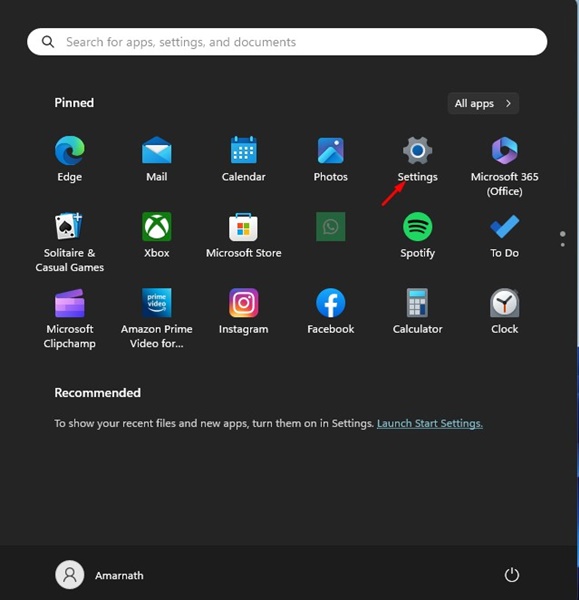
1. Click on the Windows 11 Start button and select Settings.
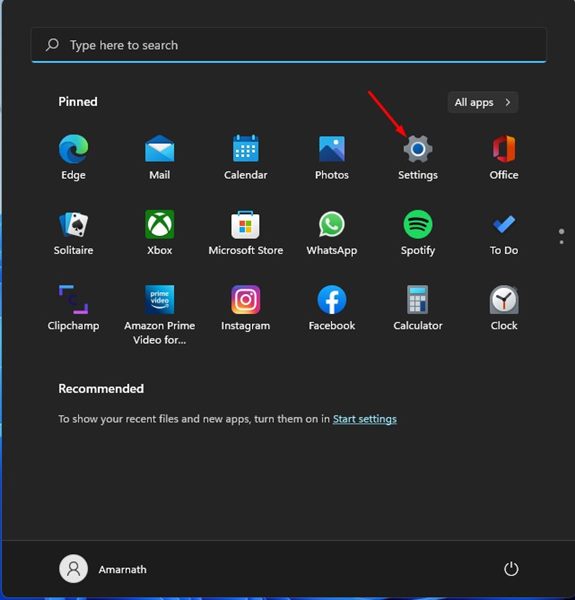
2. On the Settings app, click on the System.
3. On the right pane, click on the Troubleshoot option as shown below.
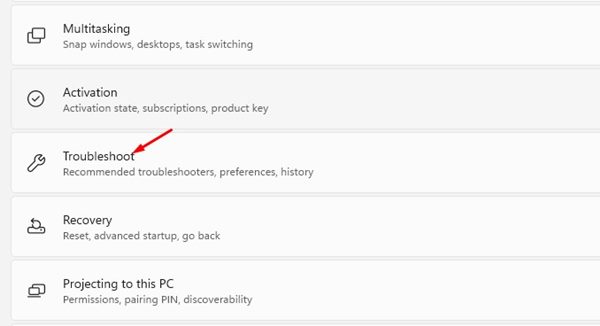
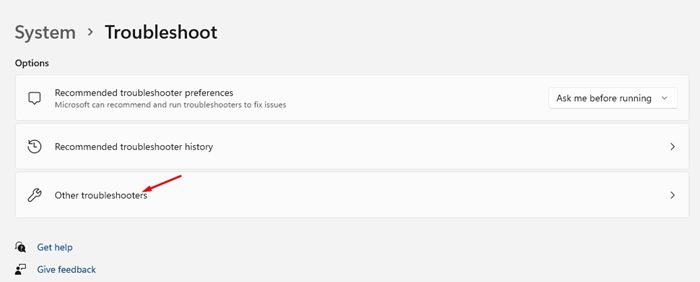
4. Under the Troubleshoot, click on the Other Troubleshooters option.
5. On the next screen, click the Run button beside the Playing Audio to run the Audio Troubleshooter.
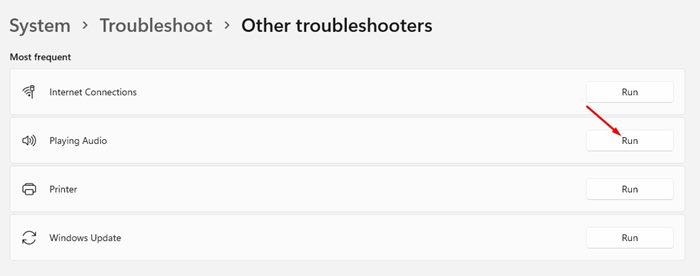
6. Now, you will be asked to select the audio device. Select the audio device you are using and click on the Next button.
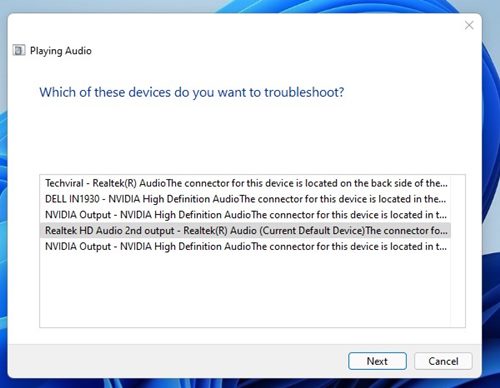
Now, you need to follow the on-screen instructions displayed by the Audio Troubleshooter to fix the YouTube Audio Renderer error on Windows 11.
7. Disable the Hardware Acceleration on the Browser
Hardware acceleration is a great feature as it improves the graphical performance. However, the hardware acceleration of web browsers, especially Google Chrome, triggers various problems.
Many users have claimed to fix YouTube audio render errors just by disabling the hardware acceleration of their Chrome browser. Hence, you can try disabling it as well. Here’s what you need to do.
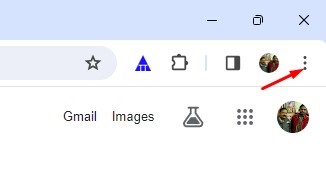
- Open Google Chrome and click on the three dots at the top right.
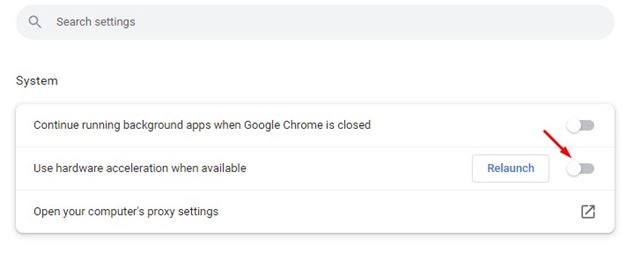
- On the menu that appears, select Settings > Advanced Options.
- Now switch to the System and disable the Use hardware acceleration when available.
That’s it! After making the changes, restart your Chrome browser and play the YouTube video again. This time, you won’t get the YouTube audio renderer error.
8. Clear the Browsing Data
As we all know, outdated or corrupted browser cache data can trigger various problems, and one of those problems is the Audio Renderer error on YouTube.
You can get rid of corrupt cache data by clearing the saved cache data of your web browser. Here’s what you must do if you use Google Chrome web browser.
1. Click on the three dots at the top right corner.
2. On the Chrome menu, click on the Clear Browsing data.
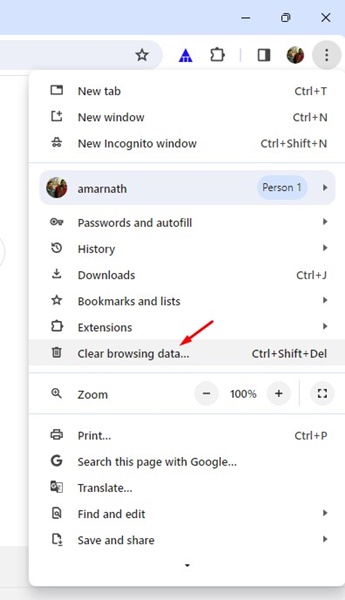
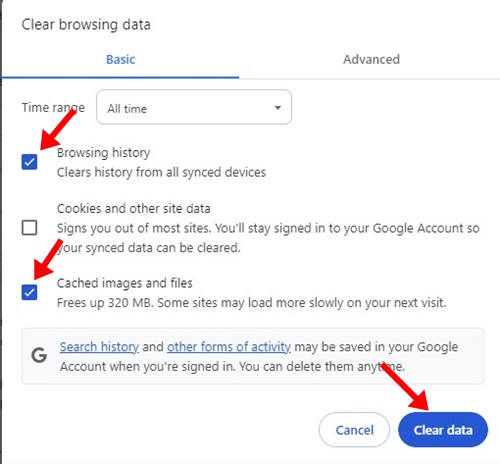
3. On the Clear Browsing data prompt, select All Time on the Time Range and select Browsing History, Cached Images and Files. Once done, click on the Clear Data button.
That’s it! This will clear the browser cache & history. Once done, relaunch the web browser and play the YouTube video.
9. Disable the Audio Enhancements
Windows 10/11 introduced a few audio enhancement features that improve the overall sound quality. While the feature is useful, it can be responsible for the YouTube audio error. So, it’s best to disable it and check whether the problem is fixed.
1. Click on the Windows Start button and select Settings.
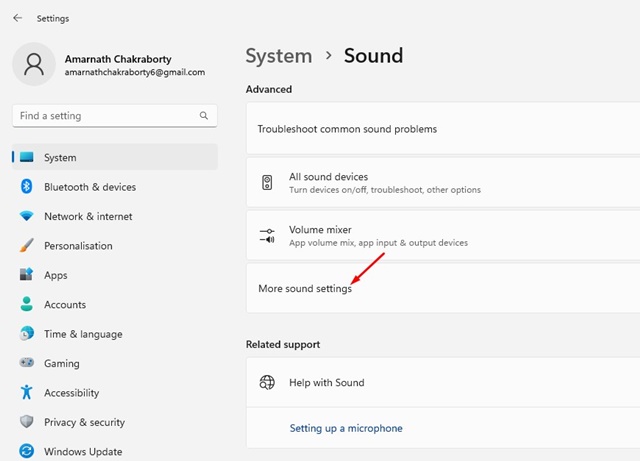
2. On Settings, navigate to System > Sound > More Sound Settings.
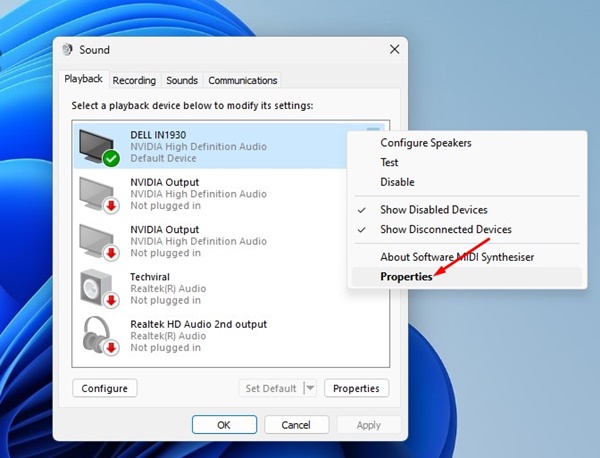
3. Right-click on the connected speaker and select Properties.
4. Now, switch to the Enhancements tab.
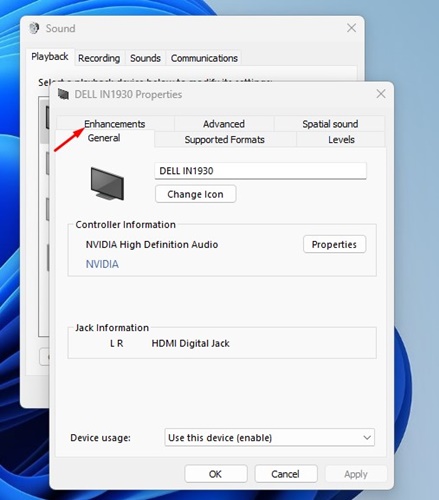
5. Check the Disable all enhancements and click on the Apply button.

After making the changes, make sure to restart your computer. After the restart, play the YouTube video again.
10. Update BIOS
Although it’s not a sure-shot fix to the Audio Renderer error in Windows 11, many users have claimed to resolve the issue by updating their BIOS firmware. To update the BIOS firmware, visit your motherboard/laptop manufacturer’s website.
For example, if you use an ASUS Motherboard, you must search on Google ‘Asus (model name & version) BIOS update’. You will find many guides; stick with the official one and follow that to update your BIOS firmware.
Audio Renderer Error on YouTube can cause problems, especially if you are a video creator on YouTube. I hope these methods will help you fix the error on Windows 11. If this article helped you, please share it with your friends. Also, if you have doubts about Audio Renderer Error on YouTube, let us know in the comment box below.


