On Windows 11, you don’t really need to visit any software download websites to download your favorite software. Instead, you can use Microsoft’s Windows Package Manager to install programs on your Windows 11 system.
Windows Package Manager or winget is a command-line tool that enables users to discover, install, upgrade, remove, and configure applications on the Windows operating system. You can rely on winget to install software even on Windows 10 operating system.
Since Windows Package Manager is a command-line program, you need to use the Command Prompt utility of Windows 11 to install programs on your system. The package manager will first download the files and will install the programs on your PC.
Also Read: How to Install Google Play Store on Windows 11
How to Install Multiple Apps on Windows 11
One can also use winget to install multiple apps on Windows 11. So, if you are interested in installing multiple apps using winget on Windows 11, you are reading the right guide.
In this article, we will share a step-by-step guide on installing multiple apps quickly on Windows 11 operating system. So, let’s check out.
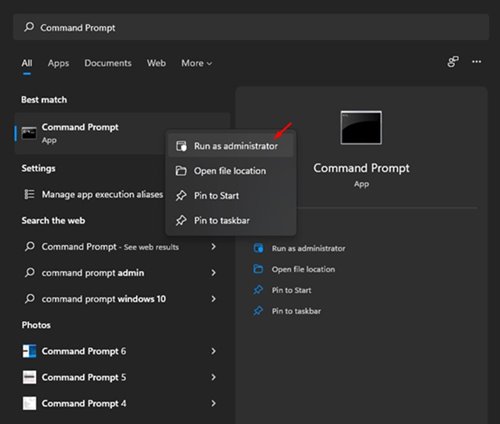
1. First of all, click on the Windows 11 Search and type in Command Prompt. Right-click on the Command Prompt and select Run as administrator.
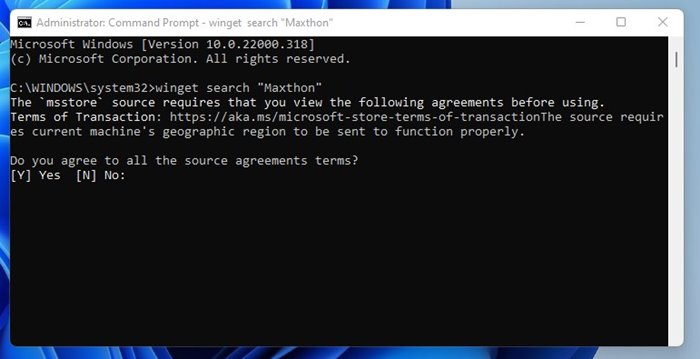
2. Now, on the Command Prompt, you need to execute the Command to search for an app. For that, you need to execute the Command:
winget search "APP NAME"Important: Make sure to replace the “APP NAME” with the name of the app you want to install. For example, “Maxthon”
3. Now, Command Prompt will ask you to agree to the source agreements. Press the Y button on your keyboard and then hit the Enter button.
4. Now, winget will search for the application. On the app listing, you need to note down the ID of the app.
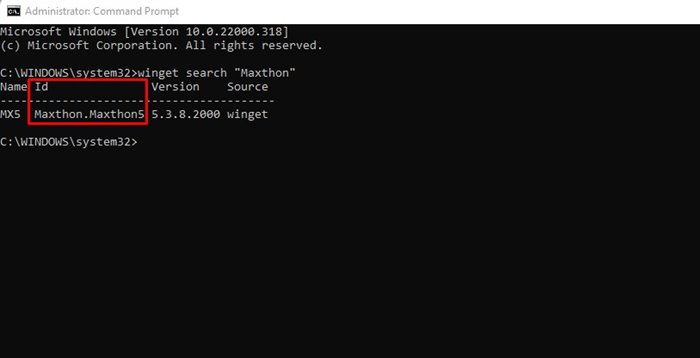
5. You need to repeat Step 2 and 4 to find the ID of all apps you want to install.
6. After getting the App IDs, you need to execute the Command:
winget install --id=APP ID 1 -e && winget install --id=APP ID 2 -e && winget install --id=APP ID 3 -eImportant: Replace the APP ID with the actual ID. For example, the Command will install Edge, Firefox, and Chrome on Windows 11.
winget install --id=Malwarebytes.Malwarebytes -e && winget install --id=Mozilla.Firefox -e
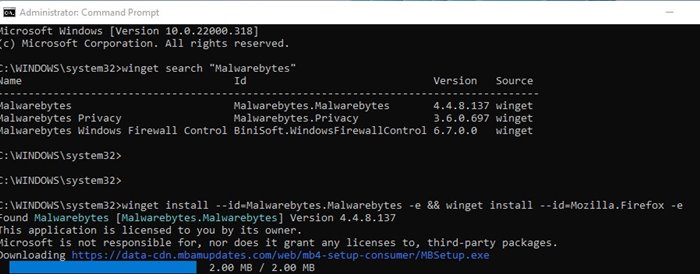
That’s it! You are done. Now winget will attempt to install all your selected apps on Windows 11.
So, this guide is all about how to install multiple apps using winget on Windows 11. I hope this article helped you! Please share it with your friends also. If you have any doubts related to this, let us know in the comment box below.


