If you are using Windows 11, you might know that Microsoft has changed how Start Menu works. Not only does the Start Menu of Windows 11 looks different, but it also works differently. Microsoft introduced the Start Menu on Windows 11 as a separate process to make the operating system stable.
Due to this, if the Start Menu crashes, the other elements of the Taskbar, such as the System tray, taskbar icons, etc., won’t be affected. Since Windows 11 is still being tested, users might face a few problems while using the Start Menu. Start Menu not opening, not showing apps, lags, etc., were counted as a common issues on Windows 11.
So, if you are dealing with Start Menu-related problems on your Windows 11 operating system, you are reading the right guide. In this article, we will share a step-by-step guide on how to Re-Register Windows 11 Start Menu.
Steps to Re-Register the Start Menu in Windows 11
When you re-register the Start menu, all related processes get refreshed which ultimately fixes all Start Menu-related problems. Hence, follow the steps only if your Windows 11’s Start Menu is not opening or not responding. So, let’s get started.
1) Re-Register Start Menu for Current User
If you are the only user on your computer facing problems related to the Start Menu, you need to re-register Start Menu for the current user. Here are some of the simple steps you need to follow.
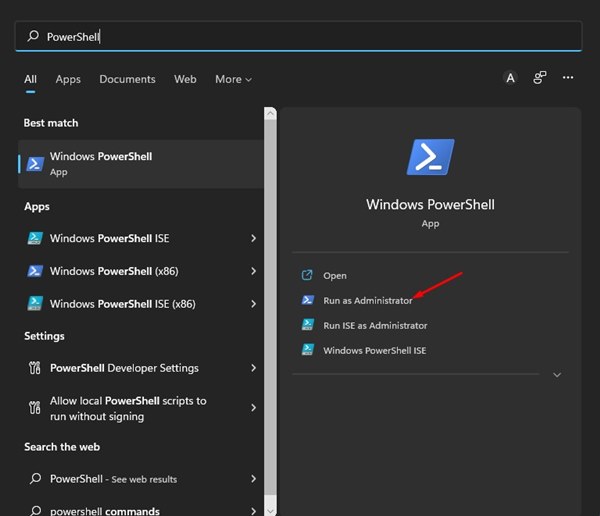
1. First of all, open the Windows 11 search and type in Windows PowerShell. Next, right-click on PowerShell and select the Run as administrator option.
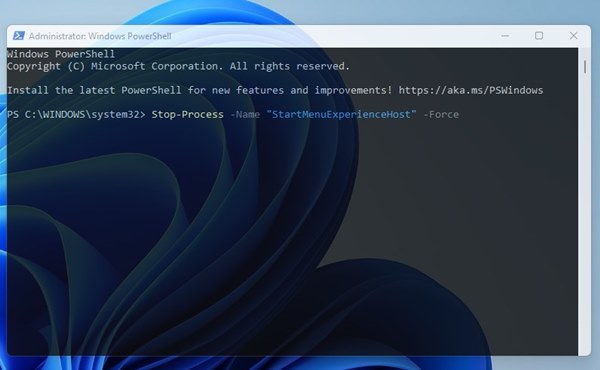
2. Now, on the Windows PowerShell, type in the given command and hit the Enter button:
Stop-Process -Name "StartMenuExperienceHost" -Force
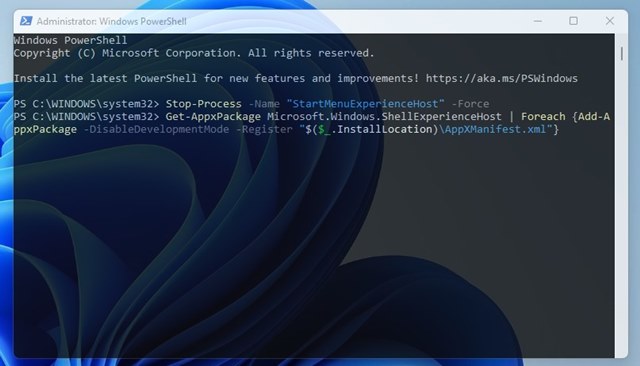
3. Once done, you need to type in another command and hit the Enter button:
Get-AppxPackage Microsoft.Windows.ShellExperienceHost | Foreach {Add-AppxPackage -DisableDevelopmentMode -Register "$($_.InstallLocation)AppXManifest.xml"}
That’s it! This will re-register Windows 11’s Start Menu for current users.
2) Re-Register Start Menu in Windows 11 for All Users
If you have multiple user profiles on your Windows 11, you need to follow this method to re-register the Start Menu for all users. Here’s what you need to do.
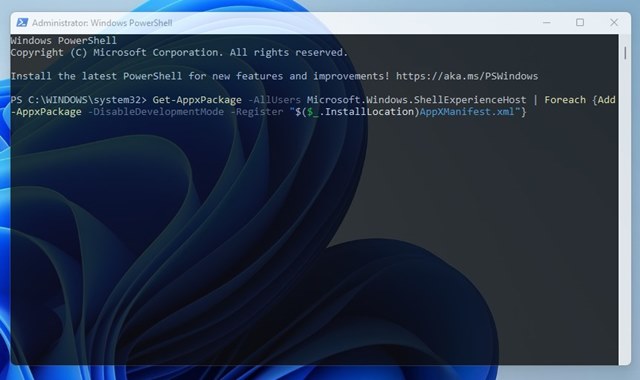
1. First of all, open Windows 11 Search and type in Windows PowerShell. Next, right-click on PowerShell and select the Run as Administrator option.
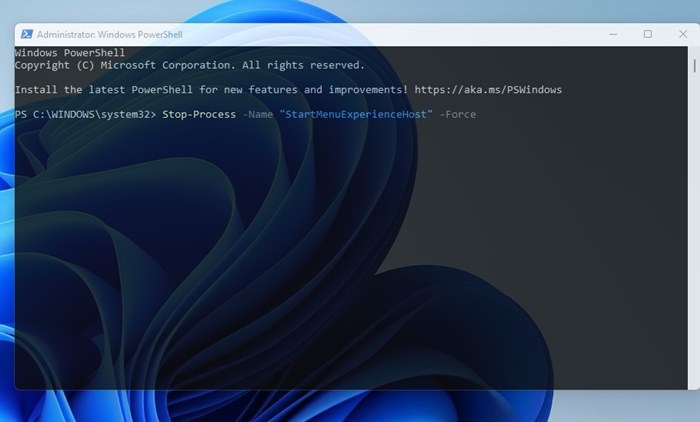
2. On the PowerShell window, execute the command given below:
Stop-Process -Name "StartMenuExperienceHost" -Force
3. Once done, copy and paste the second command and hit the Enter button:
Get-AppxPackage -AllUsers Microsoft.Windows.ShellExperienceHost | Foreach {Add-AppxPackage -DisableDevelopmentMode -Register "$($_.InstallLocation)\AppXManifest.xml"}
That’s it! This will re-register the Start Menu in Windows 11 for all users.
It’s pretty easy to re-register the Start Menu in Windows 11. I hope this article helped you! Please share it with your friends also. If you have any doubts related to this, let us know in the comment box below.


