The Windows 10 operating system stores cache fonts, icons, DNS, and many more things. If we talk about the Font Cache, it works the same way as Icon cache. The Windows operating system creates a cache for fonts to load them faster.
However, if, for any reason, the font cache is corrupted, then you might experience problems while viewing the fonts. For example, fonts may not appear properly on the websites or display invalid font characters.
So, if you are experiencing fonts-related problems on Windows 10, you are reading the right guide. In this article, we will share a step-by-step guide on how to rebuild font cache in Windows 10.
Also read: How to Install & Uninstall Font Files On Windows 10/11
How to Rebuild the Font Cache in Windows 10/11
Rebuilding Font Cache in Windows 10 is pretty straightforward, but you need to follow the steps carefully. So, let’s check out how to rebuild the font cache in Windows 10/11 operating system.
1. First of all, press Windows Key + R button to open the RUN dialog box.
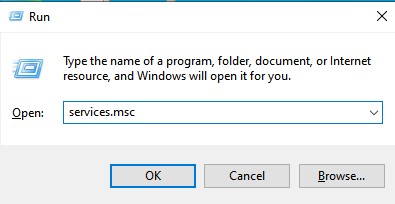
2. On the Run dialog box, enter services.msc and hit the Enter button.
3. This will open the Services page. On the left, scroll down and till you find Windows Font Cache Services.
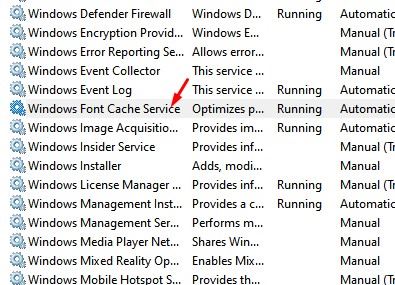
4. Right-click on the Windows Font Cache Service and select Properties.
5. On the next Window, select ‘Disabled‘ under the Startup type. Once done, click on the Apply button then on Ok.

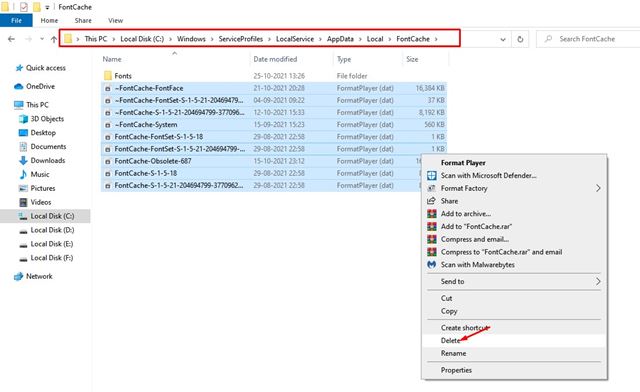
6. Now open the file explorer and navigate to the following path:
C:\Windows\ServiceProfiles\LocalService\AppData\Local\FontCache
7. Delete all the files with the name FontCache and .dat as the extension.
8. Now navigate to the C:\Windows\System32\ and delete the FNTCACHE.DAT file.

That’s it! You are done. Now restart the PC. After the restart, make sure to start the Windows Font Cache Service from the Services page. To enable the Windows Font Cache service, select ‘Automatic’ under the Startup type.
So, this guide is all about how to rebuild font cache in Windows 10 operating system. I hope this article helped you! Please share it with your friends also. If you have any doubts related to this, let us know in the comment box below.


