Well, if you are using a pirated version or trial version of Windows 10, then you might be getting a ‘Activate Windows’ watermark on the bottom-right corner of your screen. The Windows activation watermark appears when you have not activated the operating system.
Windows’s activation watermark doesn’t impact your PC’s performance. Neither it prevent you from doing anything within the OS, but it doesn’t look very pleasant on the desktop. So, if you are also getting the ‘Activate Windows’ watermark on your system, then this article might help you.
3 Methods to Remove Windows 10 Activation Watermark
In this article, we are going to share a few best methods to remove the Windows activation watermark in 2020. All of these methods would help you to remove the activation watermark permanently from your system. So, let’s check out.
1. Purchase a License Key
Well, the Activation watermark appears if you are using a non-activated version of Windows. So, the easiest way to get rid of the Activate Windows watermark is to buy a license or activation key.

You can purchase the digital key from the Microsoft Store directly. You can also purchase an activation key from Amazon. The standard home version of Windows 10 costs around $139, whereas the Windows 10 professional edition costs around $200.
2. Editing Registry Values
Well, if you don’t want to purchase an activation key, then you need to use this method. In this method, we will make a few changes to the Windows 10 registry file to remove the activation watermark.
However, please remember that this will not activate your Windows operating system. It will only remove the watermark from your desktop.
Step 1. First of all, open the RUN dialog box on your PC.

Step 2. On the Run dialog box, enter ‘Regedit’ and hit the Enter button.

Step 3. On the Registry Editor, navigate to the following path-
HKEY_LOCAL_MACHINE > SYSTEM > CurrentControlSet > Services > svsvc
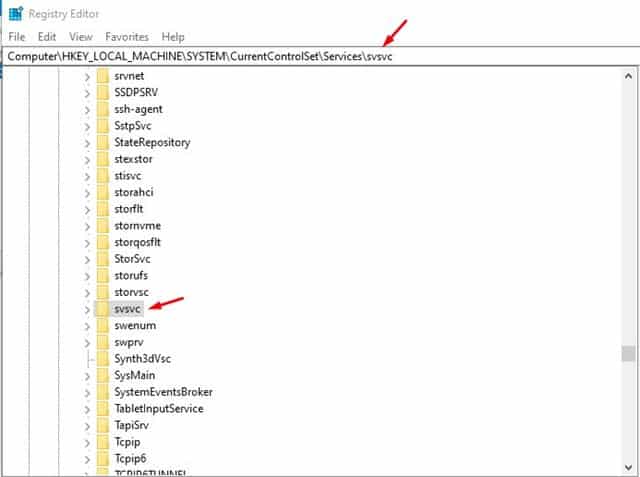
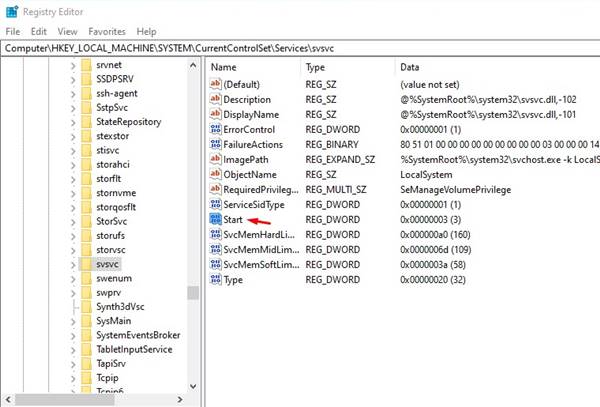
Step 4. Now on the svsvc file, look at the right-hand side pane and search for ‘Start’
Step 5. Double click on the Start. On the ‘Value Data’ field, enter ‘4’ and click on ‘Ok’
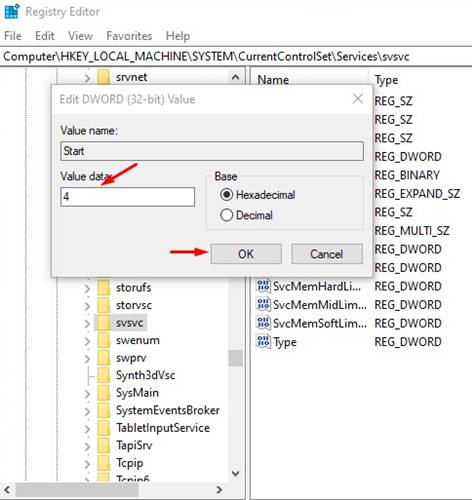
Step 6. Now close the registry editor and restart your PC.
That’s it! You are done. After the restart, you will no longer see the ‘Activate Windows’ watermark.
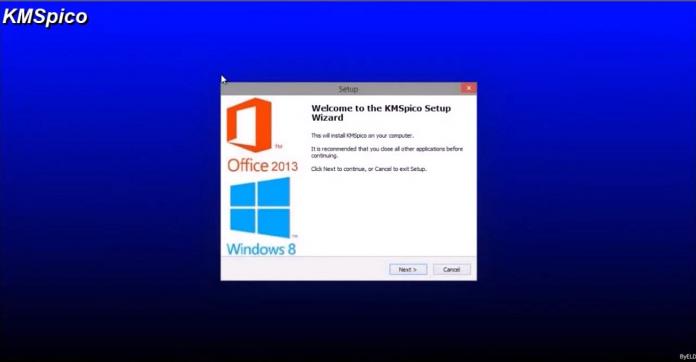
3. Activate Windows (KMSPico)
If you are still getting the Activate Windows watermark, then there’s only one option left. You can use third-party apps like KMSPico to activate the Windows 10 operating system. KMSPico has been around for a while, and it activates most of Microsoft’s products like Office suite, Windows 10, etc. Here’s how to use KMSPico.
Step 1. First of all, download the software KMSPico on your PC. Right-click on the file and select ‘Run as administrator’
Step 2. Once installed, open Windows search and search for KMSELDI. Right-click on the KMSELDI.exe and select ‘Run as administrator’
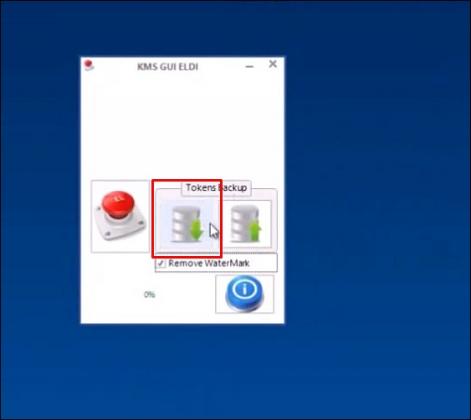
Step 3. Now you will see a screen like below. Here click on the ‘Red button’
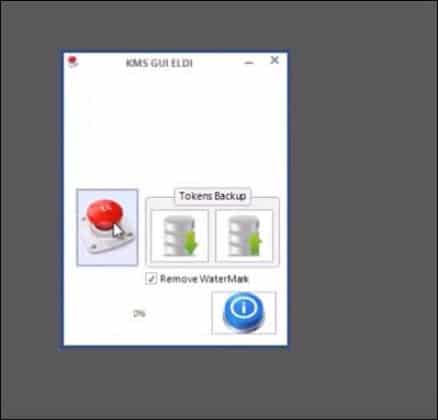
Step 4. Next, check the ‘Remove Watermark’ option and click on the ‘Tokens Backup’ button.
Step 5. Now, wait for a few seconds. Once done, you will get a success message reading ‘Watermark has been removed..’

Now just restart your Windows 10 computer to apply the changes. This will also activate the operating system.
So, these are the three best methods to remove Windows 10 activation watermark. I hope this article helped you! Please share it with your friends also.


