Plenty of video calling and text messaging apps are available on the mobile operating system, but we only have a few options on a desktop operating system. Skype is one of the best and most used video calling and collaboration solutions for business and personal users.
We are pretty sure that every person in this world knows about Skype. Skype is available on almost all major platforms, including Android, iOS, Windows, Linux, etc. Skype allows users to make free video and voice calls. However, like all other video calling apps, Skype has some problems.
Recently, more and more Skype users are complaining that Skype calls don’t go through an error message. Not just that, a few users have also complained about Skype calls won’t work, skype calls won’t show up, and Skype calls failing. So, in this article, we have decided to share a few best methods to fix Skype calling errors.
Best Methods To Fix ‘Skype Call Didn’t Go Through’ Problem On Windows 10
The methods we will share below will help you fix most of the skype-related problems. So, let’s explore a few best methods to fix Skype calls don’t go through the issue.
A few Windows users have reported fixing Skype errors by deleting the shared.xml file from the app data folder. While it’s not sure that deleting the file will fix Skype errors, it does not harm. So, in this method, we will delete the Shared.xml files to fix Skype Calls don’t go through error.
1. First of all, open the Task Manager, and from there, close the Skype app.

2. In the next step, press Windows Key + R, which will open up the RUN dialog box.
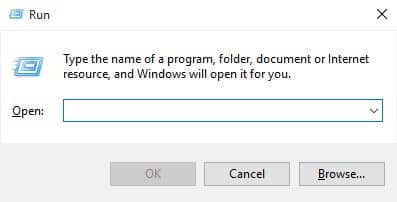
3. On the RUN dialog box, you need to type in %appdata%skype and then press Enter.
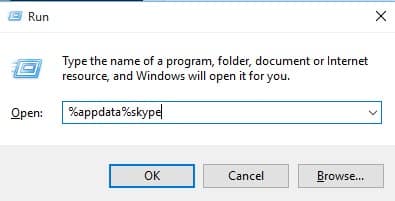
4. You need to find and delete the shared.xml file.
That’s it! Now restart the computer, and the Skype errors will probably be fixed.
2. Update Your Skype App
If you want to enjoy Skype to its best, you must install all pending updates. There might be some bug in the older version of Skype, causing the error message that can only be fixed by installing the updates. So, in this method, we will update the Skype app to solve Skype calls that don’t go through errors.
1. First of all, open Skype on your Windows computer.

2. In the next step, head to the Help > Check for Updates
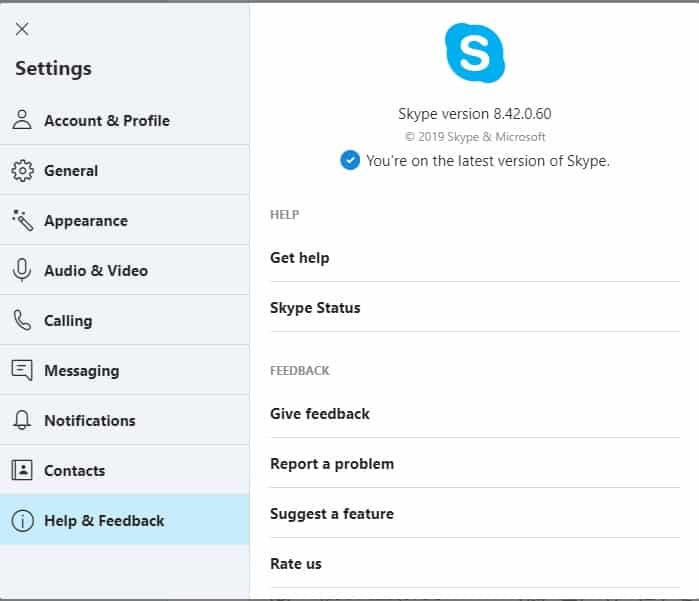
Now Skype will check for available updates and will download them. Once updated, restart your computer, and you can use Skype without errors.
3. Reinstall Skype
If the Skype calls don’t go through, you need to reinstall Skype. Reinstalling the application will reset all user-made settings, probably fixing the error messages. So, here’s how you can reinstall Skype on Windows.
1. First of all, open the Control Panel on your Windows computer.

2. Now, on the Control Panel, search for ‘Skype‘.
3. Once done, click on it and select ‘Uninstall‘
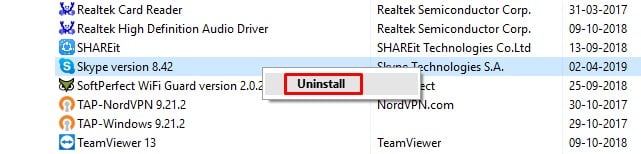
4. Once uninstalled, reinstall the software again.
That’s it! This is how you can reinstall the Skype app to fix calls that don’t go through error messages.
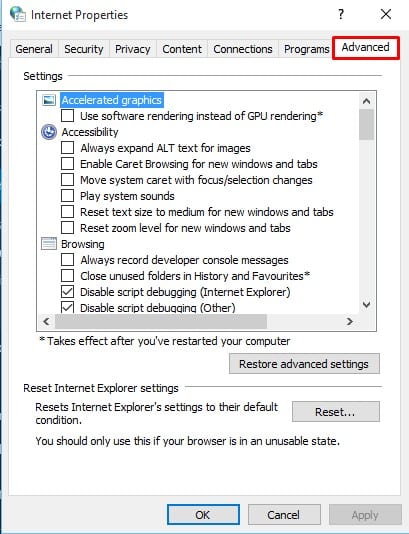
4. Check the Internet Options
Skype errors like calls don’t go through can also occur due to internet options. Most of the time, the incorrect internet settings lead to Skype errors. So, in this method, we need to change the internet options to fix Skype errors like calls can’t connect, calls didn’t go through, calls won’t show up, etc.
1. First, press Windows Key + S and open the search box; you need to enter Internet Options. Open Internet Options from the list.

2. On the internet options, head to the ‘Advanced‘ tab.
3. On the advanced tab, enable the Use SSL 3.0, Use TLS 1.0, and Use TLS 1.1. Finally, click on ‘Apply‘ and then on ‘Ok’.
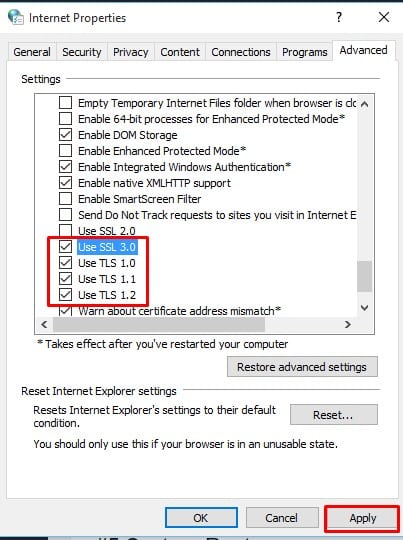
That’s it! Now restart your computer for the changes to take effect. After the restart, open the Skype app, and you can connect to the internet without any problem.
5. System Restore
Well, System Restore restores the operating system to the previous restore point. That means system restore will delete essential settings and data that has been saved after creating a restore point. So, make sure to back up your important files and passwords before you perform a system restore. This method will roll back the operating system to its previous state, which will probably fix the Skype errors. Here’s how to perform a System Restore on Windows 10.
1. First of all, open the Control Panel.
2. On the control panel, search for System Restore and open it.
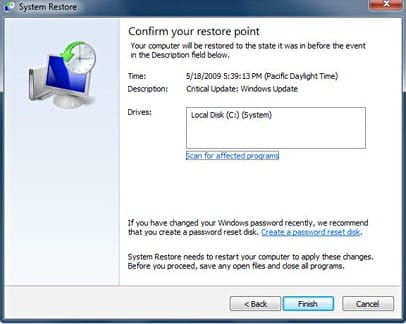
3. If you have created the backup for your system before, you will see that backup in the ‘System Restore’ panel. Click the restore point and then click on ‘Next‘
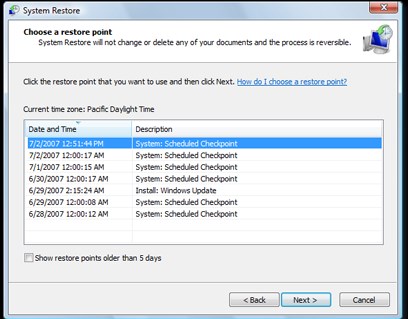
4. Now follow the on-screen instruction to complete the System Restore.
That’s it! Now restart your computer and open the Skype app. This will most probably fix the Skype error messages.
So, these are the 5 best methods to fix Skype calls don’t go through error messages from a Windows computer. Let us know in the comment box below if you know any other method to fix the Skype errors.
thanks for that now its working well. 🙂