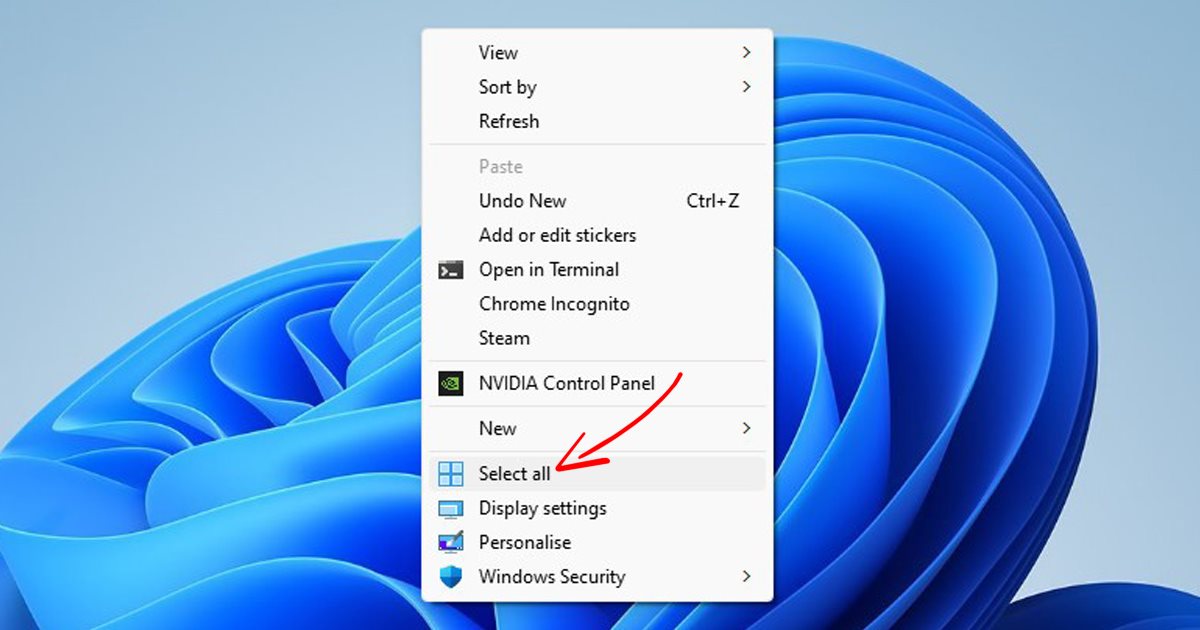
Using Windows 11, you may know that the operating system supports a CTRL+A keyboard shortcut to select all files and folders inside a folder. The CTRL+A keyboard shortcut for selecting all items works everywhere on the operating system.
While it’s pretty easy to press the CTRL+A key to select all items, if your keyboard is not working or you don’t like using a keyboard shortcut, you can add the ‘Select all’ functionality straight on the Context menu.
Both Windows 10 and Windows 11 operating systems allow you to modify the context menu options in easy steps. You can edit the Registry file or use third-party apps to customize the context menu on Windows 11.
Also Read: Windows 11 Free Download Full Version (ISO File 64 Bit)
Steps to Add ‘Select All’ Option to Windows 11 Context Menu
Hence, if you are interested in adding the ‘Select all’ option to the Windows 11 right-click menu, you are reading the right guide. Below, we have shared a step-by-step guide on adding the ‘Select All’ option in the Windows 11 context menu. Let’s get started.
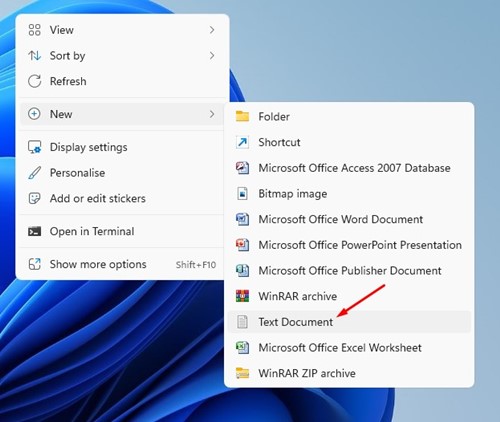
1. First, right-click anywhere on your desktop and select New > Text Document. Alternatively, open Windows 11 search and type in Notepad. Next, open the Notepad app from the list.
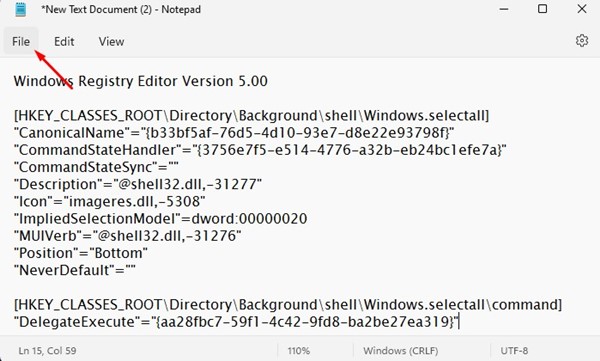
2. On the Notepad, copy and paste the following script:
Windows Registry Editor Version 5.00
[HKEY_CLASSES_ROOT\Directory\Background\shell\Windows.selectall]
"CanonicalName"="{b33bf5af-76d5-4d10-93e7-d8e22e93798f}"
"CommandStateHandler"="{3756e7f5-e514-4776-a32b-eb24bc1efe7a}"
"CommandStateSync"=""
"Description"="@shell32.dll,-31277"
"Icon"="imageres.dll,-5308"
"ImpliedSelectionModel"=dword:00000020
"MUIVerb"="@shell32.dll,-31276"
"Position"="Bottom"
"NeverDefault"=""
[HKEY_CLASSES_ROOT\Directory\Background\shell\Windows.selectall\command]
"DelegateExecute"="{aa28fbc7-59f1-4c42-9fd8-ba2be27ea319}"
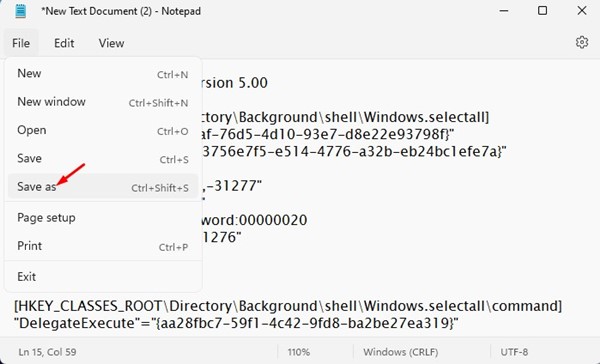
3. Once done, click the File button as shown in the screenshot below.
4. Click on the Save As option from the list of options.
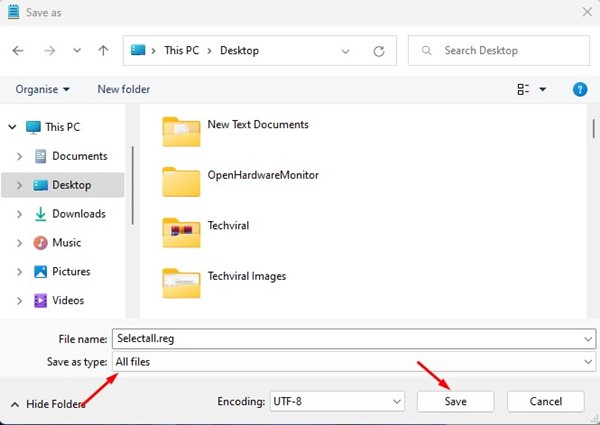
5. Now, on the Save As prompt, name the File name as selectall.reg and select ‘All Files’ in the Save as type. Once done, click on the Save button.
6. Once done, double click on the Selectall.reg file to add the script to the registry file.

That’s it! After making the changes, restart your Windows 11 computer. After the restart, right-click on a blank space in a folder and find a new ‘Select all’ option.
2. How to Remove Select All Option from Context Menu
Well, if you don’t like to have the ‘Select all’ option in the Context Menu, you can remove it quickly. Here’s how to remove the Select all option from Windows 11 right-click menu.
1. First, right-click anywhere on your desktop and select New > Text Document.
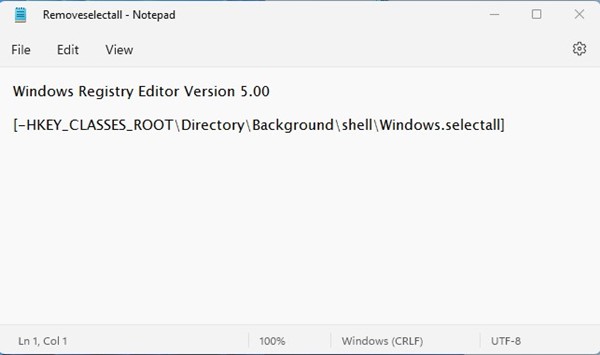
2. On the Notepad, copy and paste the following script:
Windows Registry Editor Version 5.00
[-HKEY_CLASSES_ROOT\Directory\Background\shell\Windows.selectall]
3. Once done, click on the File > Save as option.
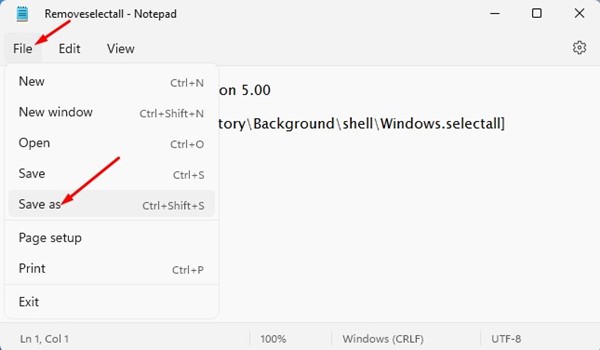
4. On the Save As window, name the file as Removeselectall.reg and set All Files on the Save as Type. Once done, click on the Save button.

5. Now, if you want to remove the Select all option from the context menu, double click on the Removeselectall.reg file you have created.

That’s it! This will remove the Select all option from your Windows 11’s context menu.
Also read: How to Change Wallpaper in Windows 11 Without Activation
So, this guide is about adding or removing the ‘Select All’ option to Windows 11 context menu. Even though we have used Windows 11 to demonstrate the method, the method works even on Windows 10. If you need more help customizing the context menu, let us know in the comments.


