It’s no doubt that Gmail is right now the most used email service. Businesses and individuals widely use the email service. The good thing about Gmail is that it provides you lots of business-related features.
If you have been using Gmail for a while, you might know that the platform doesn’t offer a tool for adding tables to the Emails. However, it does support adding tables.
To add tables in Gmail emails, you need to create tables in the Google Sheets. After creating a table in Google Sheets, you can move it to your Gmail emails. So, if you are looking for ways to add a table to an email in Gmail, you are reading the right guide.
Also Read: How to Create Gmail Without Phone Number (2 Best Methods)
Steps to Add Table to an Email in Gmail (Full Guide)
In this article, we will share a step-by-step guide on how to add a table to an Email in Gmail. The process is going to be very easy; follow some of the simple steps given below. Let’s check out.
Step 1. First of all, you would need to create a table in the Google Sheets to send us an email. For that, head to the Google Sheets website on your web browser.
Step 2. On the Google Sheets, click on the (+) and create a table that you want to attach to your email.

Step 3. Once done, use your mouse or keyboard’s arrow key to select the spreadsheet. The selected spreadsheet would look like this.

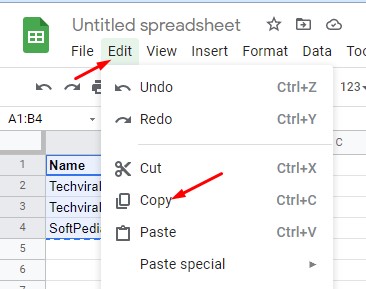
Step 4. Now press the CTRL+C button to copy the sheet to the clipboard. Alternatively, you can copy it through Edit > Copy in Google Sheet’s menu.
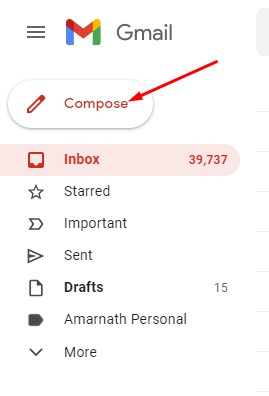
Step 5. Now open Gmail on your web browser and click on the ‘Compose‘ button.
Step 6. Enter the recipient email address, subject. Then, on the email body, press the CTRL + V button. Alternatively, right-click on the email body and select ‘Paste.’
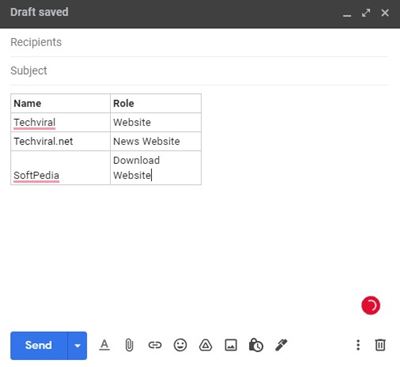
Step 7. This will paste the copied spreadsheet on Gmail.
That’s it! You are done. This is how you can add a table to an email in Gmail.
So, this guide is all about how to add a table to an Email in Gmail. I hope this article helped you! Please share it with your friends also. If you have any doubts related to this, let us know in the comment box below.