The new desktop operating system from Microsoft – Windows 11, is redesigned to have a modern and clean design. Along with the new design, Microsoft also added many new accessibility features to Windows 11.
Microsoft’s Windows 11 comes with an improved accessibility feature that helps people achieve more. Each of the accessibility features of Windows 11 is designed for a specific group of users with certain disabilities.
One important accessibility feature of Windows 11 is the Live Captions that converts audio into texts played on the PC/Laptop. The Live Caption is also available on Windows 10, but you get a more improved version of the feature on Windows 11.
On Windows 11, you can customize the Live Captions as per your preferences. You can change the text color, background color, Window Color, and more. Hence, if you are interested in enabling & customize the Live Captions on Windows 11, you read the right guide.
Steps to Enable & Customize Live Captions on Windows 11
This article will share a step-by-step guide on enabling and customizing the Live captions on Windows 11 operating system. The steps will be very easy; follow them as we have directed. So, let’s get started.
Enable Live Captions on Windows 11
It’s pretty easy to enable Live Captions on Windows 11, and it can be done without installing any third-party app. You need to access the Accessibility settings and enable the feature. Here’s how to do it.
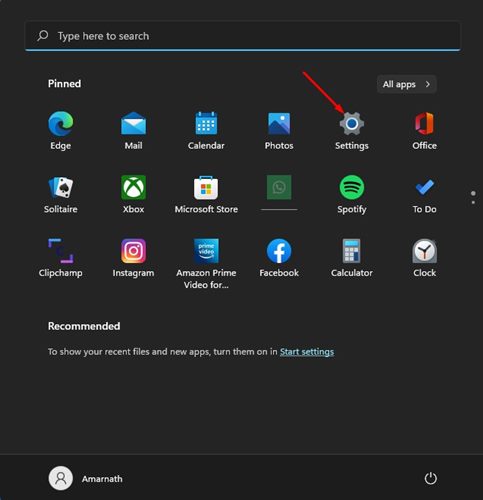
1. First of all, click on the Windows 11 Start menu and select Settings.
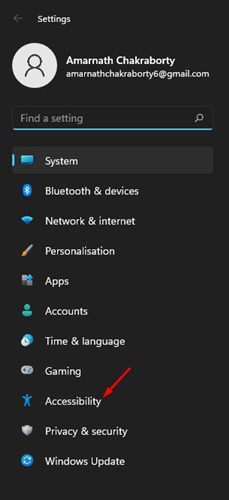
2. On the Settings app, click on the Accessibility tab below.
3. Scroll down and click on the Captions on the left pane.

4. Turn on the toggle for Live Captions on the next screen.
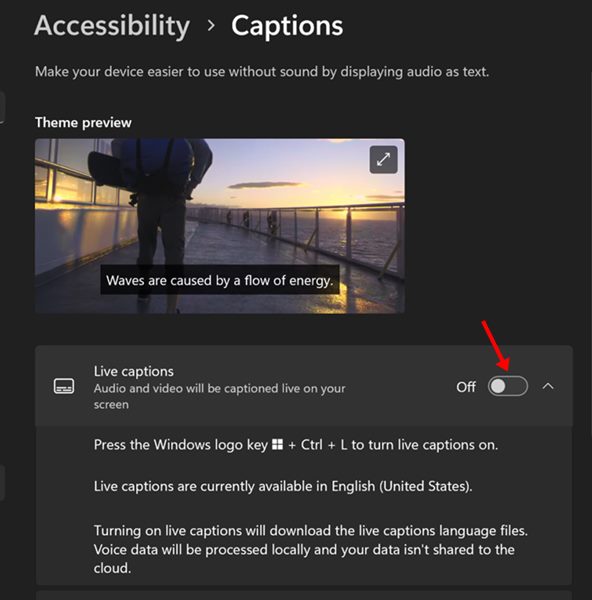
5. You can also turn on Live Captions by pressing the Windows + CTRL + L key on your Keyboard.
That’s it! This is how you can enable Live Captions on your Windows 11 computer.
Customize Live Captions on Windows 11
As mentioned above, Windows 11 even allows you to customize the Live Captions style. Here’s how you can customize Live Captions on Windows 11.
1. First of all, click on the Windows 11 Start menu and select Settings.
2. On the Settings app, click on the Accessibility tab.
3. Scroll down and click on the Captions on the left pane.
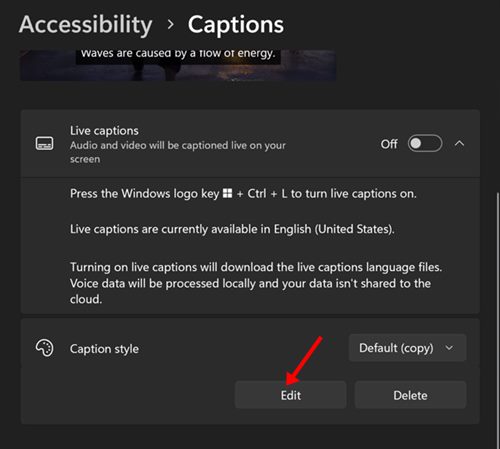
4. Now, on the next screen, click on the Edit button underneath Caption Style.
5. Now, you will find various options to customize the appearance of Live Captions. You can customize the text color, Background Color, set the opacity, etc.
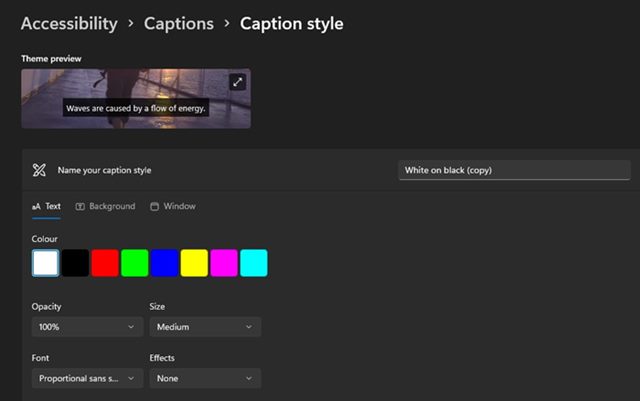
6. You can check the live preview of the changes in the Theme Preview section.
That’s it! This is how you can customize the live captions on Windows 11.
Live Captions on Windows 11 could be very handy to those who find it hard to comprehend the audio flow. Even if you have no problem, you can enable Live Captions to display audio as text. So, that’s all about how to enable and customize the Live Captions on Windows 11.


