Hardware Acceleration is a feature that enables your computer to take advantage of hardware components instead of only relying on software.
The feature is mainly used for graphics, where you let a dedicated GPU render the graphics rather than making the CPU run the software.
With this feature enabled, the software can perform certain computing tasks by offloading them onto specialized hardware components within the system, giving faster results.
What is Spotify Hardware Acceleration?
Spotify hardware acceleration is a feature that’s supposed to make the Spotify desktop app faster and more responsive.
When you enable Hardware Acceleration on Spotify, the work is offloaded to the dedicated GPU, leaving the main CPU free to do other tasks on the PC more efficiently.
The hardware acceleration feature is only available on the Spotify desktop app for Windows and macOS. You shouldn’t enable the feature on older computers with underpowered GPUs. Few users have reported issues like unplayable tracks, skipping songs, interface not loading correctly, etc.
Also Read: 10 Best Alternatives of Spotify
Enable or Disable Spotify Hardware Acceleration
Enabling or disabling Hardware acceleration is easy on Spotify for Windows & macOS. Here are some of the simple steps you need to follow.
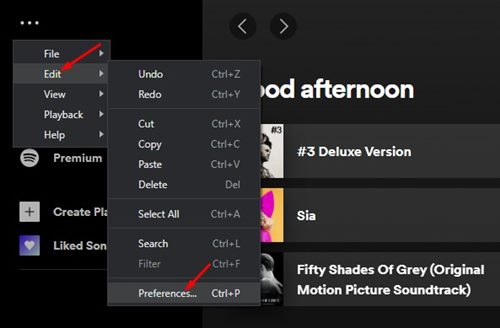
1. Launch the Spotify app on your desktop and click on the three dots below.

2. From the Menu, select Edit > Preferences.
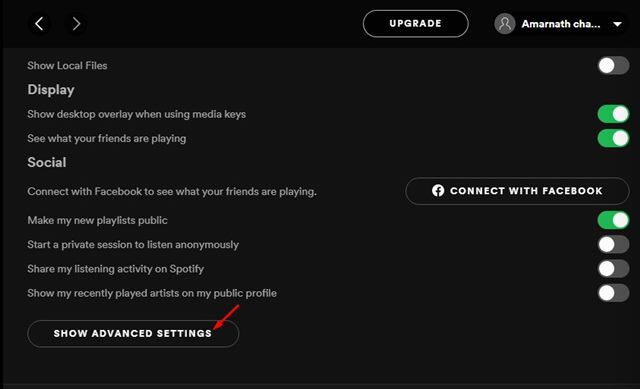
3. On the Settings page, scroll down and click on the Show Advanced Settings button.
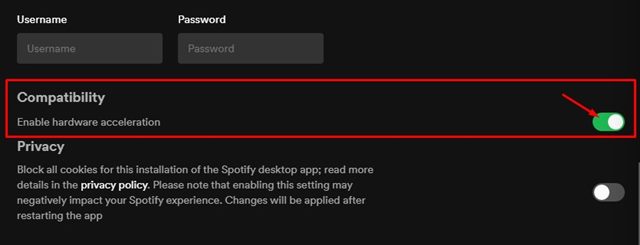
4. Now scroll down and find the Compatibility section. You need to use the toggle switch to enable/disable the Hardware Acceleration feature.
Enable Spotify Hardware Acceleration on macOS
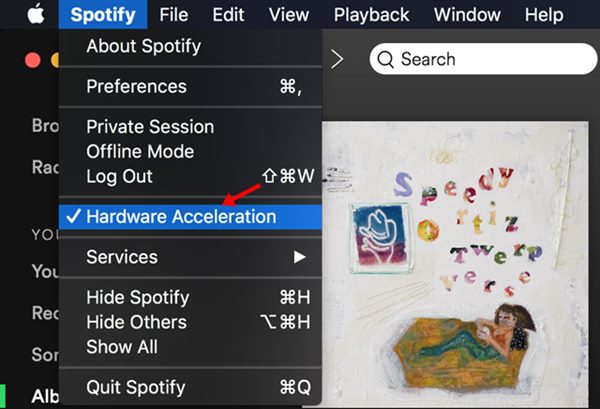
Enabling Spotify Hardware acceleration on macOS is very straightforward. You just need to click on the Spotify icon on the menu bar and click on Hardware acceleration. This will enable Hardware Acceleration in Spotify for macOS.
Although Spotify Hardware Acceleration is a great feature, it won’t improve the audio quality. To improve the audio quality on Spotify, read our guide, How To Change The Streaming & Download Sound Quality on Spotify.
Frequently Asked Questions
Should I enable hardware acceleration for audio?
Hardware acceleration is useful as it transfers the audio tasks from the CPU to your sound card or GPU. This frees up the CPU resources to carry on other tasks effectively.
How Does Spotify Hardware Acceleration Work?
Spotify Hardware Acceleration is only available on the desktop app of Spotify for Windows and MacOS. When the feature is enabled, Spotify offloads the tasks to your GPU, leaving the main CPU free to perform other tasks more efficiently.
Does turning off hardware acceleration improve performance?
Turning off hardware acceleration makes no sense if your system has a dedicated GPU unit. It’s true that hardware acceleration can break certain web pages and can trigger errors, but these incidents are very rare. Turning off hardware acceleration doesn’t negatively impact the performance either.
Does hardware acceleration use more battery Spotify?
No! Hardware acceleration on Spotify offloads the work to the GPU, lowering battery usage. However, since Spotify doesn’t do much graphics-intensive stuff, you can only save an ample amount of battery life with hardware acceleration turned on.
I hope this article helped you! Please share it with your friends also. If you have any doubts, let us know in the comment box below.


