There might be various reasons why you want to find your Laptop’s serial number. For example, do you want to avail yourself of some technical services or download drivers?
Whatever the reason, you can easily find your Laptop’s serial number on a Windows 11/10 computer. Here’s what you need to do.
1. Find the Serial Number On Laptop’s Hardware, Box, etc.
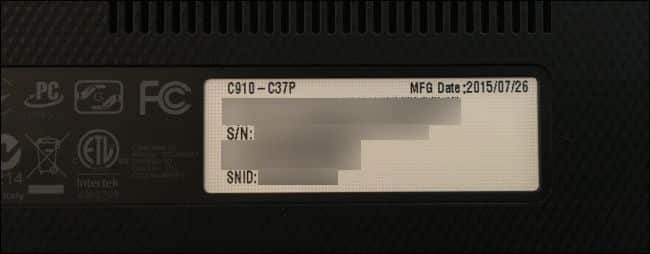
Before looking elsewhere, you need to examine the Laptop’s hardware. Usually, the Laptop serial number is listed on the side where you put the battery. So, flip the Laptop over and check for the serial number.
The serial numbers are usually printed directly on the laptop’s plastic or metal. If you don’t find the serial number, remove the battery and check inside the compartment. You can also look at the laptop bill.
2. Using Command Prompt
In this method, we will utilize Windows 10’s command prompt to find the serial number. Here’s what you need to do.
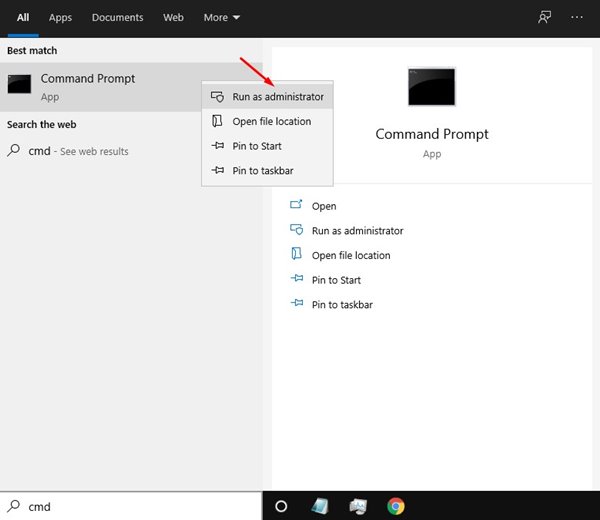
1. First, open Windows search and type in CMD. Then, right-click on the CMD and select Run as administrator.
2. Type in wmic bios get serialnumber and hit the Enter button on the Command Prompt window.
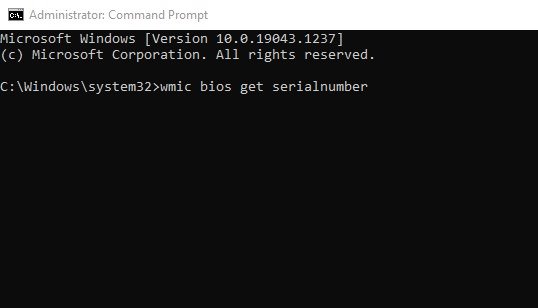
3. You will now see the computer’s serial number. If it says ‘To be filled by O.E.M,’ it means the PC manufacturer didn’t fill the number correctly.
3. Using Powershell
In this method, we will use Windows PowerShell to find the Laptop’s serial number. Here’s what you need to do.
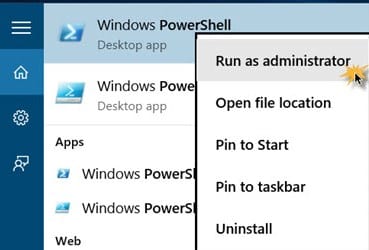
1. On your Windows PC, you need to access Powershell. To do this, press the Windows button and type Powershell. Next, right-click on Powershell and select ‘Run as administrator.’
2. Now, in the PowerShell, you need to enter the below command; this Command is made so that it can access your serial number and display it on your screen:
gwmi win32_bios | fl SerialNumber
3. Your serial number will now be displayed on your screen, and you can access it to do whatever you wish.

Alternatively, you can remove your laptop battery and look for the serial number below. You will most likely be able to locate it.
4. Through BIOS
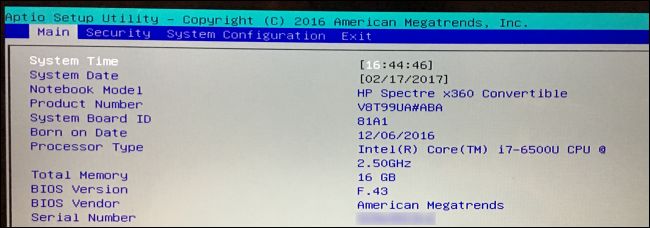
Another easy method to find the Laptop Serial number is through BIOS or UEFI firmware settings.
However, playing with BIOS settings is not recommended. Still, if the above command prompt trick fails to list the serial number, you can try the BIOS or UEFI method if you have no other option.
Also read: How To Find PC’s Serial Number via Command Prompt
To do so, go to the BIOS settings page and briefly examine the main screen. First, note the number written behind the ‘Serial Number.’ If you don’t find the Serial Number on the main screen, search for it in the ‘System Configuration.’

")
