If you’re using Windows 11 and occasionally face problems such as BSOD, system crashes, file explorer lag, and more, you need to repair the corrupted system files. Here’s how you can repair the corrupted system files.
1. Run the SFC Command in Windows 11
SFC, or System File Checker, is a Windows utility that scans and fixes corrupted system files. Here’s how you can run the tool from the Command Prompt.
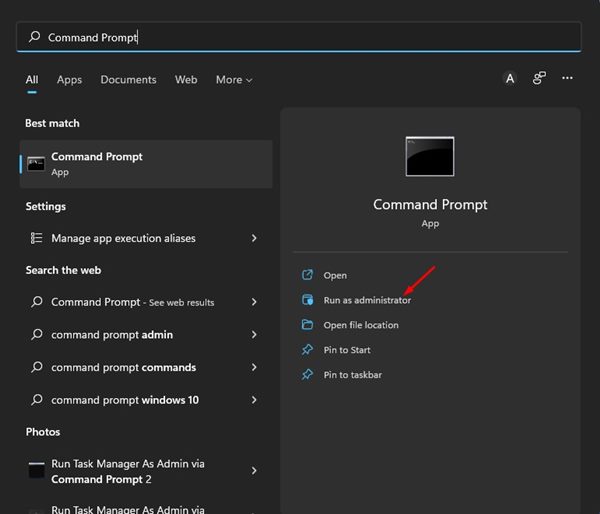
1. Type Command Prompt in Windows Search. Right-click on the CMD and select Run as administrator.
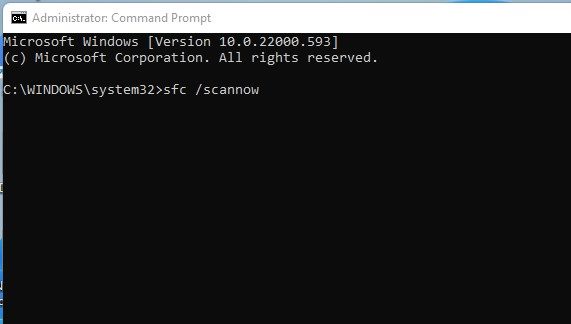
2. Type in sfc /scannow and press Enter.
3. This will run the SFC utility on your Windows 11. The process will take a few minutes to complete. Once completed, you will see one of the following messages. Here’s what each message means.
- Windows Resource Protection did not find any integrity violations.
If you see this message, it means your Windows 11 is in good condition, and there are no corrupted files in your system.
- Windows Resource Protection could not perform the requested operation.
If you see this message, the SFC command failed to run the scan. To fix this, you need to boot Windows 11 into safe mode and follow the same steps.
- Windows Resource Protection found corrupt files and successfully repaired them.
If the Command Prompt utility shows you this message, SFC has fixed the corrupted system files.
- Windows Resource Protection found corrupt files but could not fix some of them.
If you see this message, the SFC Command has found corrupted system files but failed to replace them. In this case, you need to follow other methods to fix corrupted system files.
2. Run the DISM command
If the SFC utility has failed to repair the corrupted system files, you should run the DISM command. It can quickly fix system file corruption, corrupted system image files, etc.
1. Type Command Prompt in Windows 11 Search. Right-click on the CMD and select Run as administrator.
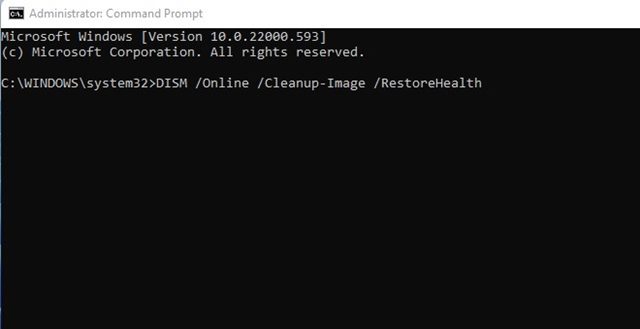
2. Execute the command shared below and press Enter.
DISM /Online /Cleanup-Image /RestoreHealth
The DISM utility will try to find and repair the corrupted files in your Windows 11 PC. The process might take a few minutes to complete.
3. Run Startup Repair
If you have problems with Windows 11 startup, you must run Startup Repair.
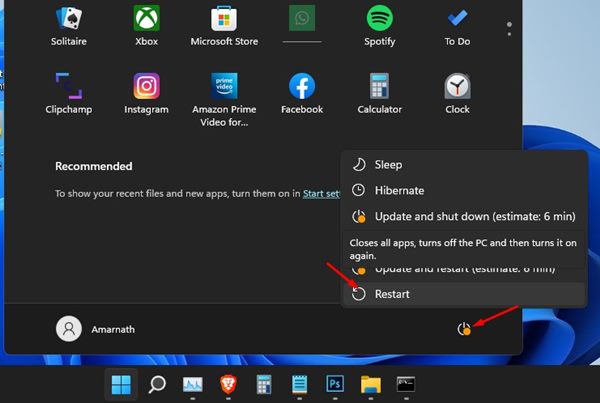
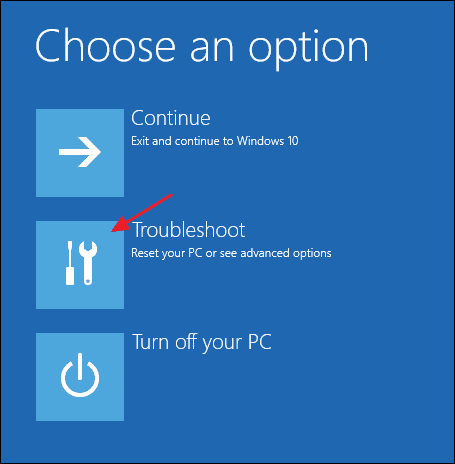
1. Click on the Windows 11 power menu, hold down the Shift key, and select Restart.
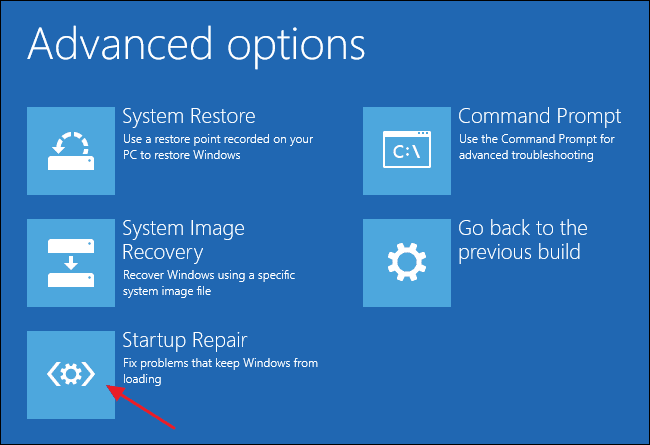
2. This will take you to the boot screen. On the Boot screen, click on the Troubleshoot option and the Advanced Options.
3. Click on Startup Repair.
4. On the next screen, select your OS version.
Your Windows 11 PC will restart and attempt to fix Startup problems. The process might take some time to complete, so be patient.
4. Perform a System Restore
If the above methods fail to fix corrupted system files on your Windows 11 PC, you need to perform a system restore. However, this will only work if you have already enabled the feature to create System Restore Points on your Windows 11 PC.
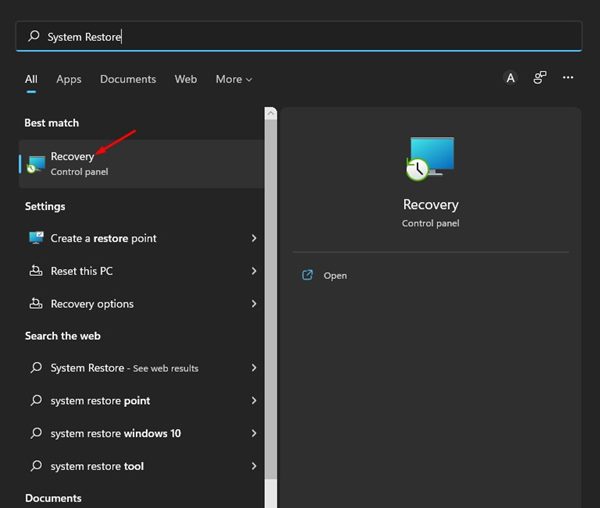
1. Type System Restore in Windows Search and open the Recovery app.
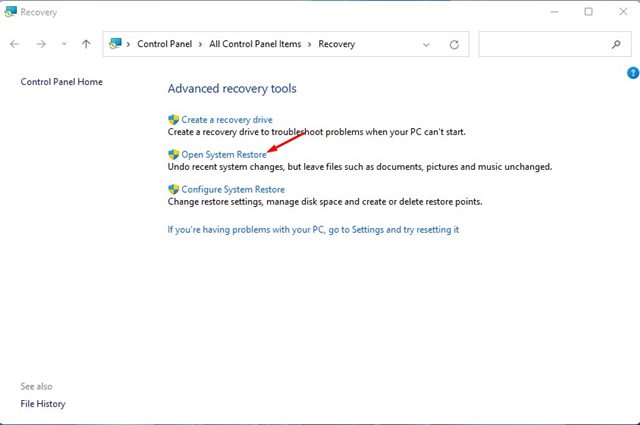
2. Click on the Open System Restore.
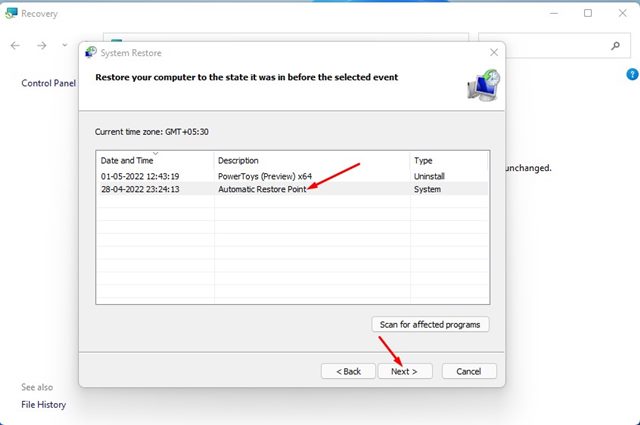
3. Select the restore point you want to use on the System Restore Window. Once done, click Next.
4. Click Finish.

Your device will restart and restore your computer to its state before the selected event.
5. Reset Your Windows 11 PC
If none of the methods worked and you are still getting BSOD errors, it’s best to reset your PC. Windows 11 provides an option to reset your PC to its factory default state.
However, you should note that resetting Windows 11 will remove all apps installed on your device. Back up your essential apps and data before resetting your PC.
Frequently Asked Questions:
Does repairing corrupted system files speed up a PC?
If the system files are corrupted, the device will perform slowly. So, it’s best to repair the corrupted system files to ensure better performance & stability.
Can Windows 11 Repair Itself?
Yes, if some files are corrupted, Windows 11 will automatically run the repair tool to fix them. However, you may sometimes have to manually repair corrupted files.
How do I fix the automatic repair loop in Windows 11
You can try running the SFC/DISM commands, checking the disk utility, rebuilding the BCD, and restoring the Windows Registry to fix the repair loop.
How to Repair Windows 11 Using CMD?
You can try running the System File Checker utility from the Command Prompt to repair the corrupted system files.
These are the best and most effective methods to repair corrupted Windows 11 files. If none of the methods worked for you, you must reinstall Windows 11 on your device.


