Windows 11 users may have noticed the new icons in File Explorer. One can access the File Explorer by opening the This PC folder. The icons also appear on the Quick Access folder in the left pane.
In this article, we will talk about the Quick Access feature of Windows 11 and its usefulness. Quick Access is a menu that lets you quickly access your most-used files and folders.
You can add folders that you frequently access to the Quick Access menu. In fact, the files and folders that appear on the Quick Access menu automatically change as you access different files and folders.
This feature might be helpful for many users, but it’s not meant for everyone. For example, many users share their computers with other family members and wouldn’t want to show what they have accessed.
Remove Recent Files/Folders From Quick Access in Windows 11
Many users would want to hide their recently & frequently used folders in Quick Access. So, if you are also looking for the same, you are reading the right guide. This article will share a step-by-step guide on hiding recently used files and frequently used folders in Quick Access.
How to Hide Recently Used Files in Quick Access
It’s pretty easy to hide Recently used files in Quick access. You don’t need to change the registry or install any third-party app. The option to hide recently used files in Quick access relies on File explorer.
1. First, open File Explorer on your Windows 11 PC.
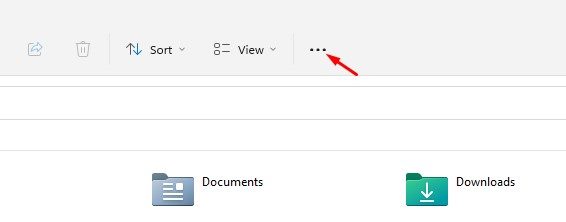
2. Next, click on the three dots as shown below.
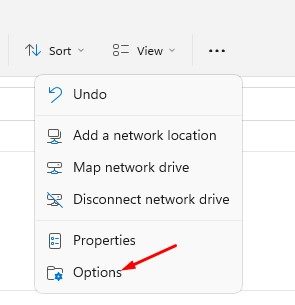
3. From the list that appears, click on Options.
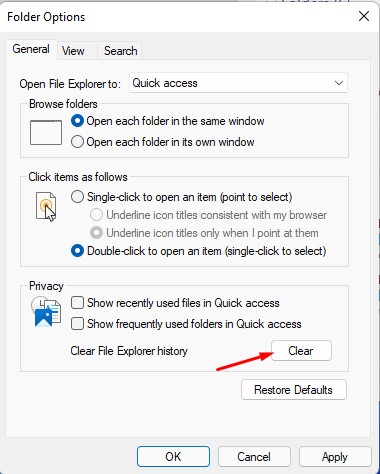
4. On the Folder Options dialog, switch to the General tab. Under the Privacy, uncheck the Show recently used files in Quick Access.
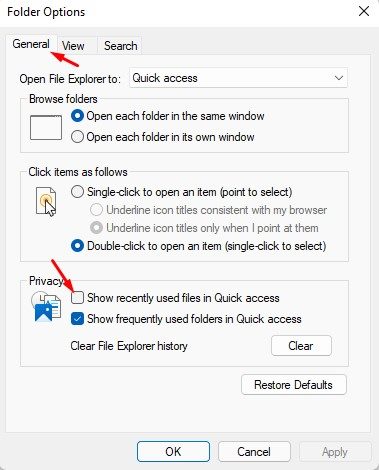
5. If you wish to hide the Frequently used folders in Quick Access, then uncheck the Show frequently used folders in Quick access as well.
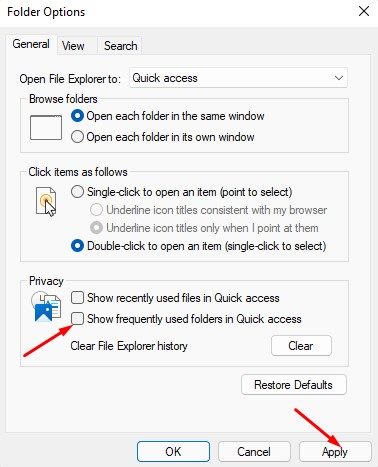
5. Once done, click on the Clear button next to the Clear File Explorer History. This will immediately remove the recently used files in Quick access.
That’s it! You are done. This will hide your recently used files & frequently used folders in Quick access on Windows 11.
How to Reset Quick Access Folders in Windows 11
Few users have reported that the changes don’t reflect on the Quick access panel. If you face the same issue, reset the Quick Access folder in Windows 11. Here’s what you need to do.
1. Open the File Explorer on your PC and open the C:Drive or your system installation drive.
2. On the Address bar, paste the following path and hit the Enter button.
%AppData%\Microsoft\Windows\Recent\AutomaticDestinations

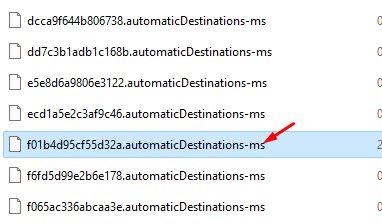
3. This will take you to the AutomaticDestinations folder. On this folder, you need to find the f01b4d95cf55d32a.automaticDestinations-ms file. You can use the search box to find the file.
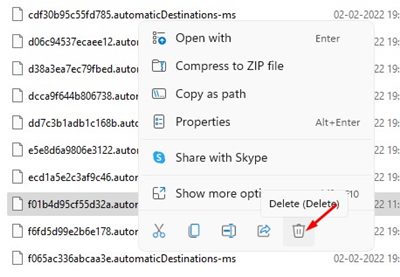
4. After locating the file, right-click on it and choose the Delete option.
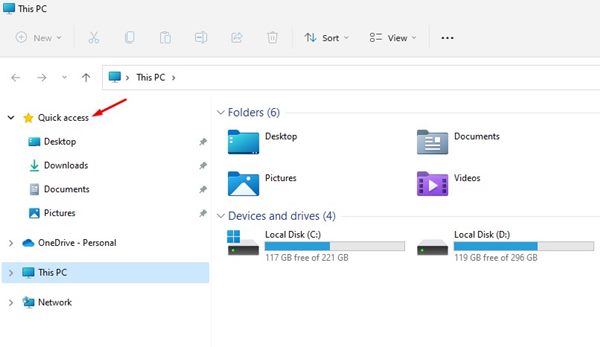
5. Once done, close all file explorer windows and open the File Explorer again. You will now see the default folders on the Quick Access menu.
That’s it! You are done. This is how you can Reset Quick Access folders in Windows 11.
It is pretty easy to customize the Quick Access folder in Windows 11. I hope this article helped you! Please share it with your friends also. If you have any doubts related to this, let us know in the comment box below.


