The ultimate guide will help you set up and Use iTunes Home Sharing, and you can easily sync media between your ios devices connected over the network. So follow the tutorial to proceed.
With the release of iTunes, Apple has introduced the all-new feature of Home Sharing, through which the users could share their Media Library among up to five computers connected to the Home Wifi or Ethernet network. The feature could also stream up the media library to an iDevice or Apple TV, making it much easier to keep in touch with most music on those devices.
Now, if you are new to this feature, then you probably would find it difficult to set it up and hence use it on your devices; there is a particular need for you to know about its functions properly so that you would be able to get the most proportion out of it.
Here in this article, we have written about the exact method of how you could use iTunes Home Sharing and how it could be easily set up. If you are still curious about how this could be done, then it’s time for you to read this article and explore the method described well below. So now go and read the article!
Also Read: Top 5 Best iPhone Apps to Generate Unlimited Wallpapers
How to Setup and Use iTunes Home Sharing
1) How to Setup iTunes Home Sharing
Before you know how to set up the iTunes Home Sharing feature on either the computer device or Apple TV, you should know the requirements. You should first have at least two computers on which you need to make up the connection, and after that, you also require an Apple ID.
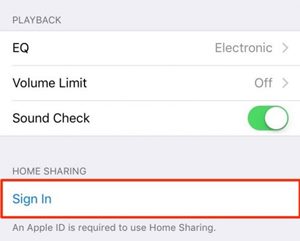
Foremost you should have the latest version of iTunes installed on the device. An active home network should also be there for those devices among which the connection is to be made. If you utilize the iTunes Home Sharing feature on any iDevice, then be sure that it will run iOS 4.3 or later.
On Apple TV:
1. On the Apple TV, choose the Computers Icon or the option and click on the Yes button to enable the Home Sharing Feature using the Apple ID.
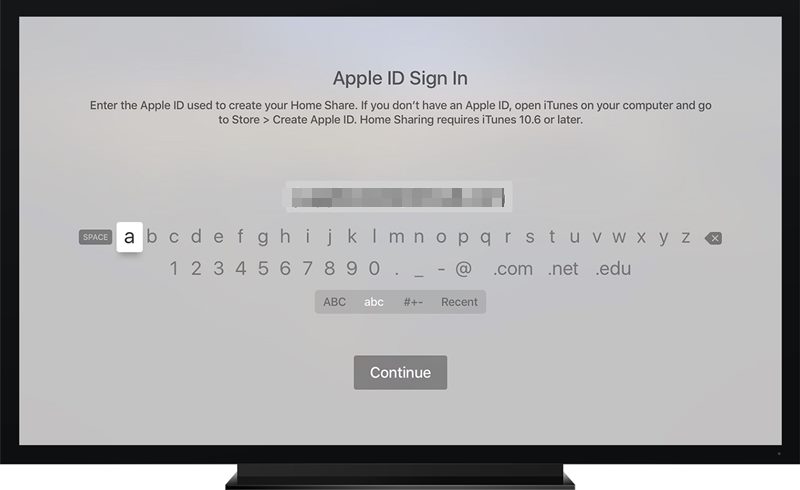
2. Now, on the next screen that appears on your TV, you will find that the Home Sharing feature has been enabled, and your Apple TV will automatically detect up to the computers that have the Home Share feature enabled with the same Apple ID!
Also Read: How to Use Giphy Right from your iPhone Keyboard
On Computers:
1. First, install the latest version of iTunes on your computer. And after that, launch it on your computer.
2. Inside iTunes, go to the File > Home Sharing > Turn On Home Sharing options. On the iTunes version or the latest one, choose the Advanced > Turn On Home Sharing options from the menu on the above taskbar.

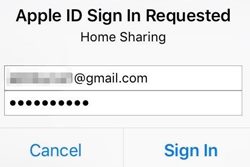
3. You must enter the Apple ID and Password on the right side of the page under the label Enter the Apple ID. Note that Apple ID is used to create the Home Sharing network; hence, it will be used on every other computer you wish to connect.
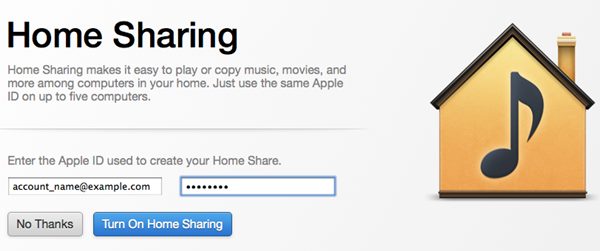
4. After all that, click on the Turn On Home Sharing button, which will verify your Apple ID, and after verification, you will see another screen where you have to click on the Done button.
5. Use the above steps from 1-4 to create and set up the Apple ID on all those computers you wish to connect to the Home Sharing. Remember that you use up the same Apple ID on those devices! The devices now linked using the same Apple ID would be seen in the Shared section.
Also Read: How To Download Paid iPhone Apps For Free Without Jailbreak
To Enable the Automatic Media Transfer:
1. First, click on the Settings button on the lower right side of the page while you are in the Home Share section on iTunes.
2. Now, on the next screen, you have to select those file types you wish to enable up to the automatic transfer and click on the OK button after making your selections.
3. This would now set up iTunes to automatically share your selected media types to all those connected computer devices by that same Apple ID.
4. Now click on the Show menu at the bottom-left side of the page, and then select the option Items, not in my library. This would be necessary not to let the feature share and duplicate those files already on the other devices.’
Also Read: 10 Best Weather Apps For iPhone You Need To Try Today
After reading the above method from this article, you might have now got up that method by which you could now set up iTunes Home Sharing and hence use it up. The article here described the easiest way to do so, and there are no such complexions in the whole procedure which could be difficult to be applied.
It’s your turn now to try up the method; in the case of any issues related to the process, please comment below, as we would love to solve the problems!