Learn how to Unlock Windows PC With Android Device’s Fingerprint Scanner with the help of a simple method that will help you to sync the single-pass encryption for both devices quickly. So follow the below guide to proceed.
If you are in a hurry to use your Windows Pc and you rather start it up, and then at that stage, you require to go through the Lock screen where you need to fill in the password for getting in logged. In this whole process, it could take too long for you to get directly to your desktop. Hopefully, the time could be consumed if the lock screen could be bypassed quickly without disturbing the security strength.
Now the Android device has the high capability to let you help in this case, and you could successfully use the Android fingerprint scanner to unlock the Windows PC directly. This also makes your Windows more secure as you could only open your Windows through your Android device. Here in this article, we have written about the method through which the Android’s Fingerprint could be preferred to unlock the Windows PC. Just read up the article to know about the way!
Also Read: How to Fix Problem of Windows 10 Bluetooth Not Working
Steps to Unlock Windows PC With Android Device’s Fingerprint Scanner
Things you will need for this Tasker, Unified Remote for Android, Unified Remote Server for Windows, Autotools Beta, So follow the below steps to proceed.
1. The very first thing that you have to do is you have to set up the fingerprint on your Android device and also install the Unified Remote Server application on the Windows PC. The Unified Remote app for Android devices is also to be installed before you could start up the process.
2. Open up the Unified Remote app on the Android device and then find up the Windows IP address or the computer’s IP address from an app. Once you have done that you would require making a 3-action quick task to encrypt your Windows password Within Tasker which all we would tell you afterward.
3. Create a new task inside the Tasker app and give it some custom name to it which you could identify later on. This work won’t be used after one-time usage, so this could be deleted after that. Just follow the below things to make up some of the changes:
# Go to Variables -> Variable Set and then from there name up “%pass” to the ‘your-windows-password’. Remember that this is your password and you should not forget it.
# Now go to Plugins>AutoTools>AutoTools Text. For Text:%pass go to the encryption and set it to encrypt the pass and for encoding name it to some arbitrary phrase which you have to remember for further use.
# At last go to the Variables> Variable Set and from there rename “%EncryptedPass” to “%attextresult()”. This would store your password in the global variable.
4. Run up the above new task that you have just created for once and then after that delete it up. This won’t be required anymore, so it’s just safe to delete it up and know that it have done its work.
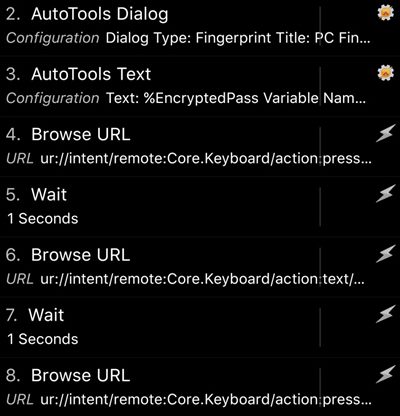
5. Create the another new task and name it something like Fingerprint Unlock. Now just follow up the below things for the creation and setting up of that new task:
- Plugins –> AutoTools –> AutoTools Dialog. Select Fingerprint Dialog. Title: PC Fingerprint Unlock. Number of Tries: 1. Failed Message: Error: Fingerprint not recognized. Everything else you can customize to your liking.
- Plugins –> AutoTools –> AutoTools Text. Text: %EncryptedPass. Variable Name: %pass. Go to encryption and select to Decrypt. For the password, use the encryption password you made earlier.
- Net –> Browse URL. URL: ur://intent/remote:Core.Keyboard/action:press/extra:space/destination:YOURPCNAMEHERE
- Task –> Wait 1 second.
- Net –> Browse URL. URL: ur://intent/remote:Core.Keyboard/action:text/extra:%pass/destination:YOURPCNAMEHERE
- Task –> Wait 1 second.
- Net –> Browse URL. URL: ur://intent/remote:Core.Keyboard/action:press/extra:enter/destination:YOURPCNAMEHERE

6. And finally, after you have made up all those amendments to your device via Tasker you could now be able to unlock your Windows PC directly through the Fingerprint scanner on your Android device!
So here in this article, you have read about the method through which the Android device’s fingerprint scanner could be actually used to directly unlock the Windows PC and hence bypass the need to fill up the password.
As the fingerprint scanner is used in this procedure so you could conclude the process to be really quick. Hope that you would have liked this method, we would love to see your presence in the comments below!


