Learn how to Disable Protected View in Microsoft Word, which always irritates users while editing files. To disable this, you need to try a simple method, So look at the complete guide discussed below to proceed.
Microsoft has implemented one attractive security feature inside Word. This is the Protected View feature, a security container that prevents any virus, malware, etc., that the downloaded documents may retain. This feature is meant primarily for the safety of the user’s device from malware and virus, focusing on the downloaded documents as their source.
The Protected View becomes active whenever the user downloads and opens the document file in Word. The users usually don’t have to do anything to enable this feature, and it won’t require working with disabled Word functions. Everything works alike, only the users get alarmed about the protected view, and when they wish to turn to the edit mode, only a few clicks are required. For those users who are not bothered to shift onto edit mode for the downloaded documents doing those few clicks and wish to maintain security first, the Protected Feature will do that all.
Here in this article, we have written about the simple method of disabling the Protected View for Microsoft Word. Users who wish to turn this security feature off for the smooth flow between switching documents to edit mode just read the method written in this article! But certainly, users who wish to slip that shifting to edit mode whenever they download and open the Word documents can also disable the Protected View.
Also Read: How to Fix the Problem of Windows 10 Bluetooth Not Working
How to Disable Protected View in Microsoft Word
The method is quite simple and easy, and you just need to follow the simple step-by-step guide that will help you to disable this protection, and you can easily file. So follow up on the below steps to proceed.
Also Read: How to Add Sound Equalizer on Windows 10 (PC or Laptop)
1. The first step to this method of Disabling protected view in Word is undoubted to open Microsoft Word. Note that we are going to describe this method which is all according to the latest Word software. As the whole view and options are altered in the previous app versions, it could be difficult to follow this method. Try to update Word to its latest version instead.
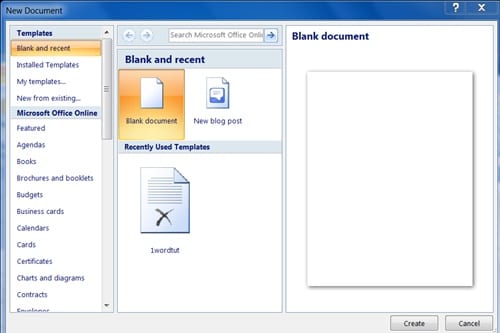
2. Choose the blank page to create a new document and click on the File menu. Inside the file menu, op proves that will appear as the left bar slide, click the options listed at the bottom.

3. In the options panel that appears, you will have to go to the Trust Center window. It can be simply accessed through the option Trust Center again placed at the bottom of the left sidebar.
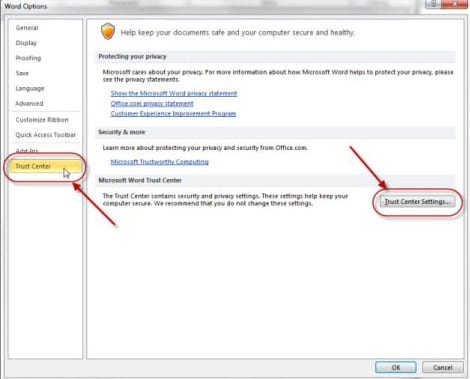
4. Look for the Trust Center Settings button on the screen that appears and clicks on it. You will be taken to the next window. On the next window, you can find the Protected View option, which is all related to the Protected view mode of Word. Just click on it!
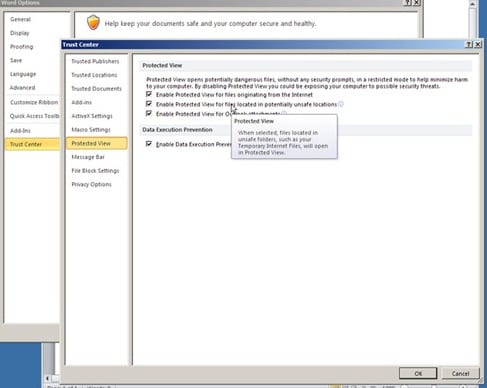
5. Select every check box on the screen you reached after the above step. This will fully disable the Protected View feature in Microsoft Word. If you ever wish to enable this feature again, select all three check boxes on the same screen!
Also Read: Best Screen Recording Software For Windows
Those who were unknown of the method to disable the Protected View in Microsoft Word could have gotten about the whole through the above article. As from the article, everyone could easily judge how easy it is to disable the Protected View in Microsoft Word. We hope you will not get any issues while applying this method, but if you encounter any issues, please tell us about your problems through the comments section below!


